If standing water or soaked materials aren't addressed within 24 to 48 hours, the job can jump from drying to demolition plus mold remediation. The EPA says carpet and backing should be dried within 24 to 48 hours, and materials that remain wet beyond that window require a different mold-prevention response. (EPA mold remediation guidance)
It's 2 a.m. A supply line has burst, water is creeping across the floor, and you're standing there trying to decide whether to grab towels, call your insurer, or wake up a restoration company. Don't wait for daylight. Water damage restoration starts with the decisions you make before the crew arrives, and drying is only the middle of the job. The finish line is a documented clearance to rebuild and safely use the affected space again.
Water damage is also common enough that you shouldn't treat it like a freak event. Industry summaries report that roughly 1 in 60 insured homes files a water-damage claim each year, while U.S. insurers paid about $4.3 billion for water damage in 2022. Typical restoration work is often cited around $3,000 to $3,867, with many residential projects ranging from $1,384 to $6,384. (Restoration cost statistics)
Table of Contents
- The First 60 Minutes After Water Hits Your Home
- How Pros Classify the Damage You're Looking At
- Extraction, Drying, and Dehumidification Step by Step
- When to Tear Out and When to Dry in Place
- Mold Prevention on a 24 to 48 Hour Clock
- What Water Damage Restoration Actually Costs
- Insurance, Documentation, and Getting the Claim Paid
- DIY Versus Calling a Certified Pro
The First 60 Minutes After Water Hits Your Home
At 2 a.m., a burst supply line can spread water across a room before you find the shutoff. Act in the right order. Stop the source, protect people, document the loss, and control the water before hidden cavities turn a manageable repair into a larger rebuild.
Shut off the main valve if a pipe, appliance line, toilet, or water heater is still feeding the loss. If water is entering from outside, a drain backup, or a roof intrusion, keep people away from the affected area and contact the appropriate emergency service or restoration professional.
Treat electricity as a separate emergency. If water is near outlets, appliances, cords, or the electrical panel, do not cross the wet area to reach a switch. Turn off only the affected circuits from a dry, safe location. If you cannot do that safely, leave and have an electrician handle it. A wet floor and live electricity create a shock hazard.
Make the first call and create a record
Photograph and video the source, standing-water depth, damaged walls and flooring, appliance labels, and the full affected area before moving furniture or discarding materials. Call your insurance carrier, open a claim, get the claim number, and report that emergency mitigation is needed.
Avoid irreversible demolition unless safety requires it. You can remove standing water and protect the property from further damage, but preserve damaged materials and record every item you move. Insurance decisions often depend on this early documentation, not only on the final repair invoice.
Remove water without creating a second problem
Move valuables, electronics, artwork, and undamaged furniture to a dry area. Towels, a mop, or a wet vacuum are appropriate only for clean water when the electrical setup is safe. Never use a household vacuum on standing water.
Sewage, drain backups, floodwater, and chemical contamination require a different response. Keep people and pets out. Category 3 water may contain pathogenic or toxigenic agents, so trained professionals should perform contaminated extraction with suitable protective equipment. (Water damage categories)
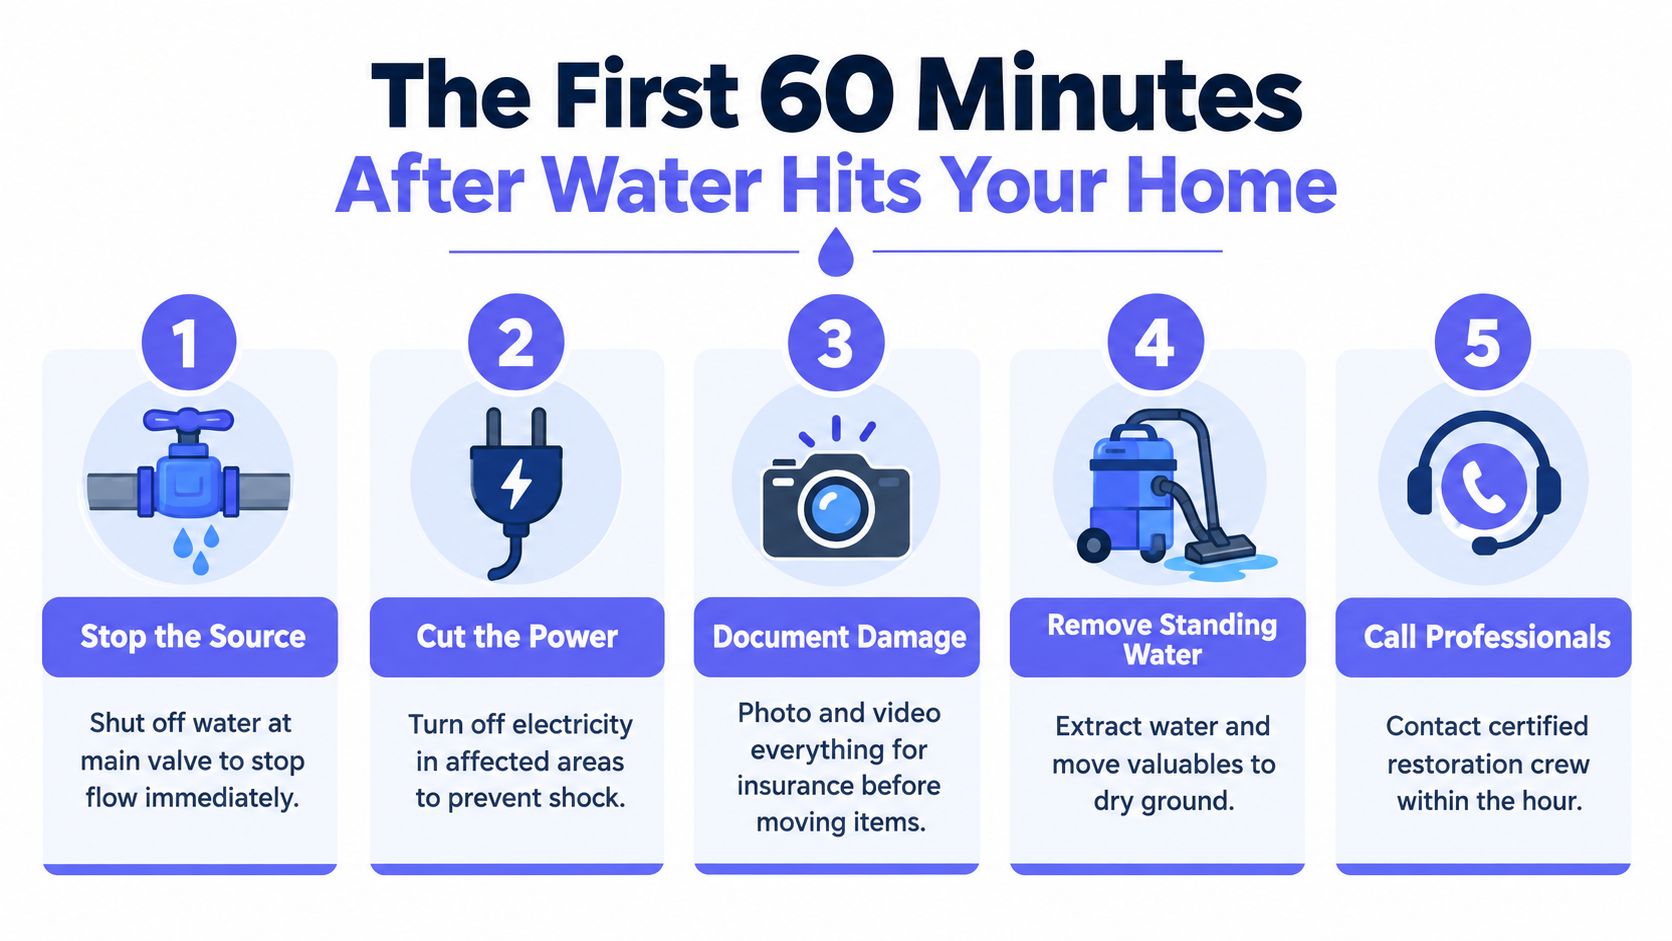
Call a qualified restoration crew promptly. A provider arranged through emergency water damage repair can inspect the source, map moisture, and begin extraction. Drying is only the middle of the job. Before drying, the crew must decide what stays and what comes out. After drying, you need documented clearance before rebuilding or returning to the affected space.
Practical rule: Stop the source, make electricity safe, document the loss, then extract water. Cosmetic cleaning comes last.
How Pros Classify the Damage You're Looking At
A restoration crew should give you two labels, category and class. Category identifies contamination. Class shows how much material absorbed water and how difficult the drying work will be. A vague “water damage” description is not enough to approve demolition, drying, or an insurance estimate.
Category 1 means sanitary water, such as water from a broken supply line. If the response is prompt and materials remain sound, more of the structure may be dried in place. Category 2 means gray water with significant contamination, commonly from an appliance overflow or used water. Category 3 means black water from sewage or flood sources. It calls for protective handling, removal of affected materials, cleaning, and appropriate antimicrobial treatment. (IICRC-based water categories)
Class describes the size and depth of the drying problem. Class 1 affects a limited area and often dries in about 2 to 3 days. Class 2 usually involves broader absorption into floors and walls and may take 3 to 5 days. Class 3 involves extensive absorption or difficult access and often requires 5 to 7 days or longer. Class 4 covers specialty materials such as hardwood, plaster, brick, or concrete, which hold bound moisture and may need low-humidity drying. (Structural drying and dehumidification guidance)
Water Damage Categories and Classes at a Glance
| Category | Source | Required Action | Class | Affected Area | Typical Drying |
|---|---|---|---|---|---|
| Category 1 | Broken supply line or other sanitary source | Extract, inspect, and dry where appropriate | Class 1 | Localized absorption | About 2 to 3 days |
| Category 2 | Appliance overflow or significantly contaminated gray water | Remove compromised porous materials and dry remaining assemblies | Class 2 | Wider absorption into floors and walls | About 3 to 5 days |
| Category 3 | Sewage, floodwater, or grossly contaminated source | Contain, remove affected porous materials, clean, and apply appropriate antimicrobial treatment | Class 3 | Extensive absorption and difficult access | About 5 to 7 days or longer |
| Category 1 to 3 | Any category with specialty materials | Use specialized drying strategy and verify material condition | Class 4 | Hardwood, plaster, brick, or concrete | Extended and material-dependent |
Water classification is not permanent. If Category 1 water remains untreated, microbial growth can develop and the loss may be reclassified as Category 2 within 24 to 48 hours, even without more water entering the building. (Water category changes over time)
Before approving work, require the technician to document the category, class, affected rooms, proposed equipment, materials marked for removal, and the standard used to verify drying. Those records support the insurance claim and force a clear decision about what gets torn out, what can be dried, and when rebuilding is allowed. Drying is the middle of the job. Clearance and documentation decide whether the space is ready to rebuild or occupy again.
Extraction, Drying, and Dehumidification Step by Step
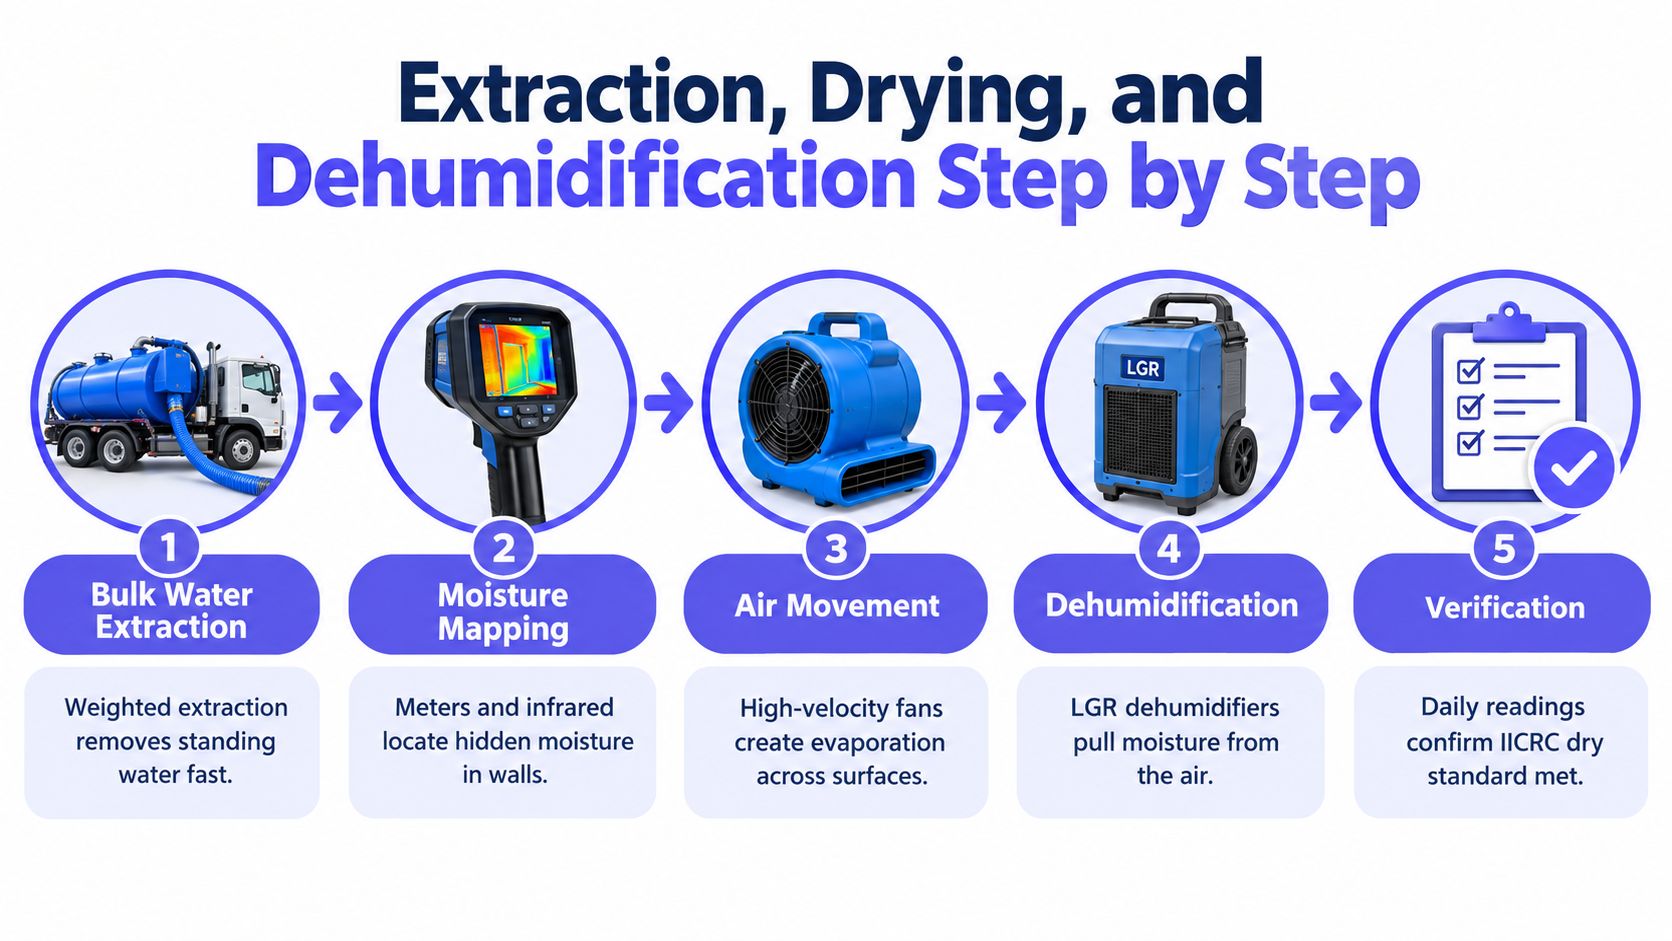
Extraction comes first. Standing water must be removed before air movement can help. A fan aimed at soaked carpet can drive moisture into walls and nearby rooms. The crew should use equipment suited to the loss, then inspect flooring, baseboards, wall cavities, and contents before choosing a drying plan.
Extraction is only the opening move
Trace the water path, not just the visible pool. Moisture mapping with pin or pinless meters can reveal wet drywall, subfloor, trim, and framing that appears dry at the surface. Infrared cameras show temperature patterns, but meter readings confirm moisture content.
After bulk water removal, technicians position air movers across wet surfaces and dehumidifiers to pull moisture from the indoor air. Residential structural drying commonly targets relative humidity around 40% to 50%, since drier air supports evaporation from building materials. The equipment layout must match the water class, materials, room volume, and access. A few fans scattered through a room are not a drying plan. Require an explanation for every air mover and dehumidifier.
Drying is the middle of the job. Before equipment runs, the crew must decide which materials stay and which come out. Afterward, documented readings determine whether rebuilding and normal occupancy can proceed. Keep those decisions tied to the room map and equipment log so the insurance file shows what happened, where, and why.
Verification decides whether equipment comes out
Daily readings matter more than the number of days equipment has operated. IICRC-aligned guidance targets affected materials within about 2 to 4 percentage points of comparable unaffected materials in the same structure. Technicians should compare wet assemblies with reference materials and record both sets before removing equipment. (IICRC S500 structural drying guidance)
Dense materials may feel dry while holding moisture below the surface. Do not accept equipment removal based on feel alone. If the company cannot show moisture maps, reference readings, and final readings, the drying is not verified.
Ask for this before sign-off: affected-material readings, unaffected reference readings, the equipment log, and a written statement confirming that the drying target was met.
When to Tear Out and When to Dry in Place
The tear-out decision rests on material, contamination, and time wet. Contractors get into trouble when they treat every wet surface the same. A clean-water loss caught quickly may justify drying in place. A porous assembly touched by black water does not.
Carpet padding is usually a poor candidate for salvage once saturated. Fiberglass insulation can hold moisture behind drywall, and particleboard cabinets can swell, delaminate, and lose their structural integrity. Drywall affected by Category 2 or Category 3 water often needs removal above the waterline to expose cavities and eliminate contaminated porous material.
Hardwood, plaster, framing, and concrete may sometimes be dried in place, but only with close monitoring and a suitable drying plan. Saving a material isn't automatically cheaper. Extra equipment, repeated readings, access cuts, odor control, and extended labor can cost more than controlled removal and replacement.
Tear Out vs. Dry In Place Material Decision Matrix
| Material | Category 1, Clean | Category 2, Gray | Category 3, Black |
|---|---|---|---|
| Carpet padding | Usually remove if saturated | Remove | Remove |
| Fiberglass insulation | Remove if wet or inaccessible | Remove | Remove |
| Particleboard cabinets | Evaluate swelling and delamination | Usually remove affected sections | Remove affected sections |
| Drywall | Dry in place when accessible and sound | Remove affected areas for cavity access | Remove affected areas and contaminated material |
| Hardwood flooring | May dry in place with prompt response and monitoring | Evaluate contamination, cupping, and subfloor | Usually remove where contaminated or unsalvageable |
| Plaster walls | Often dry in place if structurally sound | Evaluate contamination and cavity moisture | Remove or remediate affected assemblies as required |
| Structural framing | Dry in place with moisture verification | Clean, treat, and dry as appropriate | Clean, treat, and dry under professional containment |
| Concrete | Dry in place with extended monitoring | Clean and dry | Clean, treat, and dry under professional controls |
The rule is simple: if it absorbs water, has been wet beyond the mold-risk window, and touched contaminated water, expect removal. A professional should explain each exception and photograph the condition before demolition.
Mold Prevention on a 24 to 48 Hour Clock
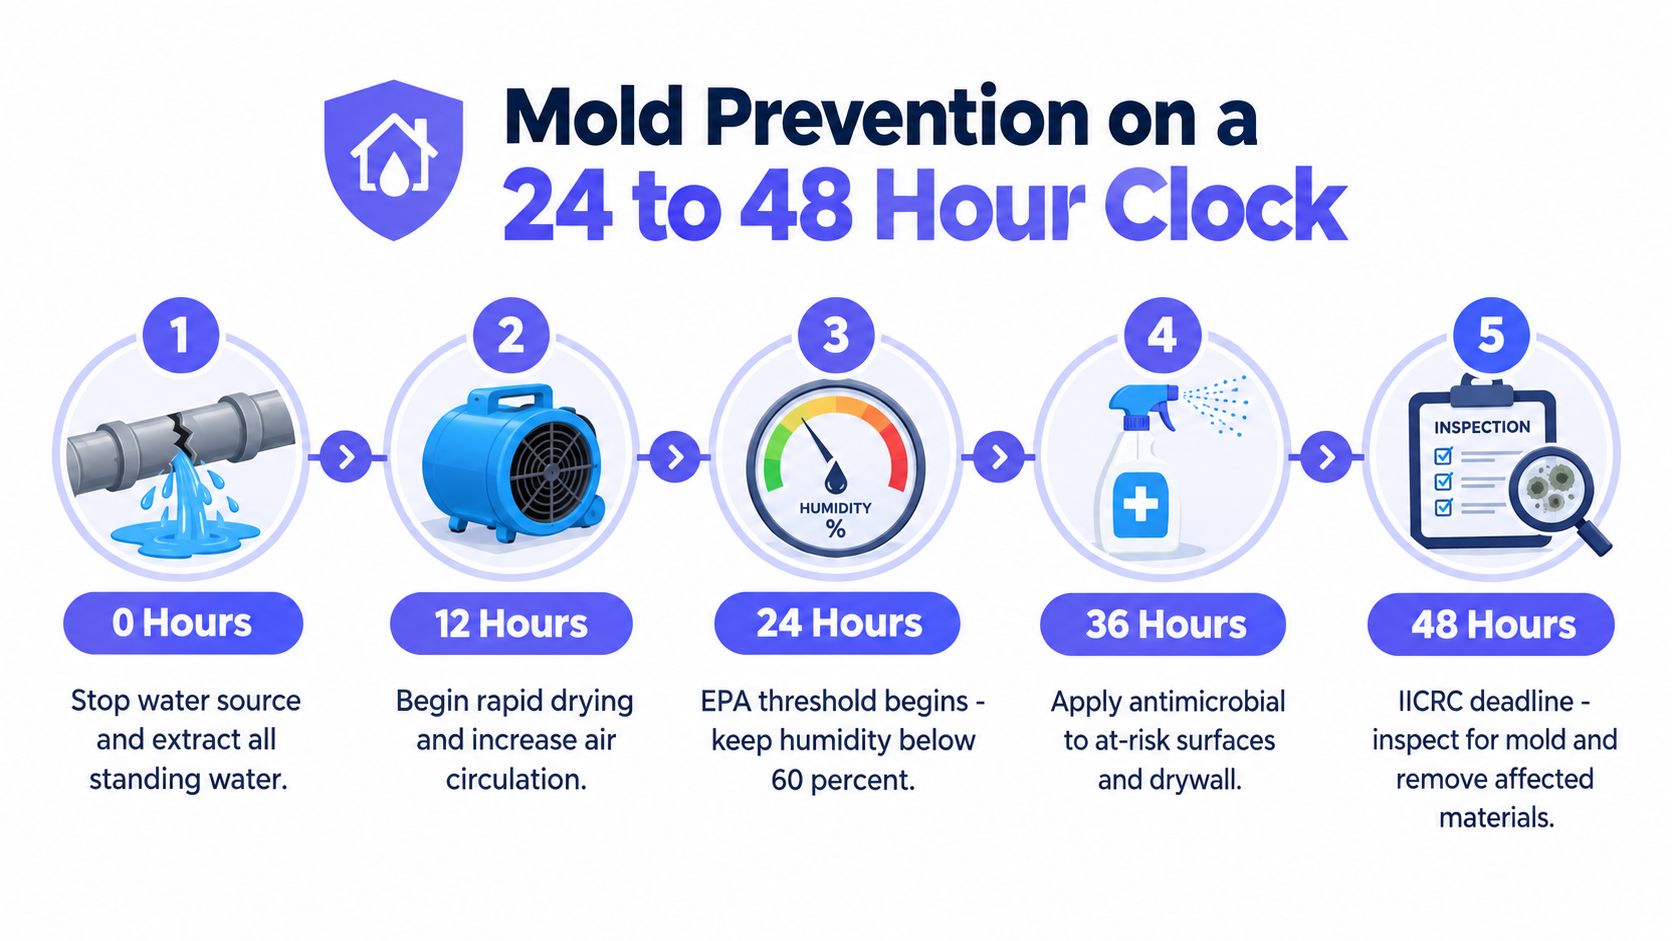
Mold prevention starts with moisture control, not a promise that a room contains no spores. The EPA recommends drying carpet and backing within 24 to 48 hours. Materials that stay wet longer need a deliberate removal or remediation decision, not wishful thinking. (EPA mold remediation guidance)
Use the clock to make decisions
At zero hours, stop the leak and remove standing water. Start safe, limited extraction yourself only when electrical conditions and exposure risks are under control.
By 12 hours, separate wet contents from dry ones and remove saturated carpet padding. By 24 hours, air movers and dehumidifiers should be operating. Confirm that indoor humidity is dropping with measurements, rather than relying on open windows or a household fan.
At 48 hours, make a removal decision for porous materials that remain wet. Drywall with high moisture readings may need controlled access cuts so the wall cavity can dry. By 72 hours, inspect any area with odor, discoloration, or visible growth, and set up appropriate containment and remediation.
Drying is the middle of the job, not the finish line. Before equipment runs, decide what must be removed. After readings stabilize, document clearance before rebuilding or returning to the space.
Why ventilation alone falls short
Open windows can help in dry weather, but humid outdoor air can add moisture. Dehumidifiers remove water from the air, while air movers increase evaporation from wet materials. Used together, they provide measurable control. Ventilation alone does not.
Visible mold changes the response immediately. Do not scrub it aggressively, spread contaminated contents through the building, or cover it with paint. Isolate the area and arrange an inspection to identify the moisture source, contain the work, remove affected materials, and verify that moisture is controlled.
For practical cleanup guidance, use professional mold cleaning help when growth is visible or affected materials cannot be accessed safely. Keep photographs, moisture readings, equipment logs, and removal records. That documentation supports the clearance decision and gives your insurance claim a defensible record.
What Water Damage Restoration Actually Costs
Water damage restoration has no dependable flat room rate. The price follows the loss: how far water traveled, which materials absorbed it, how quickly crews responded, and whether demolition or reconstruction is required. Industry summaries commonly place typical residential projects around $3,000 to $3,867, with many jobs ranging between $1,384 and $6,384. (Restoration cost statistics)
Use these tiers to plan, not to approve work. A technician must inspect the property, trace the water path, test materials, and write a defensible scope.
Water Damage Restoration Cost Tiers
| Loss Tier | Typical Cost Range | What's Included | Key Cost Drivers |
|---|---|---|---|
| Typical clean-water loss | Around $3,000 to $3,867 | Extraction, moisture inspection, air movement, dehumidification, and monitoring | Response speed, affected area, flooring type, and contents |
| Broad residential project | Often $1,384 to $6,384 | Mitigation with possible material removal, equipment rental, and drying verification | Water travel, wet contents, subfloor, wall cavities, and labor |
| Severe or complex loss | Can rise far higher | Extended drying, demolition, contamination controls, mold-related work, and reconstruction | Category, structural access, specialty materials, contents, and rebuild scope |
A small clean-water loss can become expensive after reaching hardwood, cabinetry, insulation, or several wall cavities. A larger loss over concrete may require less reconstruction than a smaller one that saturates finished walls and built-ins. The tear-out decision often matters as much as the drying equipment.
Read the estimate line by line
Confirm whether the scope includes content manipulation, packing, storage, antimicrobial treatment, containment, disposal, demolition, reconstruction, and final verification. Drying and repair are separate phases. The first estimate may cover mitigation only, leaving rebuild work for a later proposal.
Before authorizing optional work, compare the written scope with your policy. Sudden water damage may be covered under policy terms, while exclusions, deductibles, maintenance issues, flood coverage, and the water source can change payment. Do not assume an adjuster or contractor has approved every line item.
Keep the estimate, moisture map, equipment log, photos, change orders, and receipts together. Ask for written reasons when a material is removed, and require final moisture readings before rebuilding or moving back in. A detailed guide to the factors behind water damage repair cost can help identify missing line items before the scope expands.
Insurance, Documentation, and Getting the Claim Paid
Treat the insurance claim as a second job running beside the cleanup. Call the carrier as soon as the property is safe, ideally within the first day, and open a claim. Get the claim number, adjuster contact information, emergency-mitigation instructions, deductible information, and any preferred-vendor requirements.
Ask whether the policy is all-risk or named-peril, then ask whether the specific source is covered. Those labels don't answer every coverage question, but they tell you how the policy approaches covered causes of loss. Keep communication in writing whenever possible.
Photograph before and during mitigation
Before moving anything, photograph the source and the extent of damage. Include standing-water depth, affected square footage with a tape measure visible, soaked materials, damaged contents, and appliance or plumbing components. Take wide shots and close-ups.
During mitigation, document extraction, equipment placement, containment, removed materials, and daily moisture readings. Ask the technician to photograph the meter display with the make and model visible, along with the location being measured.
Claim rule: If a material can't be dried in place, document why before demolition and get the adjuster's position in writing.
Keep invoices, receipts, hotel bills, storage records, equipment logs, moisture maps, estimates, change orders, and disposal records in one folder. A daily drying log should show the date, room, material, reading, equipment status, and technician initials or signature.
Get approval before irreversible work
Call the adjuster before tearing out anything that isn't an immediate safety threat. Send photos and the proposed scope by email, then ask for written approval for demolition and disposal. If the carrier can't respond quickly, preserve the material where safe, document the urgency, and ask what emergency work the policy permits.
Insurers may tighten documentation expectations, especially when humidity and hidden moisture are difficult to demonstrate. Remote sensors can supplement site visits, but they don't replace proper moisture mapping and final verification. The evidence should show what happened, what the crew did, why materials were removed, and how the drying target was met.
DIY Versus Calling a Certified Pro
DIY works only when the variables are favorable: sanitary Category 1 water, a confined area, prompt action, accessible materials, and no hidden moisture. A small spill on a hard floor is different from water under cabinets, inside drywall, beneath flooring, or around electrical systems.
Call a certified restoration professional when any of these conditions apply:
- Contaminated water: Category 2 or Category 3 water needs controlled handling, appropriate protective equipment, and a sanitation plan.
- Hidden structural moisture: Wet insulation, wall cavities, subfloors, framing, or ceilings require meters and a drying strategy.
- Multiple rooms: Water crossing thresholds can affect more materials than the visible pool suggests.
- Extended saturation: Materials that remain wet into the mold-risk window need a demolition and remediation decision.
- Uncertain electrical safety: Water near outlets, panels, appliances, or wiring isn't a safe DIY environment.
- Insurance involvement: A documented professional assessment can support the claim scope and preserve evidence.
An IICRC-certified firm should be able to explain the water category, damage class, equipment plan, monitoring schedule, removal decisions, and final dry standard. Don't hire a company that promises a fixed completion time before measuring the structure. Drying depends on materials, humidity, access, and the amount of water absorbed.
Hand Vetted Co. connects you with one licensed, background-checked professional for water damage restoration rather than sending your request to multiple businesses. The matched professional can inspect the loss, define the scope, and provide a written estimate so you have a clearer record for mitigation and insurance discussions.
Start with safety and source control. Then document everything, extract water quickly, question every demolition decision, and refuse final sign-off until the moisture readings support clearance to rebuild and reoccupy the space.
If water damage has reached more than a small, accessible area, visit Hand Vetted Co. to request one verified restoration professional for your project. You'll receive an exclusive match with a licensed, background-checked, 4.5+ star rated business instead of competing calls from multiple companies.