Your thermostat says 58°F. It's late. The outdoor unit is dead quiet. You're standing there deciding whether this is a five-minute fix, a morning service call, or the start of an expensive mess.
Most heat pump repairs fall into three buckets. Stuff you can safely check right now. Stuff a confident person can handle if they know exactly what they're doing. Stuff that needs a licensed HVAC pro, no debate. The mistake people make is guessing wrong and turning a small problem into a bigger one.
A typical heat pump repair in 2026 often lands around $161 to $661, with an average near $409 to $410 for a normal service visit, while major failures can run from $2,500 to $4,500 depending on the part and urgency, according to this 2026 heat pump repair cost guide. That spread tells you something useful. Diagnosis matters more than people think.
Table of Contents
- When a Heat Pump Acts Up, Start Here
- Safe DIY Checks You Can Run Right Now
- The Repairs That Cost the Most and Why
- Fixes a Confident Homeowner Can Attempt
- The Repairs That Always Need a Licensed Pro
- Repair or Replace How to Decide
- Maintenance Habits That Prevent the Next Repair
When a Heat Pump Acts Up, Start Here
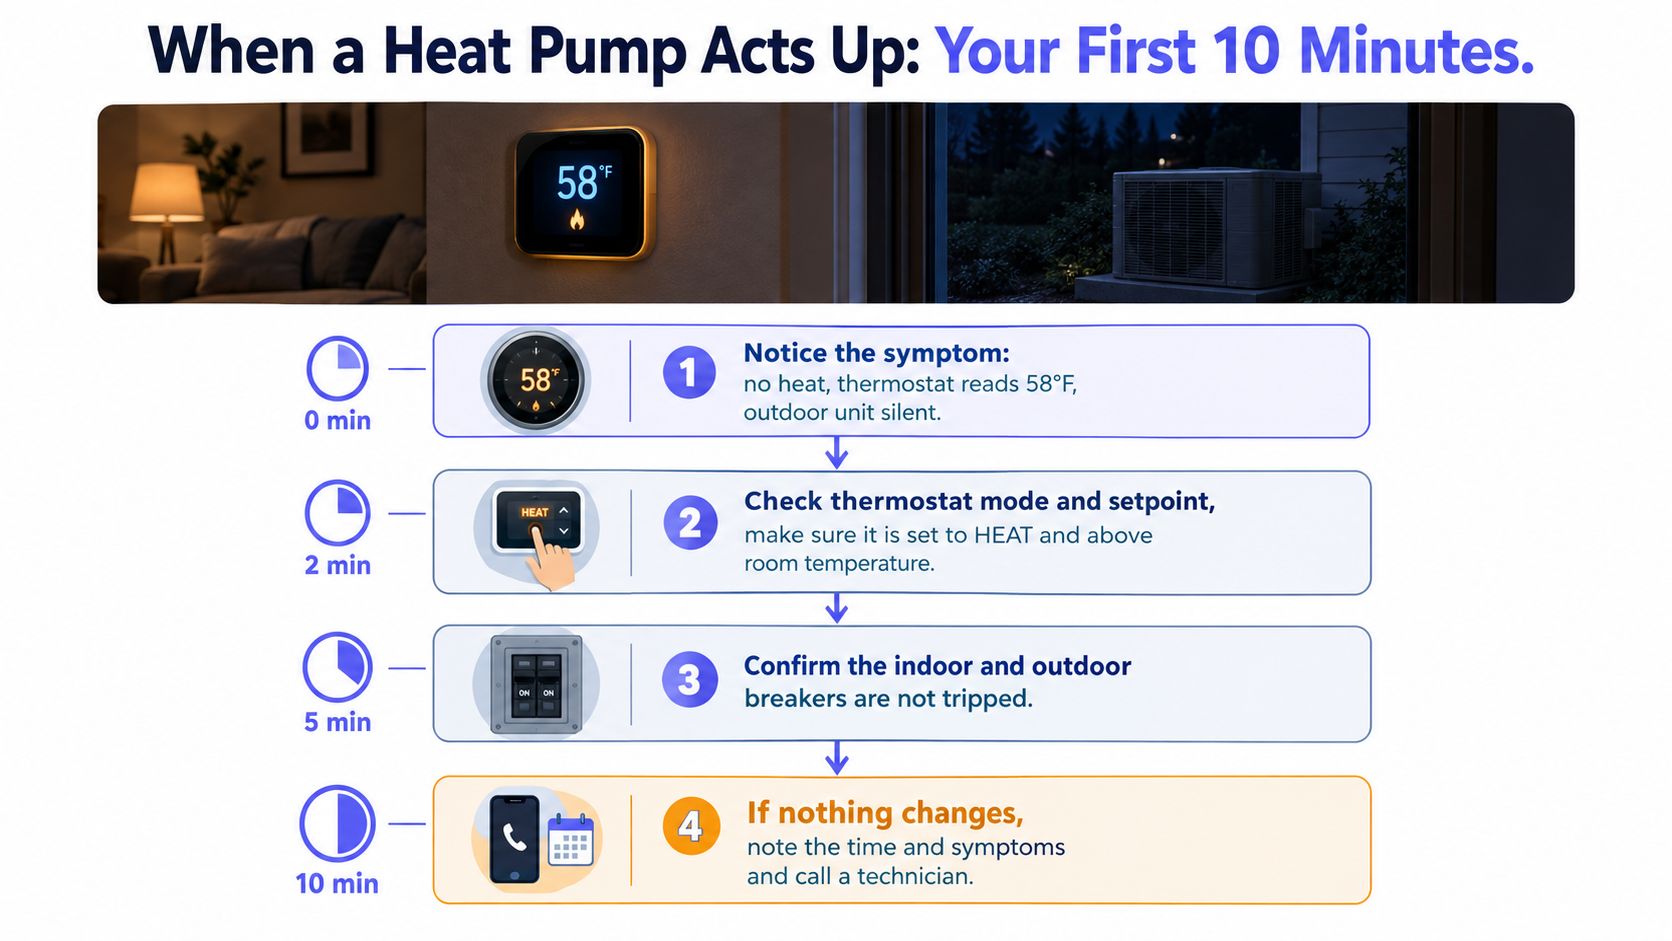
It's 11 p.m. The house feels cold. The thermostat reads 58°F. Outside, the heat pump is silent. Don't start pulling panels. Don't assume the compressor died. Start with a calm triage.
Check the obvious first
Set the thermostat to HEAT and raise the setpoint above room temperature. If the thermostat was in the wrong mode, you may be done already. If not, listen for two things: the indoor air handler and the outdoor unit.
If the indoor unit runs but the outdoor unit doesn't, that points you toward a power issue, a control issue, or a failed outdoor component. If neither one runs, think thermostat, breaker, disconnect, or a deeper electrical fault.
Look and smell before you touch
Walk to the indoor unit and the outdoor cabinet. You're checking for ice, burnt smells, buzzing, or obvious water around the air handler.
Use this quick split:
- Some heat, weak airflow. Start with filter, vents, and airflow checks.
- No heat, but system tries to run. Think controls, defrost, or outdoor-unit trouble.
- No heat and no operation at all. Think thermostat, breakers, disconnects, or electrical failure.
- Burning smell or repeated breaker trips. Stop. That's pro territory.
Practical rule: If you can solve it without tools, exposed wiring, or opening the refrigerant side, it's usually worth checking before you pay for a call.
If you need a vetted repair pro after those first checks, use a service that matches you with one qualified business, not a pile of random leads. HVAC repair services through Handvetted are built for that exact situation.
Safe DIY Checks You Can Run Right Now
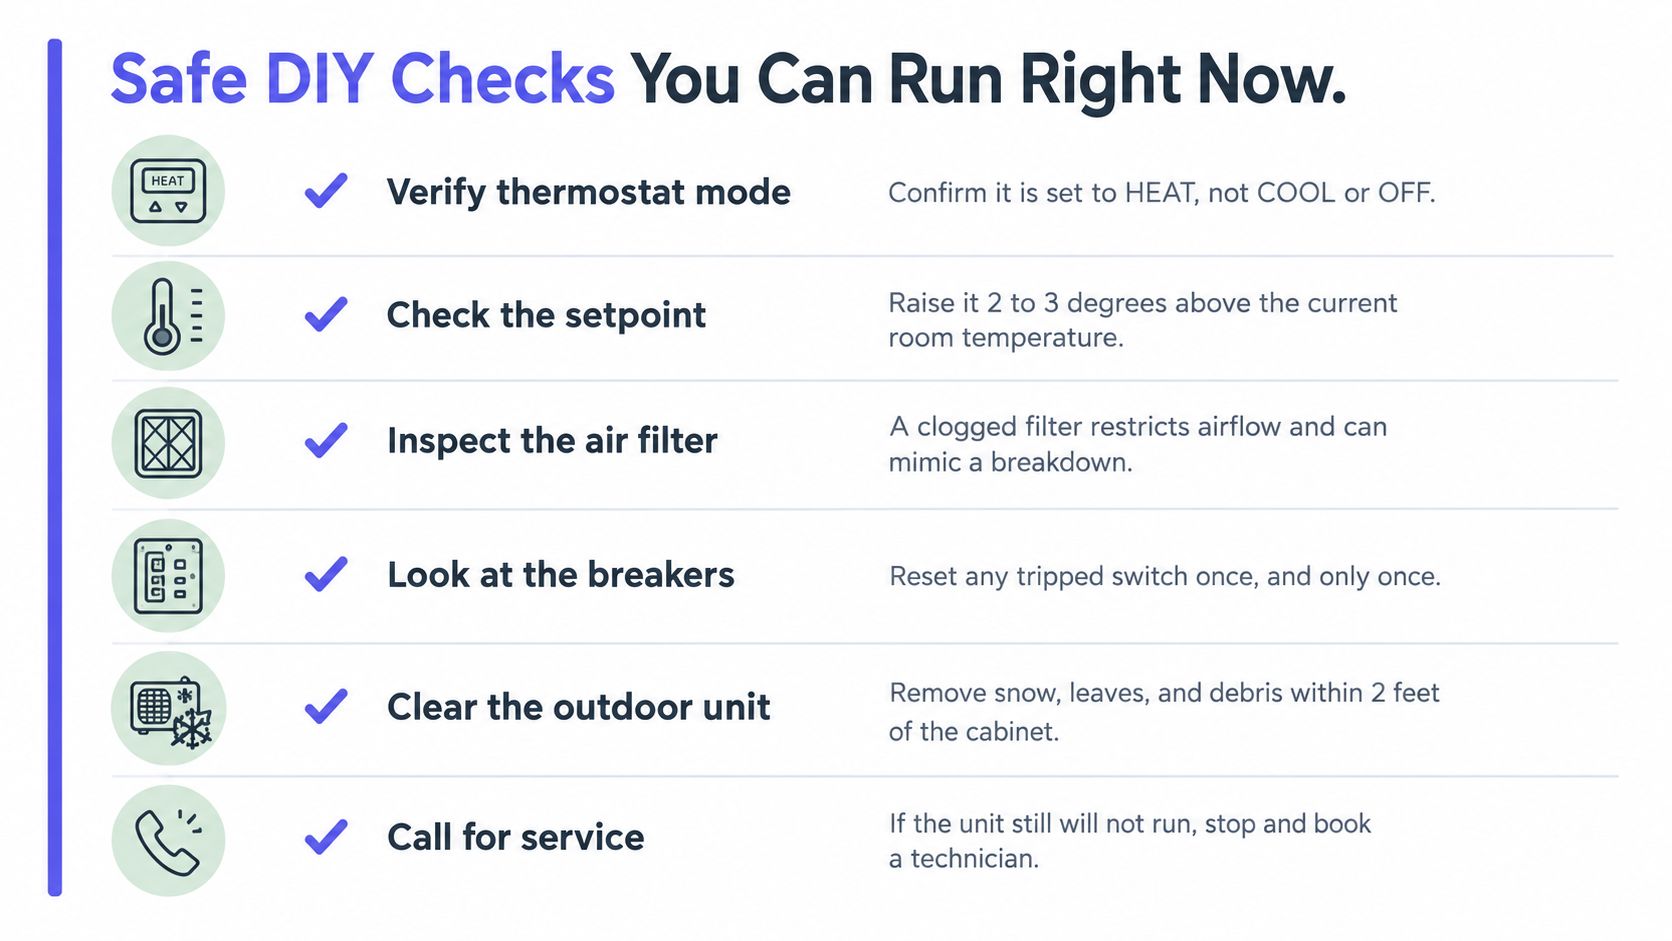
This is the no-tool list. Every step here is low risk if you stick to the basics and don't start opening electrical compartments.
Run these checks in this order
Thermostat mode and setpoint
Make sure it's on HEAT, not COOL, OFF, or EMERGENCY HEAT by mistake. Raise the setpoint a few degrees above room temperature and wait a few minutes.Indoor and outdoor power
Check the main electrical panel for a tripped breaker. Reset it once. Only once. If it trips again, stop there. Also confirm the outdoor disconnect is on if your unit has one.Air filter condition
Pull the filter and look at it in bright light. If it's packed with dust, replace it. A dirty filter can choke airflow badly enough to mimic bigger failures.Supply and return airflow
Make sure vents aren't shut and return grilles aren't blocked by furniture, rugs, or boxes. Restricted airflow causes all kinds of fake symptoms, from weak heating to icing.Outdoor-unit clearance
Clear leaves, snow, and debris from around the cabinet. Give it breathing room. A heat pump that can't move air can't do its job.Condensate drain check
If the indoor unit has a safety switch tied to the drain, a clog can shut the system down. Look for standing water near the air handler or drain pan.
What these checks actually tell you
A clean filter and open vents rule out the simplest airflow problem. A breaker that holds after reset may mean the trip was temporary. A breaker that trips again points to a real electrical fault, not bad luck.
A system that starts working after a thermostat correction or filter change probably doesn't need a night call. A system that still won't run after these checks needs proper diagnosis.
If the unit smells burned, shows scorch marks, hisses, or ices up heavily, stop troubleshooting and book service.
Independent diagnostic guidance also points people in the right direction here. The practical troubleshooting tree starts with mode checks, breaker and 24V verification, then technician-level pressure, subcooling, and defrost testing, as summarized in this heat pump system repair guide.
The Repairs That Cost the Most and Why
A heat pump gets expensive when the problem crosses into the sealed refrigerant circuit, the compressor, or the main control path. Those are the jobs that separate a quick repair from a half-day diagnostic and a four-figure invoice. A technical review published in Energies found that a large share of repaired air-conditioning and heat-pump faults cluster around refrigerant, compressor, and control or electronics failures, according to this review of HVAC fault categories.
Here's the plain version. If the fix involves recovering refrigerant, opening the sealed system, replacing a compressor, or chasing an intermittent board fault, the meter runs fast. In 2026, homeowners also need to know the legal line: refrigerant recovery, charging, and sealed-system work belong to a licensed pro. That is not DIY territory.
Why these repairs get expensive
Compressor failure is the big one. The part is costly, access can be awkward, and the tech still has to confirm the compressor is bad instead of condemned by a bad capacitor, contactor, board, or wiring issue. On older units, a dead compressor often pushes the decision toward replacement.
Refrigerant leaks get expensive because the repair is rarely just “add refrigerant.” A real repair means finding the leak, fixing it, pressure testing, evacuating the system, and weighing in the correct charge. If the leak is in an indoor or outdoor coil, coil replacement can make the repair hard to justify.
Control board and sensor faults waste labor hours. Good techs do not guess at boards. They verify power, safeties, inputs, outputs, and wiring first. That diagnosis time is why a small-looking electrical problem can still produce a painful bill.
Blower and outdoor fan motor failures sit in the middle. They usually cost less than compressor or refrigerant work, but ECM blower motors, variable-speed equipment, and OEM-only parts can raise the total fast.
Common high-cost repairs and what they usually mean
| Symptom | Likely fault | What it usually means for your wallet |
|---|---|---|
| Outdoor unit won't start, indoor fan still runs | Contactor, capacitor, defrost board, or control fault | Often one of the cheaper professional repairs if it stays in the controls bucket. Cost climbs if the failed start component was masking a compressor problem. |
| Weak heating or cooling, ice buildup, long run times | Refrigerant leak, metering issue, or airflow problem that has damaged the system | If diagnosis leads to refrigerant work, expect the bill to jump. Leak search, repair, evacuation, and recharge are where “top it off” turns into real money. |
| No heat in winter, odd cooling behavior in summer | Reversing valve or defrost failure | Usually not a quick fix. Reversing valve work can be labor-heavy and may require refrigerant handling. |
| Unit hums, struggles to start, or trips the breaker under load | Start component failure or failing compressor | Start parts are manageable. A bad compressor is where many repair decisions stop making financial sense. |
| Indoor airflow is weak or absent | Blower motor, module, or board issue | PSC blower motors are one thing. ECM and variable-speed blower assemblies are another. Those can get expensive quickly. |
| Random shutdowns, short cycling, or erratic operation | Board, sensor, thermostat, wiring, or safety circuit issue | Could be moderate. Could be a diagnostic time sink. Price depends on how long it takes to isolate the fault and whether the bad signal is coming from a larger system problem. |
A few hard rules help here.
If the unit is older, out of warranty, and needs a compressor or coil, get a replacement quote before approving the repair. If a contractor wants to add refrigerant without finding the leak, push back. If a board gets blamed in the first ten minutes with no testing, get a second opinion.
Use the symptom as a starting point. Make the decision based on the failed part, the age of the system, warranty status, and whether the repair touches refrigerant or major motors. That is how you avoid turning a sensible fix into a money pit.
Fixes a Confident Homeowner Can Attempt
This is not beginner stuff. If you don't own a multimeter, don't understand how to verify power is off, or get shaky around electrical work, skip this section and call a pro.
Start with lockout and common sense
Shut power off at the breaker and the disconnect. Verify the unit is dead before your hands go near anything. Wear insulated gloves. Keep one hand out of the cabinet when possible. If wires are burned beyond one obvious part, stop.
Tools you may need
- Multimeter
- Nut driver set
- Insulated gloves
- Needle-nose pliers
- Wet/dry vacuum
- Smartphone for wire photos
Four repairs people sometimes handle successfully
Outdoor unit iced into a block
Kill power. Don't chip ice with a screwdriver. Let it thaw fully, and if the drain area is blocked, clear it gently with water and patience. If it ices again after a full thaw, you likely have an airflow, defrost, or refrigerant issue and the DIY part is over.
Capacitor replacement
If the capacitor is swollen, leaking, or tests bad, replace it only with the exact same microfarad rating and equal or higher voltage rating. Photograph the wire layout first. Discharge the old capacitor safely before removal. If the new one fails quickly or the compressor still won't start, don't keep feeding parts into the unit.
Contactor swap
A visibly pitted or welded contactor is a fair DIY replacement for someone comfortable around line voltage. Match the part, label the wires, and tighten connections properly. If the coil isn't getting the right control signal or the breaker trips after replacement, the contactor wasn't the root problem.
Condensate drain clog
Hook a wet/dry vac to the outdoor drain termination and pull the blockage through. Then flush the line carefully from the indoor side if your setup allows it. If the drain keeps backing up, inspect for slope problems, algae buildup, or a cracked pan.
A simple part swap should look simple. If you're tracing mystery voltage, finding burnt insulation, or guessing at wire positions, you're past the DIY line.
Know which fixes stay small
Clearing a drain can take minutes. A contactor swap can be quick if the fault is isolated. Ice buildup is often not the problem itself. It's the symptom. Capacitors are where people get overconfident, because the part looks cheap and easy until the actual issue is a failing compressor, bad wiring, or a control problem upstream.
That's the line. If the repair stops being obvious, stop.
The Repairs That Always Need a Licensed Pro
Some heat pump repairs are essential pro work. Not because the industry wants to keep secrets. Because the work involves refrigerant law, sealed-system tools, live diagnostics, or warranty risk.
Refrigerant and sealed-system work is off-limits
The EPA says leak-repair provisions at 40 CFR 84.106 apply to affected refrigerant-containing appliances beginning January 1, 2026, and starting that same date, reclaimed HFC refrigerant used for installation, servicing, or repair may contain no more than 15 percent virgin HFCs by weight, according to the EPA's HFC phasedown FAQ. If your system is low on charge, hissing, or leaving oily residue, that's licensed-service work.
The EPA also draws a hard line on older equipment. Existing units can keep running through end of life, and after 2020 only recycled, reclaimed, or previously produced HCFC-22 can be used to service older equipment, per the EPA's guidance on purchasing and repairing home air conditioners or heat pumps. That's another reason not to let anyone casually “top it off.”
Electrical faults can hide bigger failures
A breaker that trips once might be a fluke. A breaker that trips again is telling you something. Repeated trips, burnt low-voltage wiring, board failures, and control faults need proper testing. Guessing here is how people fry transformers, boards, and compressors.
If you're checking whether a company is qualified to do this work, this overview of HVAC technician certification requirements gives you the basics to verify before you let anyone touch the system.
Symptoms That Always Require a Licensed HVAC Pro
| Symptom | Likely Fault | Why a Pro Is Required |
|---|---|---|
| Hissing sound near lines or coil | Refrigerant leak | Requires legal refrigerant handling, leak testing, and recharge |
| Oily residue on refrigerant components | Refrigerant leak or sealed-system failure | Needs sealed-system diagnosis and repair |
| Burning smell from unit or wiring | Electrical failure or overheating component | Fire risk, live diagnostics required |
| Breaker keeps tripping after one reset | Short, grounded motor, or major electrical issue | Repeated resetting can damage equipment and wiring |
| Error codes that return after reset | Control, sensor, board, or system fault | Needs actual diagnosis, not code-clearing |
| Compressor or reversing-valve replacement needed | Major sealed-system failure | Requires recovery equipment, brazing, pressure testing, and commissioning |
If refrigerant, repeated breaker trips, or burnt wiring are involved, this is not optional. Book service.
Repair or Replace How to Decide
It's 9 p.m., the house is drifting cold, and you just got a repair quote that makes you wonder if this unit is worth saving. Homeowners waste the most money here. They approve a big repair on a worn-out system, then pay again six months later when the next weak part fails.
Use a simple rule. Repair the unit if the fix is reasonably priced and buys dependable service. Replace it if you're pouring money into age, repeated breakdowns, or a refrigerant setup that makes future service harder and more expensive.
Ask five blunt questions
How old is the unit?
A heat pump in its earlier years usually deserves a repair if the rest of the system has been stable. An older unit with a history of service calls deserves less patience. Age by itself is not the verdict. Age plus expensive failure is.
Is this the first real failure or part of a pattern?
One bad board, motor, or sensor does not automatically make the system a loser. Two or three meaningful repairs in a short stretch usually does. Reliability matters as much as the invoice total.
What does this repair buy you?
A contactor, capacitor, sensor, or thermostat issue can buy real time if the machine is otherwise solid. A compressor, coil, or refrigerant leak repair on an older unit often buys risk, not peace of mind.
What refrigerant are you dealing with?
For residential split systems and heat pumps, the federal refrigerant transition is tied to a global warming potential threshold of 700, and new systems using refrigerants above that level are subject to 2026 installation deadline rules, while equipment manufactured or imported before January 1, 2025 can still be installed under the legacy-inventory provision, according to this ABC summary of the EPA installation deadline rules. Your current system does not suddenly become illegal. Future repair costs and parts decisions still deserve a harder look, especially if the repair involves the sealed system.
Is warranty money still on the table?
A major part failure hits differently on a younger unit with coverage. If the compressor or another expensive component is covered, labor may still hurt, but replacement is no longer the obvious answer.
Use simple math, then make a hard call
Add the unit's purchase price, total repair spending so far, and the current quote. Then divide that by the years you've already gotten from the system plus the realistic years you expect after this repair.
That rough cost-per-year number cuts through emotion fast.
If the new repair keeps ownership cost reasonable and the unit has been reliable, fix it. If the quote is large and trust in the system is already gone, replace it. Do not spend premium money to keep a problem child on life support.
Repair vs Replace Decision Matrix
| Scenario | Unit Age | Repair Cost | Replace Cost | Recommended Call |
|---|---|---|---|---|
| Minor control or sensor fault, otherwise stable | Younger to midlife | Typical lower-end repair | Full replacement is much higher | Repair |
| Single moderate repair, no pattern of failures | Midlife | Noticeable but still manageable | Replacement is usually harder to justify | Usually repair |
| Major compressor or sealed-system failure | Older or failure-prone | Often one of the highest repair bills you can get | Compare closely with new system pricing in your market | Often replace |
| Repeated service calls plus another major quote | Any age, especially older | Costs keep stacking | Replacement often buys back reliability | Usually replace |
| Young unit with major part covered by warranty | Young | Labor and incidentals may still apply | Full replacement may not make financial sense | Usually pursue warranty repair |
If you want a second opinion before approving a four-figure repair, this guide on when to repair or replace your HVAC system lays out the tradeoff clearly.
Maintenance Habits That Prevent the Next Repair
Bad installation and bad maintenance drive a lot of failures. A neutral NIST analysis found that 95% of residential heat pump units failed diagnostic testing because of issues such as duct leakage, poor duct insulation, airflow restriction, improper refrigerant charge, low evaporator airflow, non-condensables, or wrong sizing, as summarized in this California customer experience report citing the NIST analysis. That's why boring maintenance matters.
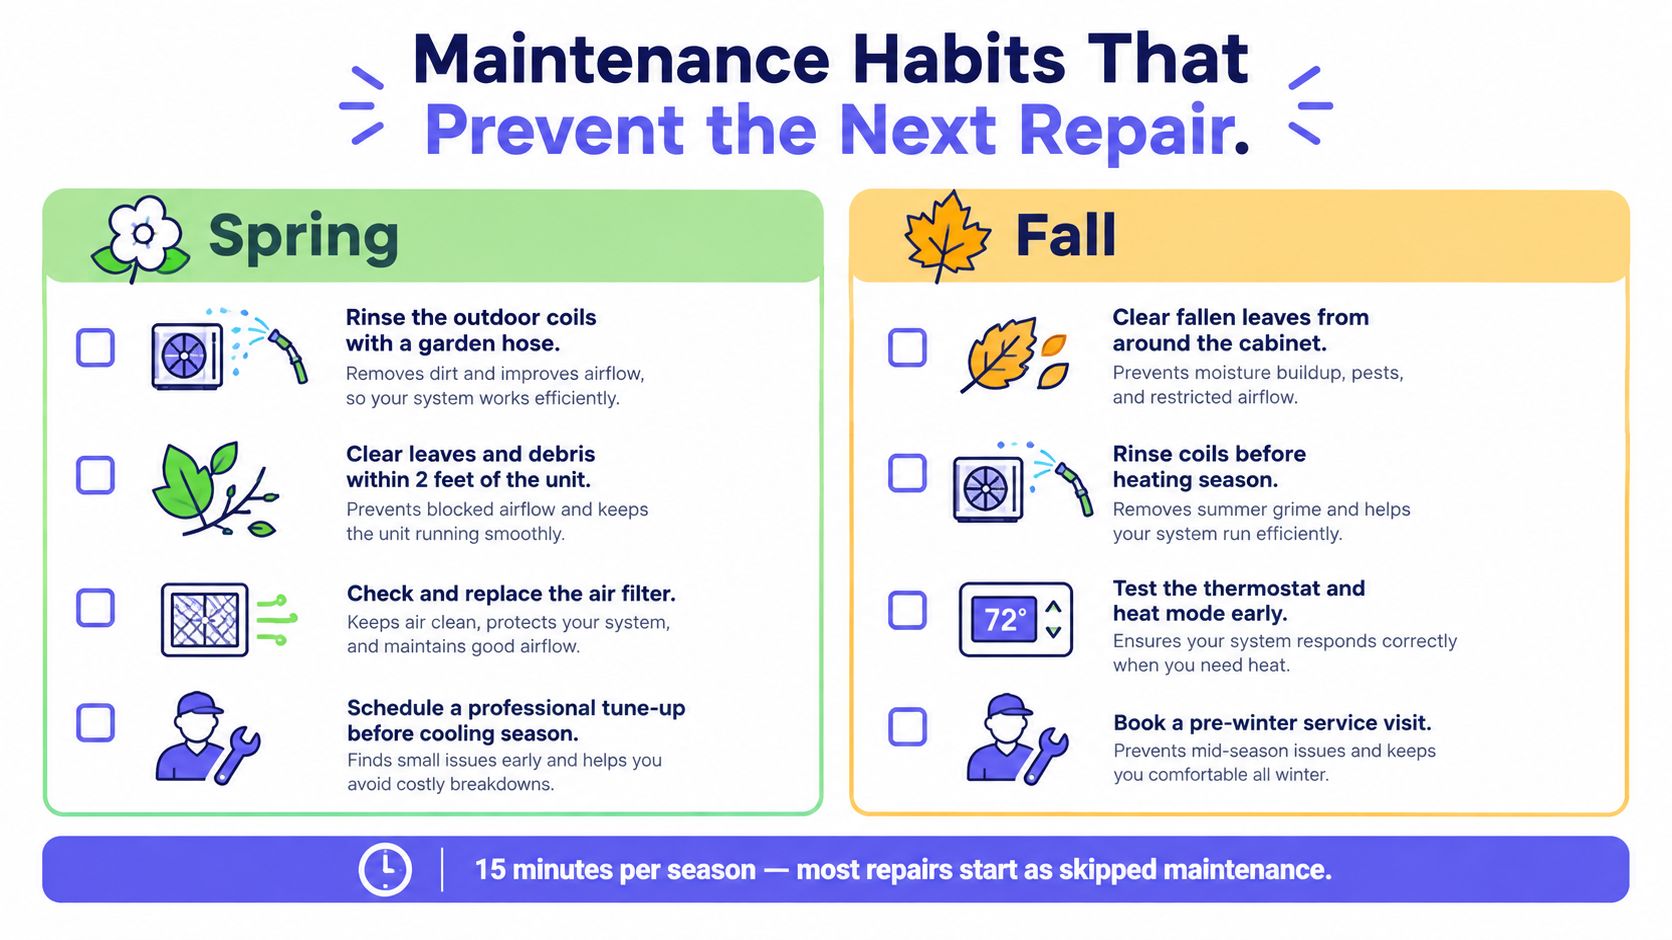
The seasonal routine that actually helps
Spring tasks
- Rinse outdoor coils: Use a garden hose, gentle flow only.
- Clear space around the unit: Keep vegetation, leaves, and clutter back.
- Check the filter: Replace it if it's loaded up.
- Listen on the first warm day: New buzzing, hard starts, or harsh compressor noise should go on your repair list.
Fall tasks
- Clear leaves again: Don't let the cabinet choke on debris.
- Test heat mode early: Don't wait for the first cold night.
- Check thermostat batteries if your model uses them: Cheap fix, common nuisance.
- Listen for defrost behavior: Some frost is normal. A solid block of ice is not.
The small habits that save service calls
Keep supply vents open. Vacuum return grilles monthly. Flush the condensate drain with a mild vinegar solution every few months if your setup allows for it. If you have UV lamps or indoor air quality accessories, replace them on schedule instead of forgetting they exist.
A California customer-experience report found that 16% of 300 systems had at least one issue requiring troubleshooting, and when issues happened, contractors resolved them through troubleshooting in 70% of ducted heat pump cases and 81% of ductless cases, according to this customer-experience report summary. That tells you a lot. Good notes, good maintenance, and disciplined diagnosis solve plenty of problems before major parts enter the conversation.
Pick the right pro before you need one
Ask for these basics:
- Current state license: Verify it, don't just accept a logo on a van.
- EPA 608 certification: Required for refrigerant work.
- Written diagnostic fee: Know what the first visit costs.
- Experience with your system type: Ducted and ductless don't fail the same way.
- Clear documentation: Date, symptoms, readings, parts used.
If the unit is past its early years or already showing age, annual professional service is money better spent than repeated emergency calls.
If your heat pump is acting up and you don't want three random companies blowing up your phone, Hand Vetted Co. matches you with one licensed, background-checked, highly rated HVAC professional for repair, replacement, or diagnosis. It's a cleaner way to get a real answer fast, especially when you're trying to decide whether this is a simple fix or the start of a money pit.