Your floor looks tired, scratched, maybe cloudy in the traffic lanes, and you're trying to answer one expensive question. Can this be saved, or are you staring at a replacement job?
Most wood floors can be brought back. The mistake is assuming every worn floor needs the same fix. Some floors need a light restoration. Some need a full sand-to-bare-wood refinish. And some, especially certain prefinished floors or floors with real structural damage, should not be touched with a buffer until you know exactly what you're dealing with.
Table of Contents
- Your Hardwood Floors Can Be Saved
- First Assess Your Floors Condition
- The Light Touch Restoration Method
- The Full Hardwood Refinishing Process
- Project Costs Timelines and Common Pitfalls
- DIY Restoration vs Hiring a Professional
- How to Find and Vet a Restoration Pro
Your Hardwood Floors Can Be Saved
A lot of floors look worse than they are.
A living room floor with chair scratches, dog wear near the sofa, and a dull path from the front door to the kitchen often still has good wood underneath. What people see is usually finish failure first, not total floor failure. That distinction matters because the repair path changes completely depending on whether the damage sits in the topcoat or in the wood itself.
The broader market tells the same story. The global wood floor renovation services market was valued at about $3.1 billion in 2023 and is projected to reach around $5.2 billion by 2032, with a 5.7% CAGR, according to Dataintelo's wood floor renovation services market report. People are choosing restoration because keeping good wood in place often makes more sense than tearing it out.
In the U.S., the replacement side of the wood flooring business accounted for 66.4% of all wood flooring sales in 2024, up from 65.4% the year before, and total first-point-of-distribution sales reached $1.845 billion in 2024, according to Floor Covering News hardwood market reporting. That doesn't mean every floor gets the same treatment. It means restoration and replacement decisions are a huge part of how people handle wood floors now.
Practical rule: Don't start with tools. Start with diagnosis. A floor that needs a recoat can be damaged by unnecessary sanding, and a floor that needs sanding won't be fixed by another coat of finish.
The good outcome here isn't just a shinier floor. It's choosing the least aggressive method that will hold up. That's how you save wood, save time, and avoid doing the job twice.
First Assess Your Floors Condition
Before you rent a drum sander or buy finish, inspect the floor like you're trying to prove yourself wrong. Restoration goes well when the diagnosis is honest.
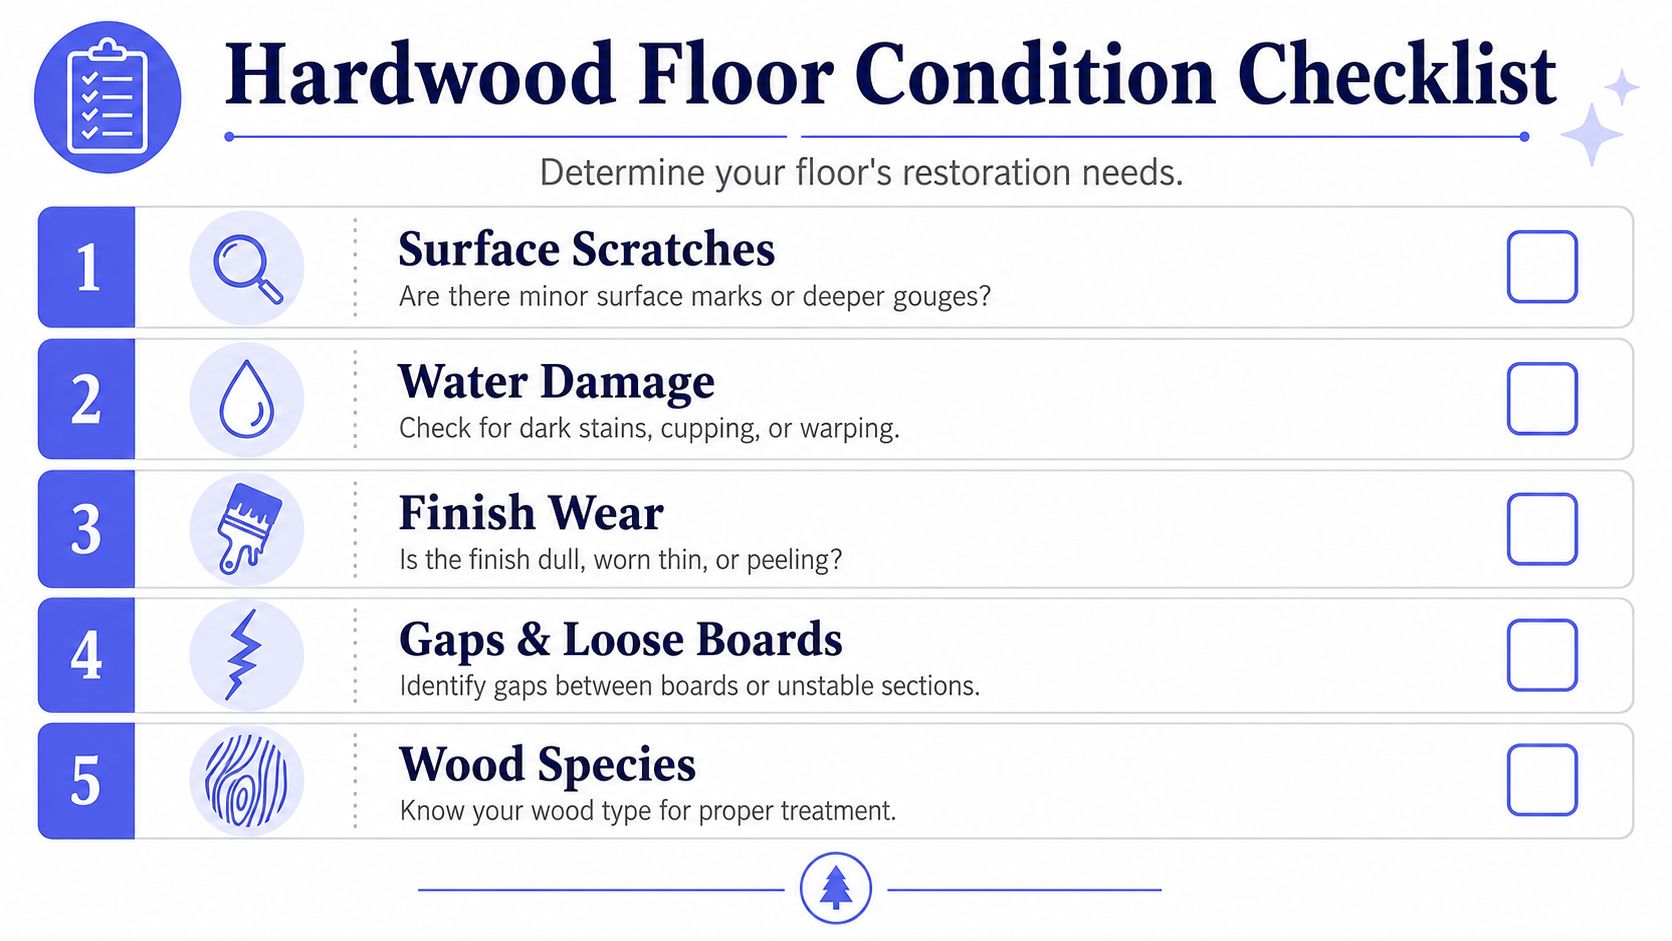
Start with what the scratches are telling you
Surface scratches usually look white, hazy, or shallow. You can feel them lightly with a fingernail, but they don't look like torn fibers or crushed wood. Those floors are often candidates for a clean, screen, and recoat if the finish is otherwise intact.
Deep gouges are different. They cut below the finish and into the wood. Black stains near pet accidents, raised edges, soft spots, or boards that move underfoot point to moisture or structural trouble, not just cosmetic wear. If water damage is part of the story, this guide on water damage restoration steps helps you think through the order of operations before you touch the finish.
A simple field test helps. Put a few drops of water on a worn area and on a protected area, then watch what happens. If the water beads on the protected section but darkens the worn section quickly, the finish is failing in the traffic lane. That often means the floor's asking for restoration, not replacement.
Figure out what kind of floor you have
Solid hardwood usually gives you more room to work because it can tolerate more sanding over its life. Engineered wood can also sometimes be restored, but only if the top wear layer is thick enough. That detail matters more than the sales label.
One more distinction gets missed all the time. Prefinished wood floors are not the same as traditional site-finished floors. If you have a prefinished floor with a hardened factory finish, standard buff-and-recoat methods can be unreliable because the new coating may not bond well. That's one of the easiest ways to spend money and end up with peeling finish later.
A professional clean, screen, and recoat system follows a 7-step method when the finish is sound but scratched, and it has a success rate above 90% for floors with at least 0.75mm of wear layer remaining, as described in Naperville Hardwood's clean, screen, and recoat process.
Know when restoration is the wrong job
Some floors shouldn't be sold as a restoration project.
Use this quick checkpoint list:
- Widespread cupping or warping: Moisture is still active or the boards have changed shape enough that sanding alone won't solve the root problem.
- Soft or crumbling wood: Rot, severe water damage, or insect damage means the material itself has failed.
- Loose sections and movement: If the subfloor or fasteners are the underlying issue, refinishing is cosmetic theater.
- Delamination on engineered boards: Once layers start separating, finish work won't put them back together.
- Unknown prefinished surface with adhesion risk: Don't assume every factory-finished floor can be screened and recoated safely.
If you're not sure whether you're looking at finish failure or floor failure, stop there. Misreading that difference is how people turn a manageable restoration into a much bigger repair.
The Light Touch Restoration Method
If the wood is still healthy and the finish is just tired, a screen and recoat is the least destructive way to bring the floor back. This is the method for floors that are scratched, dull, and worn in the traffic lanes, but not severely gouged or structurally compromised.
When a screen and recoat is the right move
This works best when the existing finish is still bonded to the floor. The goal isn't to cut into bare wood. The goal is to clean away embedded grime, lightly abrade the old finish so a new coat can stick, and then lay down fresh protection.
It's a good fit when you see:
- Dull traffic patterns: Hallways and entry paths where shine has disappeared first.
- Light surface scratching: Marks from chairs, pets, and daily use that haven't cut into raw wood.
- Older finish with no major peeling: Worn, not failing catastrophically.
- A floor you want to preserve: Especially when you don't want to remove more wood than necessary.
It's not the right method for deep stains, heavy gouges, peeling finish, major color change, wax contamination, or floors with a factory-applied prefinished surface that may reject the new coat.
What the process actually looks like
A proper light restoration is more than "buff it and slap on polyurethane." The sequence matters.
The professional approach is a 7-step clean, screen, and recoat method. It starts with thorough vacuuming and minor repairs. Then comes an intensive chemical cleaning using a specialized cleaner, applied with a buffer and scrubbing pad to break loose ground-in dirt. After that, the floor is rinsed with a dedicated hardwood scrubbing machine that sprays, scrubs, and vacuums up the dirty solution. If the floor is heavily soiled, that rinse-and-scrub stage may need another pass.
Once the floor dries fully, the old finish is screened with a sanding screen on a buffer. This isn't heavy sanding. It's a controlled abrasion that gives the new finish something to bite into. After a final vacuum and tack, one or two coats of finish go down depending on the job scope.
Here's the practical version of what matters most:
- Cleaning has to be aggressive enough to remove residue, oils, and embedded dirt. If contamination stays on the floor, adhesion suffers.
- Screening has to be even so the fresh coat bonds consistently across the room.
- Dry time can't be rushed between wet cleaning and coating.
- The method only works when the existing finish is a stable base.
A screen and recoat is a restoration job, not a shortcut. It only works when the prep is cleaner and more precise than most DIY attempts.
The upside is obvious. You preserve more of the floor, create less disruption than a full sand-down, and give a tired floor another life cycle without grinding away good wood.
The Full Hardwood Refinishing Process
Some floors need the full reset. If scratches cut into the wood, the finish is peeling, color is uneven, or old coatings have built up into a patchy mess, the right answer is a complete refinish.
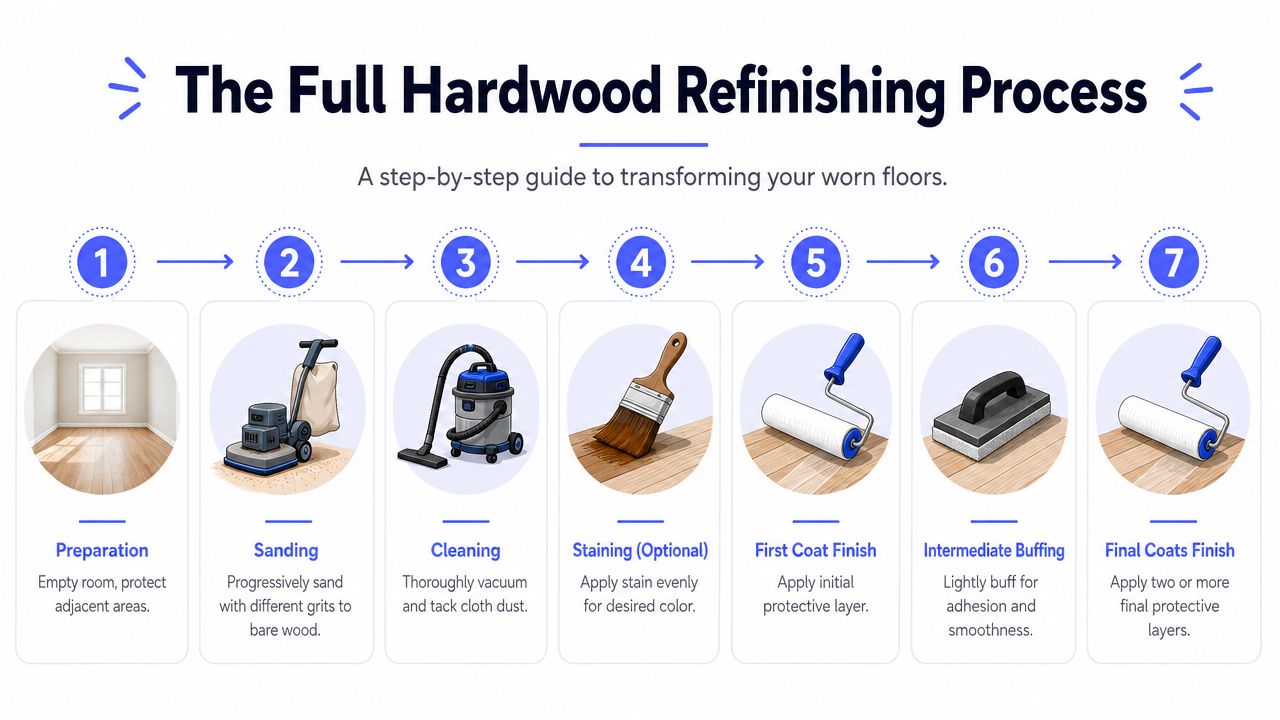
Prep work that decides the outcome
Empty the room completely. Pull furniture, rugs, floor vents, and anything that can trap dust or block sanding lines. Check for proud nails, staples, and fasteners. Anything sticking up can tear abrasive belts and scar the floor.
Then deal with damage in the right order. Deep gouges and holes should be filled after the first coarse sanding pass but before the second medium pass, because filler won't bond properly to already-smoothed wood and can sand away if applied too late, as explained in Lowe's hardwood floor refinishing guidance.
Edges, corners, and radiator cuts need their own plan. The drum or belt sander does the field of the floor. A floor edger handles the perimeter. Tight spots often need hand scraping or hand sanding so they don't stand out later as dark halos or untouched finish islands.
The sanding sequence you cannot improvise
Many DIY restoration efforts falter due to common errors. People either skip grits, sand out of sequence, or stay too long in one spot and dig a trough they can't hide.
For a full refinish, the sanding progression should move from 36 to 40 grit, then 60 grit, then 80 grit, and finish at 100 grit. Skipping grits can leave permanent gouges. The abrasive belt on a drum sander should be replaced after about 250 square feet to keep the cut consistent, according to both Home Depot's refinishing instructions and District Floor Depot's refinishing guide.
District Floor Depot also notes that licensed professionals following the full process typically get 85% to 90% success rates, and a properly finished floor can hold up for 15 to 20 years. The same guide warns that using orbital sanders or square buffers for work that really requires a drum or belt sander leads to patchy, uneven results and accounts for nearly 30% of restoration failures.
The mechanics matter as much as the grit sequence:
- Sand with the grain: Cross-grain sanding leaves ugly scratches that telegraph through stain and finish.
- Use overlapping strokes: At least one-third of the belt width helps remove scratches uniformly.
- Keep the machine moving: Parking a drum sander in one place will cut a trench fast.
- Match edge sanding to field sanding: If the perimeter scratch pattern doesn't match the middle, the floor will show a ring around the room.
A simple table keeps the sequence clear:
| Stage | Purpose | What to watch |
|---|---|---|
| Coarse pass | Remove old finish and flatten major wear | Don't linger in one spot |
| Filler stage | Repair gouges and holes | Do it after coarse sanding, not at the end |
| Medium pass | Refine coarse scratches | Keep pattern even |
| Fine passes | Smooth for stain and finish | No skipped grits |
The floor only looks as good as the scratch pattern underneath the finish. Polyurethane doesn't hide sanding mistakes. It locks them in.
Cleaning stain and finish application
Once sanding is complete, clean like dust is your enemy, because it is. Vacuum thoroughly, then tack the floor so loose dust doesn't become bumps in the final coat.
If you're staining, apply it evenly and keep a wet edge. Uneven wipe-off, missed lap lines, and inconsistent absorption show up fast on bare wood. Test color in a discreet area first if you're changing tone.
For finish, a lamb's wool applicator is a common professional choice. District Floor Depot's guide specifies 3 coats of oil-based polyurethane or 4 coats of water-based polyurethane, with light 220-grit sanding between coats for adhesion and smoothness. Oil-based and water-based finishes behave differently in color, odor, and working time, so don't switch systems casually in the middle of planning.
The final pass is patience. Fresh finish can look ready before it's ready for traffic, furniture, or rugs. If you rush that stage, you can mark the surface before the coating has hardened enough to resist compression.
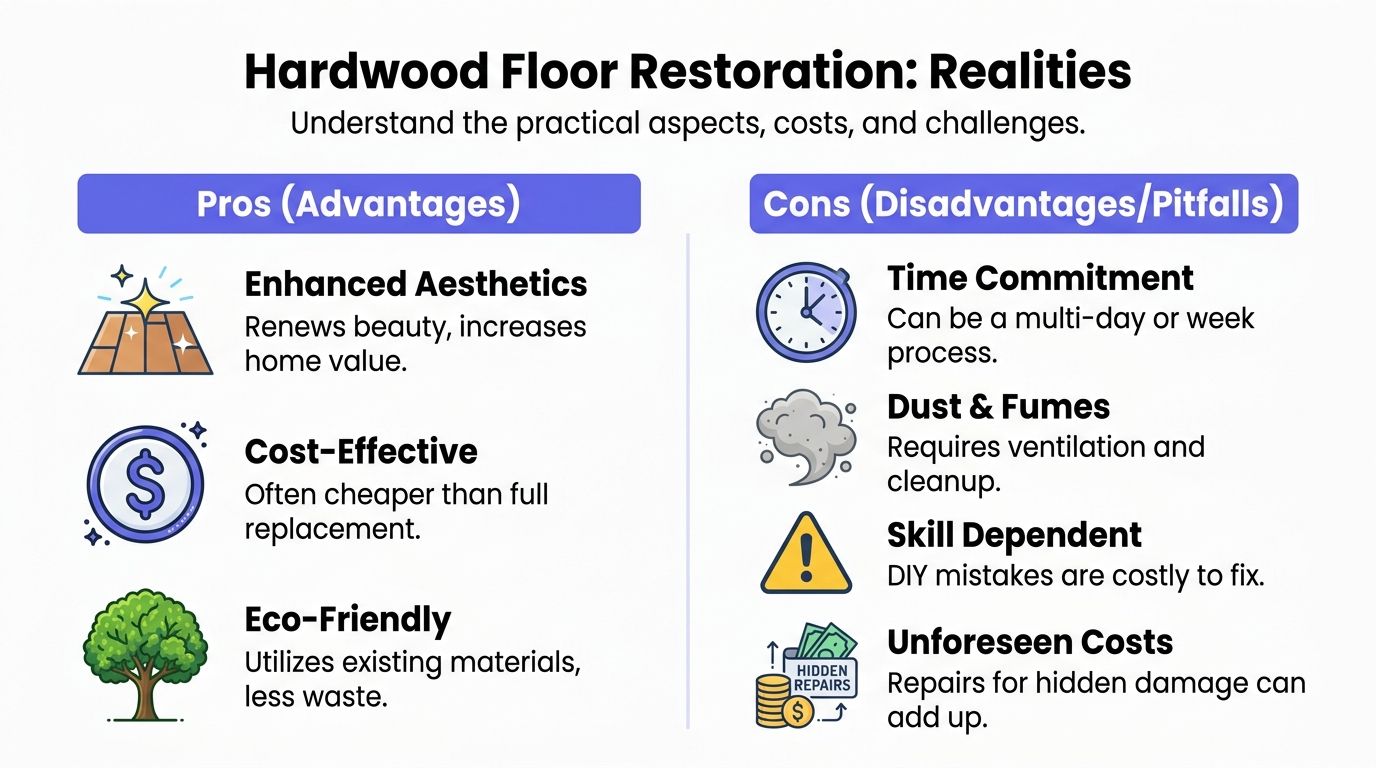
Project Costs Timelines and Common Pitfalls
People usually ask about cost first. The better question is what kind of disruption, risk, and rework you're signing up for.
How long the job actually takes
A typical refinishing project covering about 800 square feet takes 3 to 5 days, according to Lumberjack Flooring's refinishing timeline guide. That's a useful planning number because it reflects real workflow, not just sanding time.
The finish choice changes the schedule. In that same guide, water-based finishes typically need 2 days for a 3-coat application, while oil-based finishes take 3 days for the same 3-coat process. Smaller and larger jobs don't scale in a perfectly straight line either. A 500-square-foot job may still take 3 to 4 days, while a 1,000-square-foot job may take 4 to 5 days.
That matters for furniture moves, pets, room access, and whether you can stay in the space comfortably while the work is happening.
The mistakes that blow up the project
The biggest pitfall is choosing the wrong restoration method for the floor you have. A lot of people hear "buff and recoat" and assume it's a universal fix. It isn't.
Industry reporting on prefinished floors makes that especially clear. Attempting to buff or screen a prefinished floor is a gamble because its hardened, multilayer factory finish often leads to adhesion failure when new coatings are applied over it, according to Duffy's explanation of why prefinished wood floors can't reliably be buffed. That's one of the most expensive false shortcuts in hardwood floor restoration.
Other common failures are less dramatic but just as costly:
- Believing in dust-free sanding: Better containment exists, but no sanding setup makes cleanup disappear.
- Trying to spot refinish a visible area: Color, sheen, and wear pattern rarely blend the way people hope.
- Underestimating room prep: Vents, trim details, door clearances, and transition pieces can all slow the job.
- Treating finish dry time like cure time: A floor that feels dry to the touch can still be easy to dent or scuff.
A quick reality check helps:
| Issue | What people expect | What usually happens |
|---|---|---|
| Small room timeline | Done in a day | Prep, sanding, coats, and cure windows stretch it out |
| Spot repair | Invisible patch | Visible color or sheen mismatch |
| Prefinished recoat | Easy refresh | Possible adhesion failure |
| Dust control | Zero mess | Reduced dust, not zero dust |
If you're budgeting this out, don't just budget money. Budget access to the room, odor tolerance, cleanup, and the possibility that hidden damage shows up after the finish comes off. A useful planning tool like the home renovation project planner can help you organize scope, timing, and decision points before work starts.
DIY Restoration vs Hiring a Professional
This decision comes down to risk tolerance more than optimism.
A careful DIYer can absolutely handle some wood floor work. But hardwood floor restoration punishes overconfidence. One bad sanding pass can leave waves, drum marks, edge dish-out, or visible chatter that no finish coat will hide.
Where DIY makes sense
DIY is the better bet when the job is smaller, the floor layout is simple, and the restoration method is conservative. If you're dealing with a straightforward floor, you're patient, and you're willing to spend time learning the machines before touching the main room, you can get respectable results.
DIY usually fits people who are good at process work:
- You follow sequence well: Sanding order and finish timing don't feel optional to you.
- You can practice first: A closet, spare room, or less visible area gives you room to learn.
- You can handle the physical side: Buffers, edgers, and drum sanders are tiring to run well.
- You can accept an outcome that's good, not perfect: Your standard has to match your experience.
A light restoration is usually more forgiving than a full refinish. Full sanding is where the machine can outrun your skill in a hurry.
Where hiring a pro is the smarter call
Hire a professional when any of these are true: the floor has deep damage, the wood species or finish history is unclear, the room is highly visible, the floor may be prefinished, or you care a lot about stain consistency and clean edges.
Pros earn their money in the details:
- They read the floor faster.
- They know when not to buff.
- They know how to keep the field and perimeter sanding consistent.
- They understand how finish chemistry changes scheduling and furniture return.
- They can spot when the problem is subfloor movement or moisture.
If a mistake would bother you every time you walk through the room, the job probably isn't a learning project.
There's also the time factor. A professional crew works with a rhythm that's hard to match if you're renting tools, reading labels at night, and trying to squeeze the job around work and family life. Saving money on labor feels different when the floor is still unfinished and the room has been unusable for days.
How to Find and Vet a Restoration Pro
The wrong contractor can turn a fixable floor into a much more expensive one. I see that happen when a homeowner hires the first person who says, "Sure, we can buff that," without asking whether the floor is site-finished, prefinished, waxed, or already sanded near its limit.

A good vetting process is less about personality and more about whether the pro can diagnose the floor before naming a method. That matters because restoration is not one job. A screen and recoat, a repair-and-blend attempt, and a full sand-and-finish have different risks, different timelines, and different failure points. If a contractor talks price before talking floor type, finish type, board thickness, and damage pattern, slow the conversation down.
Questions that uncover real skill
Start with the floor itself. Ask, "What do you think this floor needs, and why?" A capable pro should explain whether the surface can take a light restoration or needs full refinishing, and they should be clear about what would make them refuse a buff-and-coat approach. That answer tells you a lot. Especially on prefinished floors, where adhesion problems and beveled edges change the whole plan.
Then get into the job details. The National Wood Flooring Association's guidance on recoating and maintenance makes the same point pros learn in the field. Surface condition and existing finish determine whether recoating is appropriate, not wishful thinking or a lower bid. Review those standards when you compare estimates at the NWFA finishing and recoating resource library.
Ask these questions directly:
- How will you confirm whether this is site-finished or prefinished? They should mention visual cues, board edges, finish wear pattern, and why that affects the restoration method.
- What would make you reject a buff and recoat? Good answers include wax contamination, deep scratches through the finish, peeling, cupping, adhesion risk, and certain prefinished surfaces.
- How do you contain dust in occupied areas? Look for machine extraction, doorway isolation, HVAC protection, and a realistic cleanup plan.
- What trim work is included? Base shoe, baseboards, transitions, and floor vent covers should be named in writing, not assumed.
- Do you fill the whole floor or only selected gaps and defects? There is no one right answer. The right answer depends on board movement, gap size, season, and how visible the defects are.
- What finish system are you using, and when can we walk on it, put rugs back, and move furniture in? A pro should answer without guessing because scheduling depends on the actual product, not a rough rule.
- How will you handle color and sheen changes where this room meets another one? If they have not thought through transitions, they have not thought through the job.
Answers that should make you walk away
Some bad answers sound smooth. They are still bad answers.
Be cautious if you hear any of these:
- "We can make any repair disappear." In isolated areas, maybe. In open light, many repairs still show.
- "Dustless means no dust." It means better collection, not zero cleanup.
- "We can recoat anything." No. Contamination, unknown finishes, and some factory finishes can make that fail.
- "We'll figure out the finish later." Finish choice affects dry time, cure time, odor, sheen, and furniture return.
- "Buffing should be fine on that prefinished floor." "Should" is not a plan. The contractor should explain the adhesion risk and the bevel issue.
- "Don't worry about the contract details." Worry about them now or pay for them later.
The estimate should read like a work order, not a postcard. It should spell out prep, repairs, sanding scope, stain work if any, finish coats, containment, cleanup, who moves what, and what happens if the crew finds hidden damage or a coating that will not bond.
Screening matters too. Before anyone comes out, it helps to review a service with clear contractor background check standards so you know what kind of licensing, history, and review screening happened before the first appointment.
Get at least two bids. Three is better when the floor condition is unclear. Then compare the diagnosis, not just the price. The best contractor usually gives the clearest explanation of what your floor can accept, what it cannot, and where the actual risks are.