About 1 in 60 insured homes files a water-damage or freezing claim each year, and the average claim reached $13,954 from 2018 through 2022, according to an Insurance Information Institute-based water-loss summary. Water damage isn't a freak event reserved for neglected properties. It's a predictable failure involving plumbing, roofs, drainage, appliances, foundations, or a prevention device that stopped working months ago.
Effective water damage prevention requires more than placing a sensor under the washing machine. You need a continuous drainage path from roof to foundation, seasonal maintenance that matches the weather, and equipment you can prove still works. When something fails, the response must start immediately, not after you've found the perfect repair company.
Table of Contents
- The Financial Reality of Water Intrusion
- Inspecting the Continuous Drainage Path
- Evaluating Smart Upgrades and Leak Detection
- Executing a Seasonal Maintenance Schedule
- Managing Emergency Response and Mitigation
- Engaging Vetted Professionals for Repairs
The Financial Reality of Water Intrusion
Water damage and freezing accounted for nearly 28% of homeowners losses in 2022, and water-related losses occurred more often than fire losses, according to the Insurance Information Institute-based summary. Treat that frequency as a maintenance warning, not an unusual disaster. A property can develop serious damage through a slow plumbing leak, a failed appliance hose, a roof penetration, or a drainage route that no longer carries water away.
Small defects become expensive when they remain hidden. Moisture can spread into flooring, insulation, drywall, framing, and contents before a stain appears. By then, the repair addresses several affected systems rather than the original plumbing or roofing fault.
The average claim figure provides a practical budget test. $13,954 can turn an ordinary household failure into a serious financial setback, particularly when several rooms are affected or temporary relocation is required. Review the water damage repair costs guide for repair implications. The recommendation is straightforward: fund routine inspections and repairs before a leak consumes the cash reserved for other property needs.
Why ordinary maintenance misses expensive leaks
Routine checks are usually visual and occasional. Owners look at the roof from the ground, inspect beneath a sink, and remove visible leaves from gutters. Those steps help, yet they do not test concealed transitions where water bypasses one control layer and enters another.
A supply line can leak behind an appliance. Wind-driven rain can enter around a roof penetration without leaving a clear exterior mark. At the foundation, moisture can move into a wall cavity instead of crossing the floor where it would be noticed quickly.
Practical rule: Inspect the route water follows, not just the component you can see.
Use three habits to reduce exposure:
- Find weak points: Check plumbing connections, appliance hoses, roof penetrations, gutters, downspouts, grading, and foundation interfaces.
- Control water early: Maintain drainage, choose moisture-resistant materials where exposure warrants them, monitor vulnerable areas, and install automatic shutoff equipment when the risk justifies its cost.
- Respond without delay: Stop the source, remove standing water, begin drying, and document the condition.
Smart devices deserve the same scrutiny as pipes and gutters. A sensor with a dead battery, poor signal, closed valve, or untested alert does not protect the building. Test each device on a schedule and confirm that the alert reaches the person responsible for responding.
A protected property is not a perfect property. It is one with a repeatable roof-to-foundation drainage path, working controls, and maintenance records that expose failures before they spread.
Inspecting the Continuous Drainage Path
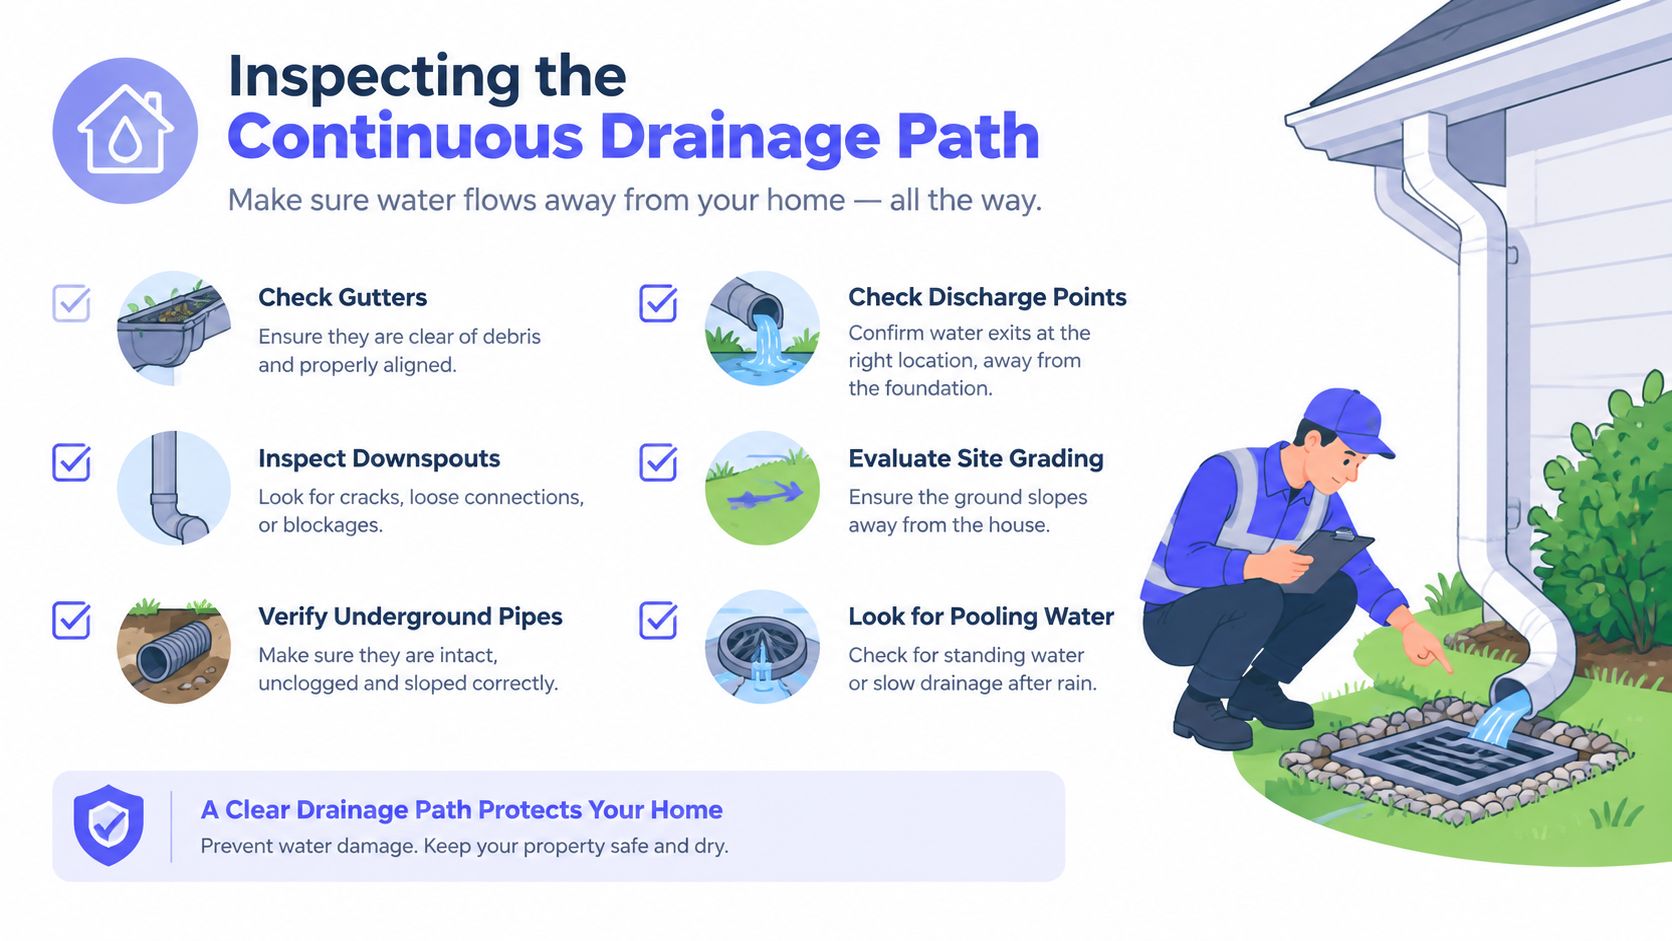
A drainage system fails at its weakest transition. Roof, walls, gutters, soil, and foundation must work as one route, carrying water from the roof to collection points, then away from the structure. Inspecting each component in isolation leaves hidden breaks that allow water into framing, wall cavities, or foundation areas.
Start at the roof
Walk the roof only under safe conditions. Otherwise, use binoculars from the ground. Check for damaged or displaced shingles, ponding, open seams, and debris in valleys. Inspect plumbing vents, chimneys, skylights, roof-to-wall intersections, and every point where materials meet.
The roof covering is only one layer of the water-control assembly. Flashing must route water around penetrations and intersections. Underlayment and drainage planes must direct captured moisture downward. A patch over one visible mark can fail when damaged flashing sends water sideways into the roof deck or wall.
Check whether gutters are pulling away from the fascia, then trace each downspout to its outlet. Water discharged against the foundation concentrates moisture beside the wall and defeats an otherwise clear collection route.
Follow wall and opening transitions
At siding, masonry, windows, and doors, look for staining, swollen trim, peeling paint, cracked sealant, and soft areas. Sealant can limit entry at a joint, but it cannot replace flashing or a planned drainage route behind the exterior finish.
The National Research Council Canada technical literature on moisture ingress supports a systems approach using moisture-resistant materials, correctly detailed assemblies, and effective moisture control. Repairs should show how water moves across roof, wall, window, and foundation transitions. Do not assume that one product can compensate for a failed adjoining layer.
Finish at grade and foundation
Stand back from the foundation and inspect the ground profile. Soil, paving, mulch, and planting beds should direct water away from the wall instead of forming a basin beside it. Look for erosion channels, settlement, cracks, damp interior corners, efflorescence, and puddles that return after rain.
Use this inspection order:
- Roof: Check penetrations, valleys, ponding, coverings, and flashing.
- Edges and walls: Examine windows, doors, cladding joints, trim, and transition details.
- Collection: Confirm that gutters and downspouts carry water without overflow or discharge beside the foundation.
- Ground: Check grading, outlets, settlement, and foundation interfaces.
- Interior: Compare exterior trouble spots with stains, odors, dampness, or damaged finishes indoors.
Continuity matters more than appearance. A blocked gutter, a short downspout, or flashing that stops at an intersection breaks the roof-to-foundation route.
Have a qualified professional investigate soft framing, persistent dampness, foundation movement, or concealed moisture. Do not open a wall without a plan. Uncontrolled access can spread contamination and remove evidence needed to identify the entry path. Record inspection findings and recheck every transition after major storms or exterior work.
Evaluating Smart Upgrades and Leak Detection
A sensor reports water. An automatic shutoff limits flow. Choose between those functions deliberately, because an alert still depends on someone receiving it and acting quickly.
Adoption remains limited despite the potential value. A 2023 Hanover homeowner water-damage prevention report found that 17% of homeowners had water sensors, while 61% had never heard of an automatic water shutoff device. Separate insurance-focused reporting cited in the same verified data connected in-line shutoff systems with 96% fewer escape-of-water claim events, while only 5% of U.S. single-family homeowners owned a smart water leak detector.
A more recent industry study summary on smart shutoff devices reported an 81% drop in claim frequency and an 85% reduction in claim severity after installation. The report also described performance that remained 30% lower in claim frequency and 40% lower in severity than the broader insured population, with estimated insurer savings of $1.1 million to $1.8 million annually per 10,000 policies with devices installed.
The recommendation is straightforward. Give a main-line automatic shutoff priority over several alarms that only notify someone nearby. Use point sensors where a leak could start, but do not mistake detection coverage for flow control.
Compare the actual protection
| Device Type | Primary Function | Loss Prevention Level |
|---|---|---|
| Point leak sensor | Detects water near a fixture or appliance and sends an alert | Low to moderate. Useful detection, no automatic flow control |
| Smart humidity sensor | Identifies abnormal moisture or humidity conditions | Low. Helpful for early warning, but it may not identify the leak source |
| Main-line automatic shutoff | Monitors water use or leak conditions and closes the household supply | High. Can limit flow before a small leak becomes extensive |
| Sump pump monitor | Reports pump failure, power loss, or abnormal basin conditions | Moderate to high for below-grade water risk, depending on backup protection |
| Manual main shutoff | Stops water after a person operates the valve | High during a fast response, but unavailable if nobody is present |
Prevent the device from becoming the weak link
The Risk & Insurance discussion of smart leak-prevention operations found that 30% to 50% of installed smart water devices are offline at any given time. Dead batteries, lost connectivity, app failures, and seized valves can remove the protection the system was meant to provide.
Set a recurring device check:
- Test connectivity: Confirm through the app or control panel that the device reports correctly.
- Replace batteries: Follow the manufacturer's schedule. Change them before a warning becomes an outage.
- Exercise the valve: Test the automatic shutoff according to manufacturer guidance so it does not seize.
- Verify alerts: Run a controlled test and confirm that the correct people receive it.
- Inspect the main line: Check for leaks, corrosion, restricted access, or installation defects.
- Keep a manual backup: Every adult in the property should know the main shutoff location and operation.
A low-tech repair can deliver more protection when the budget is tight. Replace a cracked washing-machine hose, insulate exposed plumbing, repair a failed toilet supply connection, or correct a downspout discharge before buying another sensor. Smart equipment works only when it remains powered, connected, tested, and tied to a functioning water-control path.
Executing a Seasonal Maintenance Schedule
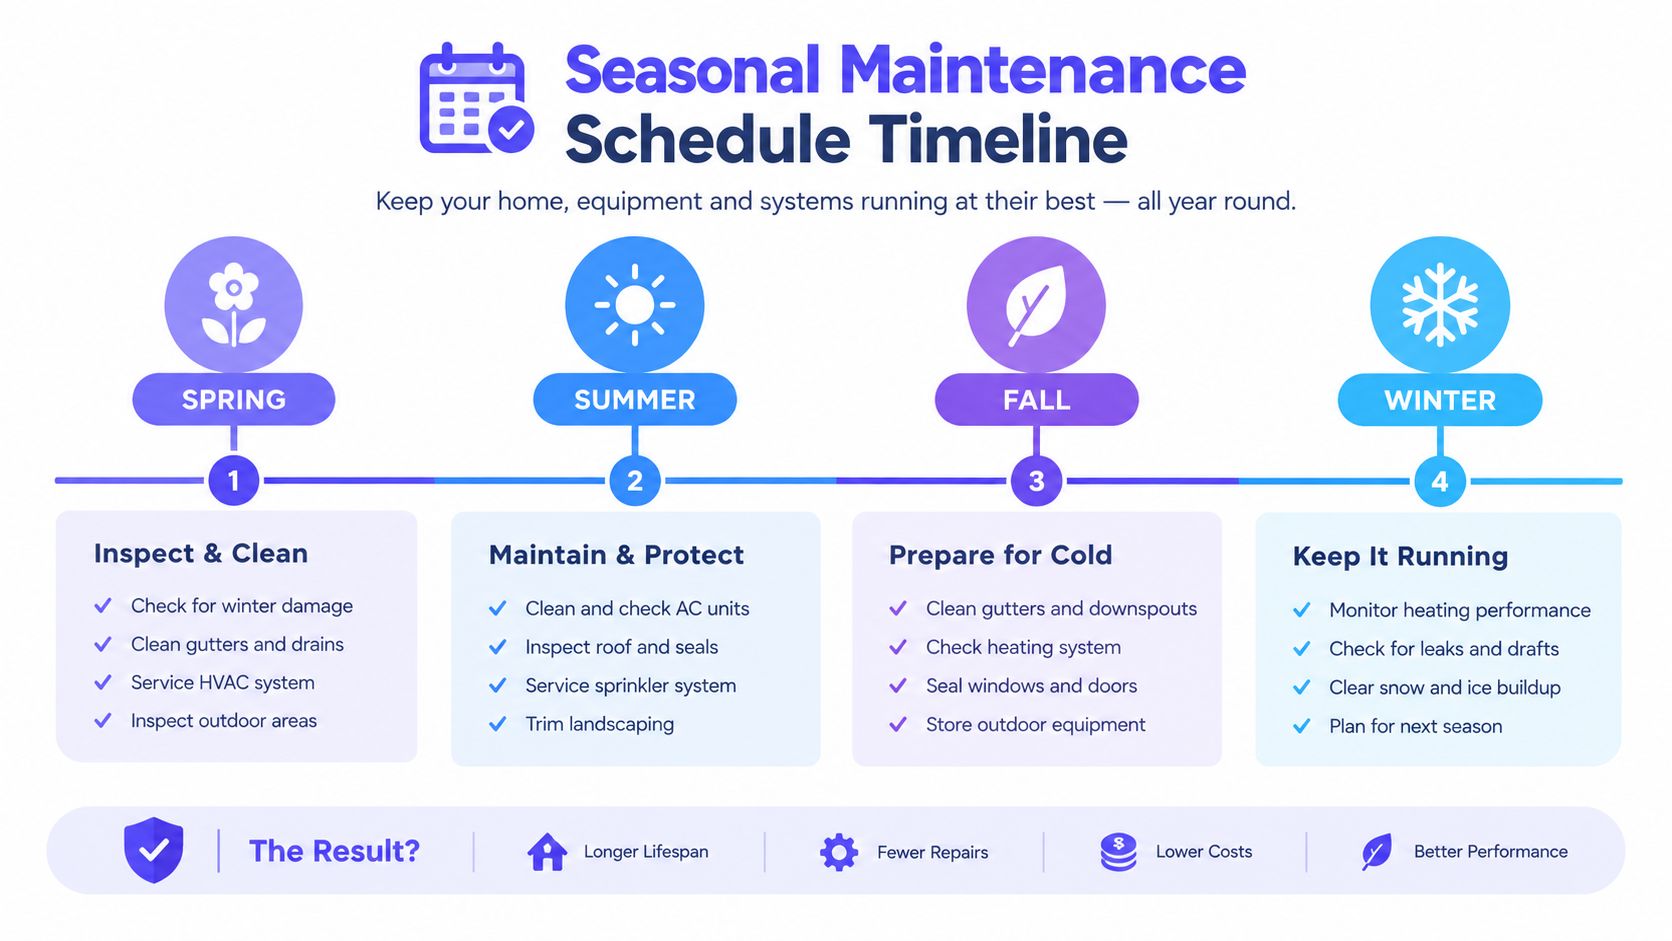
Weather changes the failure points, but the inspection route stays the same. Work from the roof and gutters down to the foundation, then check interior equipment and piping. Correct defects before the next season puts them under stress.
Spring
Inspect the exterior after heavy rain. Clear gutters and downspouts, examine roof flashing, and look for fresh settlement beside the foundation. Regrade low areas where runoff collects against the structure. Check basement and crawl-space walls for dampness, then trace any moisture upward to its entry point.
Inside, inspect the water heater, under-sink connections, refrigerator supply line, dishwasher hose, washing-machine connections, and HVAC condensate line. A blocked condensate line can discharge into ceilings, walls, or flooring even when the plumbing supply and drain lines appear sound.
Summer
Heat, thunderstorms, and empty properties create different exposure. Clear gutters before forecasted heavy rain, trim vegetation away from roof drainage, and confirm that downspouts discharge away from the foundation. Follow the entire drainage route. A clean gutter still fails if the downspout empties beside the wall or a buried outlet is blocked.
For an absence lasting more than a few days, consider shutting off the main water supply when that suits the property and its systems. Arrange a building check, especially where a sump pump, air-conditioning system, or irrigation connection could fail without anyone present.
Fall
Remove leaves from gutters and roof valleys before wet weather begins. Inspect exterior faucets and hoses, disconnect hoses, and confirm that outdoor supply lines can drain. Test the sump pump and clear its discharge route.
Inspect exposed pipes in garages, crawl spaces, attics, and other unconditioned areas. Insulation helps retain heat, but it cannot replace a working heat source or protect a pipe exposed to sustained cold. Repair gaps, drafts, and damaged insulation before freezing conditions arrive.
Winter
For frozen-pipe prevention, keep the thermostat at 65°F or above day and night when temperatures fall to 32°F or below, open interior doors so warm air can circulate, and drain and shut off outdoor water supply lines, as recommended by this independent frozen-pipe prevention advisory.
Open cabinet doors where warm air must reach plumbing, and check rooms that are rarely occupied. If a pipe starts freezing, locate the main shutoff before applying heat. Careless heating can damage the pipe and trigger a sudden release at the weakened section. Pair seasonal checks with a written roof-to-foundation route, because one blocked or disconnected segment can defeat otherwise sound maintenance.
Managing Emergency Response and Mitigation
Water damage becomes harder to control with every delayed decision. Follow a fixed order: protect people, stop the source, isolate hazards, document conditions, then begin controlled mitigation.
Keep away from electrical equipment and contaminated water. If an active leak is safe to approach, close the main water valve. Insurance guidance on burst pipes identifies shutting off the main valve as the fastest way to stop water flow through the plumbing system.
Identify the source before moving water around. It may be a supply line, drain, appliance, roof breach, groundwater intrusion, or sewer backup. Stop using nearby fixtures until the source is clear. If contamination is possible, do not use household fans or a wet vacuum, because they can spread contaminated material through the building.
The first response sequence
- Shut off water: Use the fixture valve for a localized failure. Use the main valve when the leak is active or its location is uncertain.
- Address electricity: Have a qualified person disconnect power in affected areas if water has reached wiring, outlets, appliances, or other electrical equipment.
- Remove movable contents: Move furniture, rugs, boxes, and electronics out of the wet area, placing them somewhere dry.
- Document before demolition: Photograph the source, affected rooms, damaged materials, contents, and visible water paths before removing anything.
- Start safe drying: Remove clean standing water and increase air movement only after electrical and contamination risks are controlled.
- Call a restoration professional: Request moisture mapping, extraction, drying equipment, and readings that verify the structure is drying. Use this emergency water damage repair guidance to define the response you need.
Take safe basic action without waiting for a contractor. The EPA drying guidance says wet or damp materials dried within 24 to 48 hours usually will not support mold growth, while materials wet for more than 48 hours may already have mold growth.
Know what not to save
Porous materials that absorbed contaminated water may need removal. Do not seal wet drywall, paint over stains, or close a wall cavity until moisture readings confirm it is dry. These shortcuts conceal moisture and make later repairs harder to diagnose.
Keep damaged materials and receipts when practical, and notify your insurer promptly. Coverage depends on the policy, source, exclusions, and endorsements. Document the condition, and avoid assuming which costs will be paid.
Engaging Vetted Professionals for Repairs
Loose gutter connections are manageable maintenance tasks. Hidden moisture in framing, failed roof-to-wall transitions, contaminated water, structural deterioration, and burst supply lines require qualified professionals. Choose based on the failure point, not on who answers first.
A poor hire can leave the problem active. A technician who removes visible water without mapping moisture may leave wet insulation behind. A roofer who applies sealant without repairing flashing can send the next storm into the same wall. A plumber who replaces a valve without inspecting the surrounding connection may leave the cause untouched.
Ask for proof, not promises
Before work begins, verify an active license where required, insurance, relevant experience, and a written scope. Ask who will perform the work, which equipment and measurements they will use, how progress will be documented, and how hidden damage will be handled.
Restoration work should cover source control, extraction, moisture mapping, controlled drying, and final verification. Roofing proposals should explain the water path, flashing, penetrations, and discharge points. Plumbing proposals should identify the failed component and the conditions that caused it.
A lead marketplace may send your details to several businesses, creating competing calls without showing who was screened. An exclusive match provides clearer accountability when the platform verifies the professional first and passes along the project context.
Damage restoration companies should be judged by qualifications, documentation, and process, not response speed alone. Hand Vetted Co. matches a homeowner with one licensed, background-checked professional whose business has 4.5+ star ratings, recent rating volume, and a final human review. The request stays exclusive instead of being distributed to multiple businesses.
Before signing: Put the water source, repair scope, drying plan, documentation process, and payment terms in writing.
Simple maintenance is suitable for homeowners. Concealed moisture, structural materials, and recurring roof-to-foundation drainage failures need experienced inspection and repair. Hire early, ask direct questions, and require readings or other records showing the structure is dry and the drainage path has been corrected.
Hand Vetted Co. connects homeowners with one exclusive, verified professional for water damage repair, restoration, roofing, and related home projects. For help after a leak or an assessment of recurring moisture, visit Hand Vetted Co. and submit your project details.