You’re probably staring at saved photos, rough ideas, maybe a contractor name from a neighbor, and a growing feeling that the project is already getting messy before anything has started. That’s normal. Most renovations don’t go sideways because demolition was hard. They go sideways because the planning was thin, vague, or built around wishful thinking.
A real home renovation project planner fixes that. It gives you a written scope, a budget that can survive reality, a sequence that respects how construction works, and a communication system that keeps decisions from drifting. The financial stakes are no longer small. The average median spend on a single home renovation project reached $24,000 in 2023, a 60% increase from 2020, according to home renovation statistics published by the University of South Alabama. At that level, “we’ll figure it out as we go” is not a strategy.
Table of Contents
- Your Renovation Starts Here Not with a Sledgehammer
- Phase 1 Defining Your Vision and Scope
- Phase 2 Building Your Realistic Budget
- Phase 3 Mapping Your Project Timeline
- Phase 4 Assembling Your Team The Right Way
- Phase 5 Managing Project Communication
- Your Actionable Next Steps
Your Renovation Starts Here Not with a Sledgehammer
The usual pattern is easy to spot. You start with one room. Then you realize the flooring should connect to the hallway. Then the lighting looks dated. Then someone opens a wall and finds something that changes the job. What felt like a clean update turns into a chain reaction.
That’s why the planning phase carries so much weight. Construction only exposes the decisions you didn’t make clearly enough upfront.

Why projects fail before demo starts
Those undertaking renovations don’t begin with bad intentions. They begin with partial information. They know the look they want, but not the full scope. They know the total they’d like to spend, but not the line items that will compete for that money. They know the finish date they hope for, but not the task order needed to get there.
Practical rule: If a stranger can’t read your plan and explain exactly what is being changed, what stays, and what depends on what, you don’t have a plan yet.
A useful home renovation project planner closes the gap between idea and execution. It answers basic but costly questions early. Are you replacing or relocating plumbing fixtures. Are you keeping existing windows. Who is selecting finishes. What requires permits. What has to be ordered before demo starts.
What a planner actually needs to do
A solid planner isn’t a decorative binder. It’s a control system. At minimum, it should hold these working parts:
- Defined scope: Room-by-room notes on what gets removed, repaired, replaced, or left alone.
- Decision log: Product selections, finish choices, and any unresolved items that could stall work.
- Budget structure: Labor, materials, permits, and soft costs in separate buckets.
- Timeline logic: Dependencies, milestones, approvals, and long-lead purchases.
- Communication rules: Who approves changes, how updates happen, and where documents live.
People often resist this because it feels slower. It isn’t. Front-loading decisions is what prevents weeks of drift later.
The jobs that run best usually feel boring on paper before they feel exciting in person. That’s a good sign. Boring planning produces calmer construction.
Phase 1 Defining Your Vision and Scope
Your saved inspiration isn’t useless. It’s just incomplete. Photos tell you what you like. They don’t tell a professional what to build, what to price, or what to protect during the work.
The first job of a home renovation project planner is to convert taste into scope. That means writing down every intended change, then ranking it by function first. A detailed inventory of all desired changes should come before style decisions, and projects should be prioritized by immediate needs and budget constraints rather than aesthetics, according to Buildertrend’s renovation planning guidance.
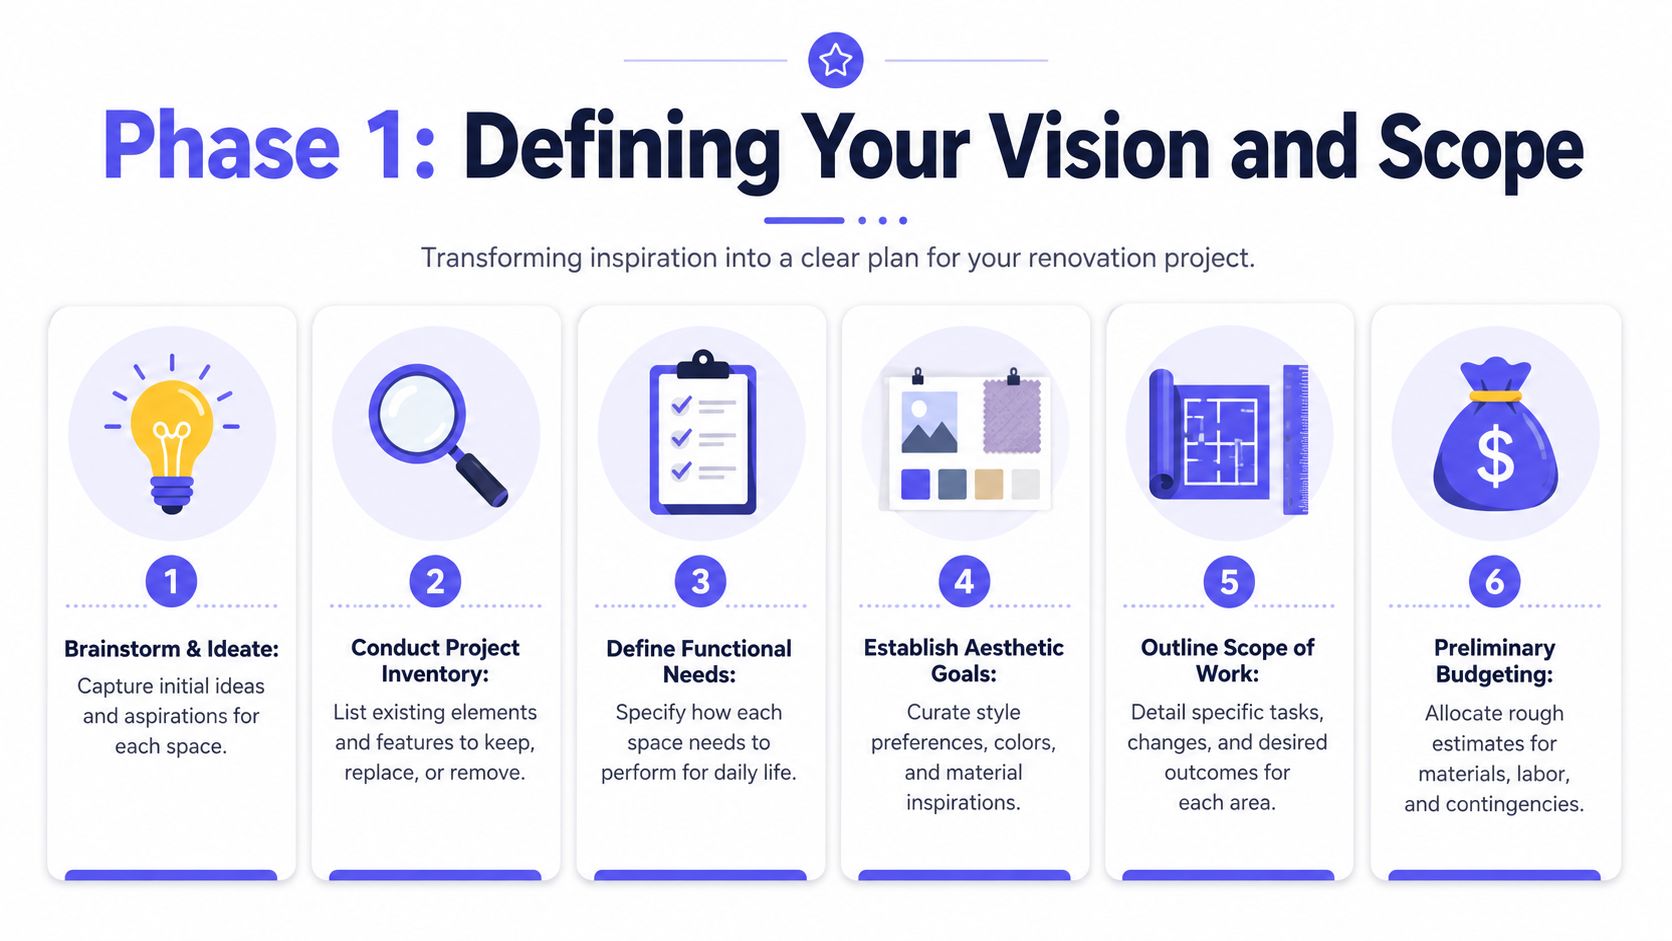
Turn inspiration into a written scope
Start with a simple room-by-room inventory. Use a spreadsheet, a Notion board, or a printed checklist. The tool matters less than the discipline.
Create three columns for every room or project area:
- Must-have
- Nice-to-have
- If budget allows
That sorting forces trade-offs early, where they belong. If the bathroom layout fails daily use, fix that before spending money on upgraded decorative finishes. If the kitchen has workflow problems, solve those before chasing statement lighting.
A practical scope document should also include:
- Existing conditions: What’s broken, outdated, unsafe, or awkward to use.
- Functional goals: Better storage, easier cleaning, improved lighting, more usable layout.
- Aesthetic direction: Cabinet style, tile mood, paint family, hardware finish.
- Non-negotiables: Items you won’t cut even if pricing comes back high.
If you’re planning a bathroom, a focused checklist helps you catch the details people forget, from fixtures to ventilation to finish coordination. This bathroom remodel checklist is a useful model for tightening the scope before pricing starts.
Build a scope that a pro can price and execute
The difference between a vague plan and a workable one is specificity. “Update kitchen” is vague. “Replace cabinets, keep appliance locations, add under-cabinet lighting, tile backsplash to underside of uppers, patch and paint adjacent dining wall” is workable.
The tighter your scope is before the first call, the less time you’ll waste revisiting the same decisions under pressure.
Include a separate “vision notes” page. Keep it short. On this page, define the overall look you want so every selection can be checked against it later. Without that anchor, projects drift. You end up approving good-looking pieces that don’t belong together.
A strong scope does one more thing. It gives you something to trim if pricing comes in high. Without tiers and categories, every cut feels emotional. With them, you can remove decorative upgrades first and protect the functional core of the project.
Phase 2 Building Your Realistic Budget
Bad renovation budgets usually fail in one of two ways. They’re too simple, or they’re too optimistic. A single top-line number sounds neat, but it hides the exact places where overruns start.
A planner needs a budget framework, not a guess. It also needs a contingency fund of 10-15% set aside for the unknown. That buffer matters because 90% of renovation projects exceed their initial budget without it, according to Matterport’s home renovation checklist.
Stop budgeting with one big number
Break the budget into categories that reflect how money moves on a project. That means separating labor from materials, permits from finishes, and known work from contingency.
Use categories like these:
- Labor: Demolition, framing, electrical, plumbing, drywall, tile, paint, finish carpentry
- Materials: Cabinets, flooring, tile, fixtures, hardware, countertops, trim
- Permit and inspection costs: Local approvals, review fees, closeout items
- Soft costs: Design work, drawings, waste hauling, temporary storage, delivery charges
- Contingency: Reserved funds for hidden conditions or approved changes
If you’re still figuring out how the project will be funded, this guide to home improvement financing options helps you compare paths before you lock the scope.
Here’s a simple format that works.
| Item/Task | Category | Estimated Cost | Actual Cost | Notes |
|---|---|---|---|---|
| Demo | Labor | Include haul-away | ||
| Cabinets | Materials | Confirm lead time | ||
| Electrical permit | Permit | Check local requirements | ||
| Tile install | Labor | Include prep work | ||
| Faucet and sink | Materials | Owner-supplied or pro-supplied | ||
| Contingency fund | Reserve | Held for unknowns |
Use a budget tracker you can update weekly
A budget only works if it stays live. Static spreadsheets die fast once invoices, substitutions, and add-ons start rolling in.
Use a running log with three status labels:
- Committed: You approved it, even if it hasn't been paid in full yet.
- Paid: Money has left your account.
- Pending decision: You know it's coming, but the amount can still move.
Budget stress usually shows up late because no one tracked committed costs early enough.
One more rule matters. Separate the contingency from your operating budget. Don't use it to make the nicer tile upgrade work. Hold it back for what you didn't see coming. When a wall opens up and the project changes, you'll be glad that reserve still exists.
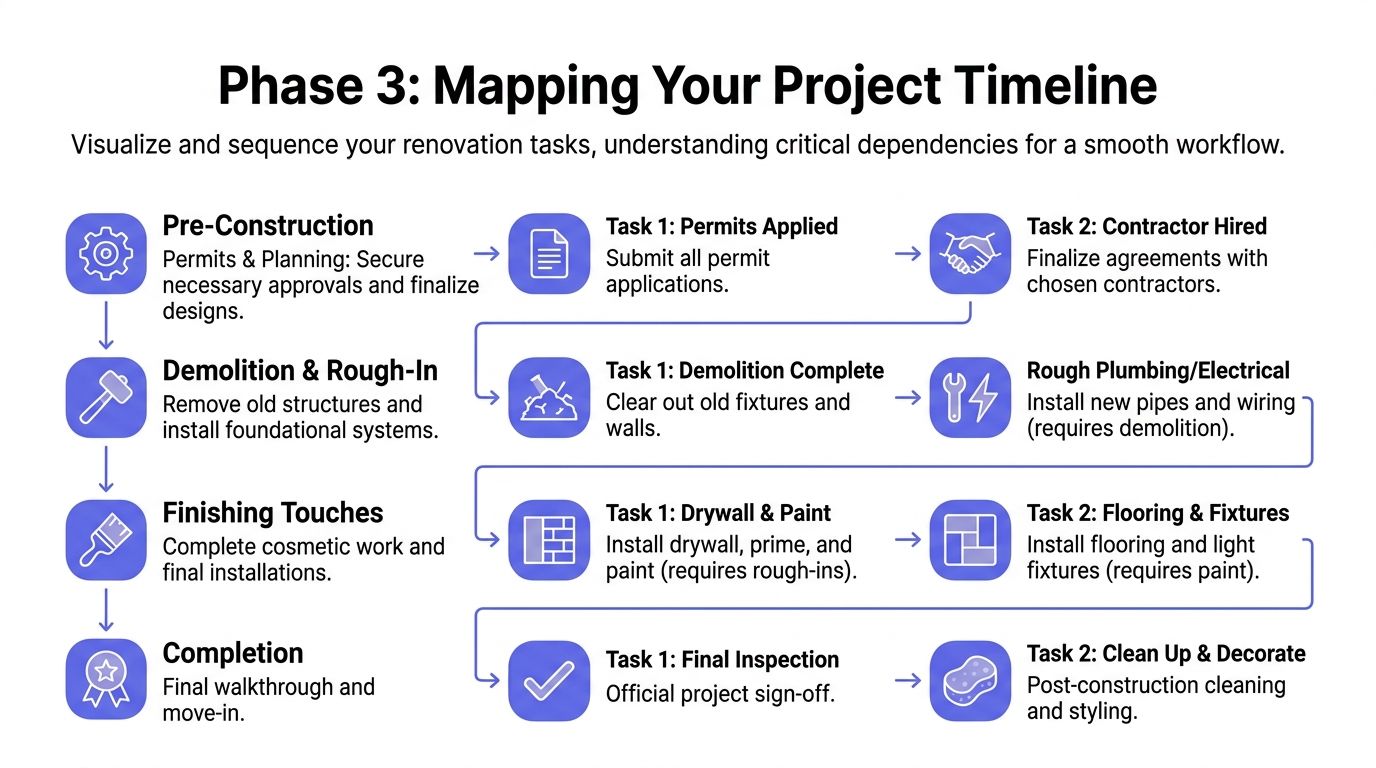
Phase 3 Mapping Your Project Timeline
People tend to treat renovation timelines like regular calendars. They aren't. Construction is a dependency chain. One task enables the next, and if the order is wrong, the whole job starts doubling back on itself.
That's why sequencing matters more than ambition. A planner should build the timeline around task relationships, not around a desired finish date.
Sequence beats speed
A critical technical standard for a planner is adding a 10-15% schedule buffer to the timeline, especially around demolition, structural work, and rough-ins. That matters because 60% of renovation delays stem from poor sequencing of tasks rather than material shortages.
The practical version looks like this:
- Demolition happens before rough plumbing and electrical
- Rough-ins happen before insulation and drywall
- Drywall and paint happen before flooring and finish fixtures
- Final trim, punch work, and inspection happen near the end, not squeezed into the middle
People create rework when they ignore that order. Installing floor finishes too early is a classic mistake. So is locking in cabinetry before confirming field dimensions after demolition.
Build milestones instead of vague target dates
Don't anchor the whole project to one finish date. Use milestones that prove the job is advancing properly.
Good milestones include:
- Design locked
- Permits submitted
- Long-lead items ordered
- Demolition complete
- Rough-in inspection passed
- Drywall complete
- Cabinets installed
- Substantial completion walkthrough
A timeline should also mark owner decisions. If you haven't selected plumbing fixtures, lighting, appliances, or tile by the date the professional needs them, the schedule is already under pressure.
A schedule isn't realistic if it assumes perfect decisions at the exact moment someone asks for them.
Build in procurement lead time before construction starts. If key items aren't selected and ordered early, the crew can end up ready to install products that haven't arrived. That's not bad luck. That's a planning miss.
Phase 4 Assembling Your Team The Right Way
Hiring often gets treated like a shopping exercise. Collect bids. Compare totals. Pick someone. That method sounds rational, but it creates its own mess when your scope is still loose.
The bigger issue isn't just price variation. It's that different people will interpret a fuzzy project in different ways. Then you compare numbers that were never based on the same assumptions.
The planning mistake most people make
Most renovation planners are built around managing several businesses at once. That's useful if your main problem is sorting through a crowded field. It's less useful if your real problem is getting the scope precise enough for one strong professional to execute cleanly.
That gap matters. 68% of delays stem from scope creep and misaligned expectations, which is exactly why thin planning becomes dangerous when you want one point of contact instead of a rotating cast of bidders.
Here's what doesn't work well:
- Loose briefs: Different interpretations create confusion before work even starts.
- Endless estimate revisions: Every unclear item comes back as a follow-up question.
- Decision-by-sales-pitch: You start comparing personalities instead of scope discipline.
A tighter process works better. You define the scope first, then give one professional a document they can react to clearly.
What to hand your professional before work starts
Before the first serious pricing conversation, prepare a single package:
- Scope of work: Room-by-room changes and exclusions
- Selections list: What's chosen, what's undecided, and who supplies each item
- Site constraints: Occupied home, access limitations, work hours, parking, pets
- Decision priorities: Where you'll spend, where you're willing to simplify
- Known risks: Old wiring, prior leaks, suspected hidden damage, permit concerns
If you're evaluating any professional, verification still matters. This overview of a contractor background check is a smart baseline for what should be confirmed before you let anyone near a serious project.
The goal isn't to manage a circus. It's to create one shared understanding. When that document is clean, collaboration gets easier, pricing gets more grounded, and fewer surprises get blamed on “miscommunication.”
Phase 5 Managing Project Communication
Once work starts, your planner becomes an operating document. If it just sits in a folder, the project will drift back toward memory, hallway conversations, and last-minute text messages. That's where small misunderstandings become expensive ones.
Good communication isn't constant. It's structured.
Set a communication rhythm early
Pick one update rhythm and stick to it. Weekly usually works well for most renovations. The point is consistency, not volume.
A simple meeting agenda keeps the conversation useful:
- Work completed since the last check-in
- Work scheduled next
- Decisions needed from you
- Problems or risks that need action
- Budget impact from approved or pending changes
Keep these updates in one place. A shared Google Drive folder, a project board in Trello, or a single email thread works better than scattered texts. If the project is larger, a written summary after each check-in helps everyone stay aligned.
If a decision affects cost, scope, materials, or schedule, it needs to be written down before anyone acts on it.
Treat every change like a mini project
Changes aren't failures. Undocumented changes are.
Use a simple change order process every time you alter something after the original scope is approved. That can be a formal template or a short written summary, but it should always answer the same questions:
- What is changing
- Why it's changing
- What it adds or removes from the scope
- How it affects cost
- How it affects timing
- Who approved it and when
Here's a script that works:
We're changing the backsplash selection from ceramic to stone mosaic. Please confirm the material cost difference, any labor change, and whether this affects the install date before ordering.
And one for schedule risk:
I'm fine delaying this decision until Friday if that doesn't push rough-in, cabinet install, or another dependent task. If it does, tell me the consequence now so I can decide with the full picture.
That level of clarity sounds formal, but it saves relationships. It also saves the project from death by a hundred small “quick changes” that no one priced or sequenced properly.
Your Actionable Next Steps
A home renovation project planner only earns its keep if it turns uncertainty into decisions. By this point, you should have four concrete deliverables, not just a folder of inspiration and a vague budget target.
Your renovation planning checklist
Make sure you can put your hands on each of these today:
- Written scope: Room-by-room work list, priorities, exclusions, and essential elements
- Live budget: Estimated costs, committed costs, actual costs, and a separate contingency line
- Working timeline: Task order, dependencies, milestones, and decision deadlines
- Communication plan: Weekly check-in structure, document storage, and change-order rules
If one of those is missing, that's the next task. Don't jump ahead to pricing, demolition, or product ordering just because it feels productive.
What to do this week
Use this sequence to get moving without creating chaos:
- Day one: List every intended change, then sort it into must-have, nice-to-have, and can-wait.
- Day two: Build the first pass of your budget. Include labor, materials, permits, soft costs, and contingency.
- Day three: Map the order of work. Mark items that must be selected before construction starts.
- Day four: Pull all project documents into one place and clean up your notes so someone else can use them.
- Day five: Get ready to share that package with a qualified professional.
The best renovations usually don't start with momentum. They start with restraint. You slow the project down just long enough to define it properly, and that's what lets it move faster later.
If you've done the prep, the next step is simple. Put your planner in front of the right pro and let the job start from clarity instead of confusion.
If you want one verified match instead of a pile of shared leads, Hand Vetted Co. is built for that. You answer a few project questions, and Handvetted matches you with one licensed, background-checked, highly rated professional. If you want to understand the process first, their How It Works, Our Standards, and FAQ pages are the right place to start.