You're probably staring at an old ceramic tile floor that looked fine once, but now just feels dated, cracked, loose, or impossible to clean. The part people underestimate isn't getting the first tile up. It's the dust, the noise, the thinset left behind, and the moment you realize the floor underneath may be in worse shape than the tile itself.
If you want to know how to remove ceramic tile floor the right way, think of it as controlled demolition. A small area can be doable. A large area with stubborn mortar, damaged subfloor, or tight indoor dust control can turn into a miserable weekend fast.
Table of Contents
- Planning Your Attack and Deciding DIY vs Pro
- Essential Prep Work and Safety Gear
- The Removal Process Manual vs Powered Methods
- Tackling Leftover Thinset and Preparing the Subfloor
- Cleanup Disposal and Solving Common Problems
- When to Skip the DIY and Hire a Professional
- Frequently Asked Questions About Tile Removal
Planning Your Attack and Deciding DIY vs Pro
The decision to DIY this job comes down to four things: how the tile was installed, what is underneath it, what tools you can realistically use, and whether you can afford to stop mid-project if the floor opens up bigger problems.
A lot of homeowners get tripped up here. The tile itself is only the first layer of the job. The real question is whether you can remove it without wrecking the subfloor, losing a full weekend to hand chiseling, or uncovering damage you are not ready to repair.
Know what the job really costs
Hiring a crew costs real money, but DIY has its own price. You still need tools, cleanup time, disposal plans, and enough flexibility in your schedule to deal with surprises. If the tile releases cleanly, doing it yourself can make sense. If it is bonded hard to the underlayment or the subfloor comes up with it, the savings shrink fast.
Subfloor repair is the budget breaker. A floor that feels solid from above can hide water damage around a toilet, cracked underlayment, loose cement board, or plywood that delaminates once the tile starts coming off. That is the point where a cheap demo job turns into a floor rebuild.
Before demo, map the whole project, not just the tear-out. A tool like this home renovation project planner helps you track the removal, debris hauling, repair allowances, and what the next floor needs from the surface underneath.
Decide based on floor conditions, not optimism
Start with a test area near a doorway, floor vent, or transition where you can get a tool under the edge. That small opening tells you a lot. If tiles pop loose in pieces with the thinset staying mostly on the substrate, the job is usually manageable. If the tile, mortar, and underlayment want to come up together, slow down and reassess.
The next decision is manual or powered removal. Do not choose based on what looks tougher. Choose based on control.
Manual tools make more sense when:
- The room is small: Bathrooms, laundry rooms, and short entry runs are easier to manage by hand.
- You need precision at edges: Cabinets, tubs, door jambs, and flooring you plan to keep nearby all benefit from slower work.
- You are testing an unknown floor: A hammer and chisel reveal how the assembly is built without committing to aggressive demolition.
Powered tools make more sense when:
- The tile is bonded hard and the area is large: A rotary hammer with a tile chisel saves hours of exhausting work.
- Production speed matters: Open kitchens and long runs punish anyone trying to do the whole job with hand tools.
- You already know the subfloor can take it: Powered tools are faster, but they can also gouge plywood, break weak underlayment, and shake loose more than you intended.
There is a trade-off every DIY guide should be honest about. Manual removal is slower but gives you better feedback from the floor. Powered removal is faster but less forgiving. If you cannot tell when a chipping hammer is starting to chew into the layer you need to keep, you can create repairs that were not there when you started.
Know when the floor is telling you to stop
Some warning signs mean "work carefully." Others mean "call somebody."
Pause the DIY plan if you find:
- Soft or dark subflooring: That often points to past moisture intrusion or rot.
- Cracked slab movement: If the tile came loose because the slab is moving, new flooring will fail too unless the cause is addressed.
- Several old layers: Tile over vinyl, cement board over damaged plywood, or patchwork repairs usually turns removal into reconstruction.
- A shower, toilet, or exterior door area with hidden damage: Those spots are notorious for trouble.
- Possible asbestos in older sheet flooring below the tile: Stop until you know what you are dealing with.
My rule is simple. If the test area shows more repair than removal, the project has changed. At that point, hiring a pro is often cheaper than pushing ahead, damaging the subfloor further, and paying for corrective work after the fact.
DIY tile removal works best when the space is limited, the floor assembly is straightforward, and you are prepared for a dirty, physical job. It stops being a smart weekend project when the first few square feet reveal structural movement, water damage, or a floor system you cannot confidently put back together.
Essential Prep Work and Safety Gear
Bad prep ruins this job faster than bad technique. Once tile starts breaking, sharp pieces and fine dust go everywhere.
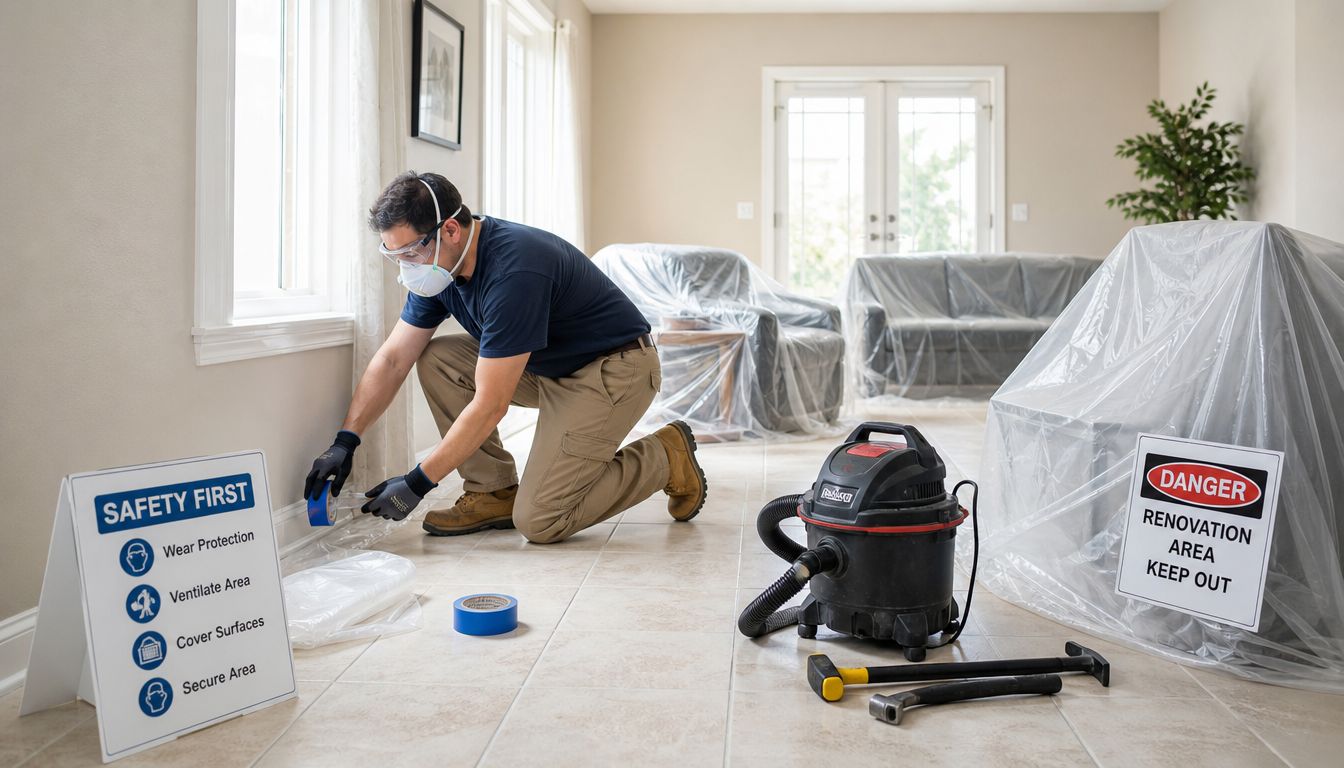
Seal the space before you break a tile
For dust control, the basics are not optional. Cover interior doorways and vents with plastic sheeting and painter's tape, open windows, and turn off the furnace and AC completely so dust doesn't circulate through the home, as outlined in Apollo Tile's step-by-step tile floor removal guide.
Do that before tools hit the floor. Not after the first few tiles. Not once the room already looks foggy.
A clean containment setup usually includes:
- Doorway isolation: Tape plastic over openings so dust stays in the work zone.
- Vent protection: Cover supply and return vents in the room. Dust in HVAC is a long, annoying problem.
- Window ventilation: Open windows to give airborne dust somewhere to go other than the hallway.
If the room connects directly to carpeted areas or occupied living space, add a path for debris removal. Broken ceramic tile has a way of spreading grit through the house one boot print at a time.
Wear gear that matches the mess
People often treat tile removal like general demo. It's rougher than that. Shards are sharp, edges are unpredictable, and the floor fights back.
At minimum, use:
- Eye protection: Flying chips are common when tile fractures suddenly.
- Gloves: Heavy-duty work gloves save your hands when lifting broken pieces and handling scraper blades.
- Respiratory protection: Fine dust is part of the job, even with containment.
- Long sleeves and durable pants: Ceramic fragments will slice exposed skin.
Don't trust a calm-looking room. The first cracked tile changes the environment immediately.
One more prep step that gets skipped too often is clearing the room completely. Remove trim you plan to save. Take off doors if they'll block debris removal. Pull toilets, vanities, or appliances only if you know how to disconnect and reset them safely. Working around fixed obstacles slows the job and raises the chance of damage.
The Removal Process Manual vs Powered Methods
The first few tiles decide the whole job. If they pop loose in chunks with moderate effort, hand tools can carry you a lot farther than you might expect. If they shatter into sharp pieces and stay welded to the floor with hard thinset, stop pretending it is a small demo job and switch to power before you waste your back and half your Saturday.
Manual removal for small areas and careful work
Hand removal works best when the room is small, the tile is already loose in spots, or you need tight control near cabinets, tubs, thresholds, or plumbing. The basic kit is simple: scoring tool, center punch, cold chisel, hammer, pry bar, and floor scraper. Home Depot's tile removal guide outlines the standard method of scoring the tile, then breaking it into smaller sections so you can get under it and start lifting.
Manual work gives you feel. You can tell whether the tile is bonded to cement board, stuck directly to plywood, or hiding a weak patch that is about to come apart with it.
Use manual tools when:
- the area is small enough that tool rental makes no sense
- you are removing a few damaged tiles or a limited section
- the room has fragile edges you cannot afford to hit
- you want to test the bond before bringing in heavier equipment
The trade-off is speed. Manual removal gets ugly fast on well-bonded floors. Kneeling, swinging, prying, and scraping for hours is what wears people down, not the first ten minutes when everything still feels manageable.
Powered removal for speed and stubborn installs
A demo hammer with a tile chisel is the right move once the floor proves it wants a fight.
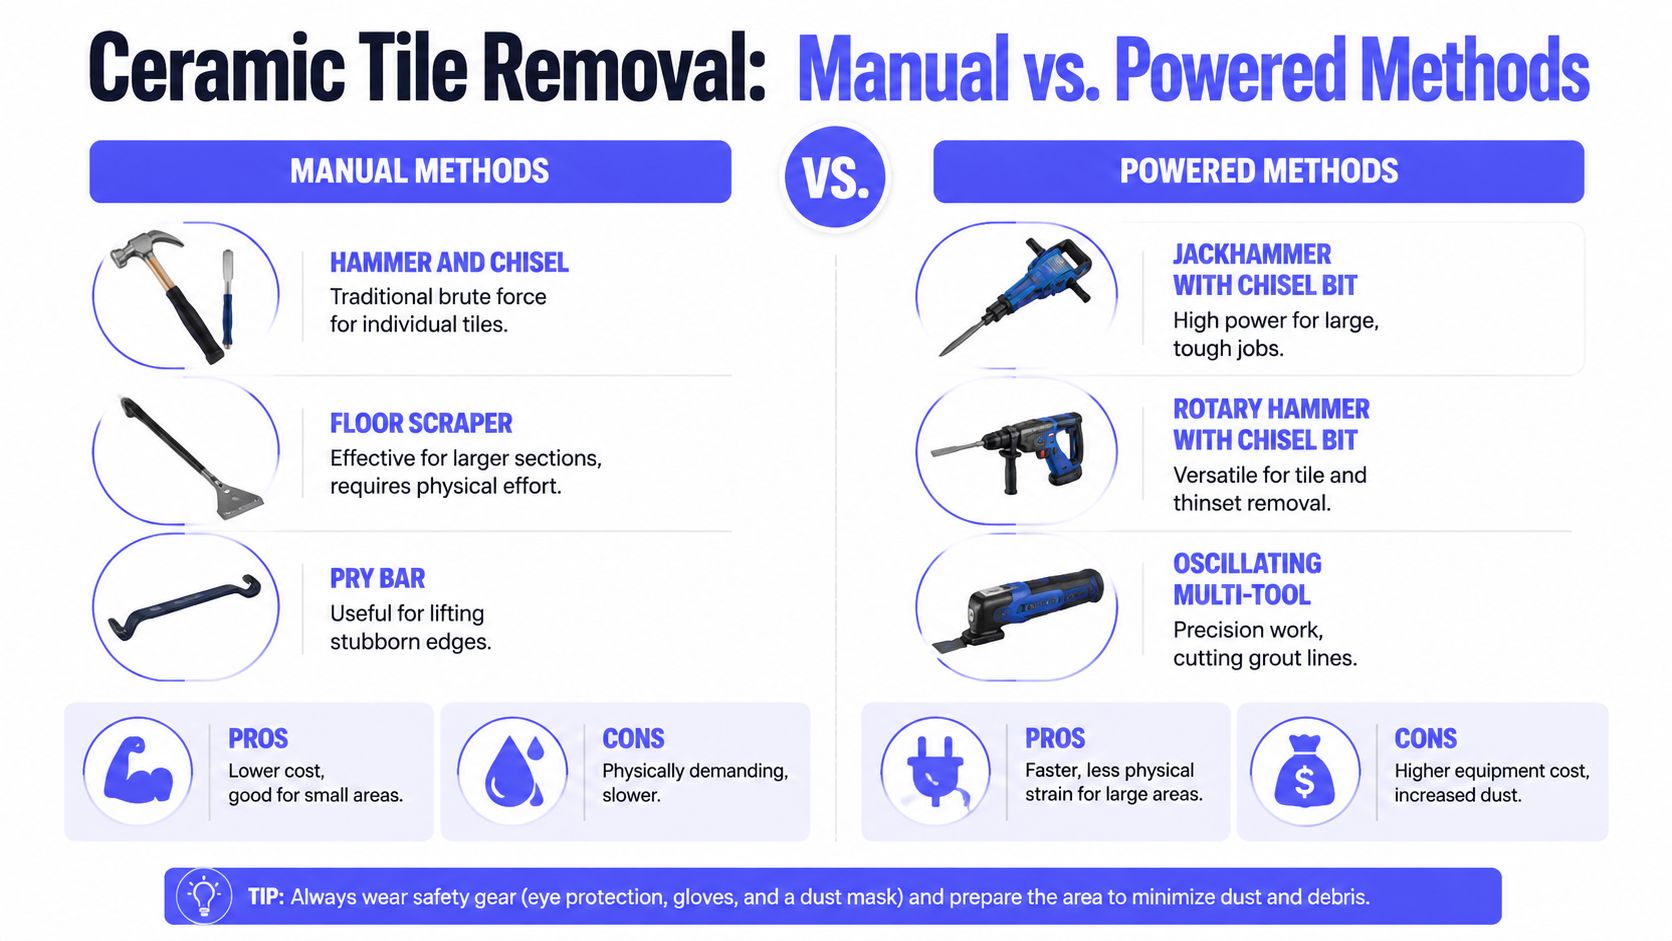
Powered removal makes sense on larger rooms, tile set in strong thinset, and jobs where the tile runs under appliances, into a hallway, or across a kitchen. It removes more material with less strain on your shoulders and wrists. It also raises the risk of damaging the layer underneath if you hold the tool at the wrong angle or get impatient near the perimeter.
What power tools do well:
- remove tile faster once you have an opening to work from
- get under hard-bonded tile better than a hand chisel
- reduce the repeated impact that beats up your elbows and knees
What they do poorly:
- work cleanly around door jambs, tubs, and cabinet toe kicks
- forgive bad technique on plywood or questionable underlayment
- tell you when the subfloor has started failing underneath the tile
That last point matters. If the chisel starts pulling up chunks of plywood, delaminating underlayment, or exposing black mastic, this can turn from tile removal into subfloor replacement very quickly. At that point, the smarter call may be to stop and price the repair before you keep tearing. If the tile was installed over a wood floor you plan to save, review what hardwood floor restoration involves before you keep chiseling through layers you may regret losing.
A side-by-side decision guide
| Method | Best for | Main upside | Main drawback |
|---|---|---|---|
| Manual hammer and chisel | Small rooms, spot repairs, delicate edges | Better control and lower upfront cost | Slow, tiring, and rough on your body |
| Floor scraper and pry bar | Loosened sections and follow-up cleanup | Good for lifting what has already broken free | Struggles on tightly bonded tile |
| Demo hammer with tile chisel | Larger areas and stubborn installations | Faster progress and less arm fatigue | Easier to gouge subfloor or damage nearby finishes |
A practical way to choose is to open one section by hand first. Start in a doorway, heat register cutout, broken corner, or any place where the tile edge is easier to reach. Watch what comes up with it. If you are getting whole tiles or large pieces and the substrate stays intact, keep going manually. If every strike creates shards, leaves thick mortar ridges, or starts chewing up the floor below, bring in a demo hammer or call a pro before the repair bill grows.
Here is the line I use on real jobs. If the removal rate is slow, the bond is strong, and the subfloor starts coming apart before the tile does, the project is no longer just tile removal. It is demolition and rebuild. That is where a lot of DIY attempts go sideways.
Tackling Leftover Thinset and Preparing the Subfloor
Removing tile is only the first half. The second half is what determines whether your next floor goes in flat or turns into another problem.
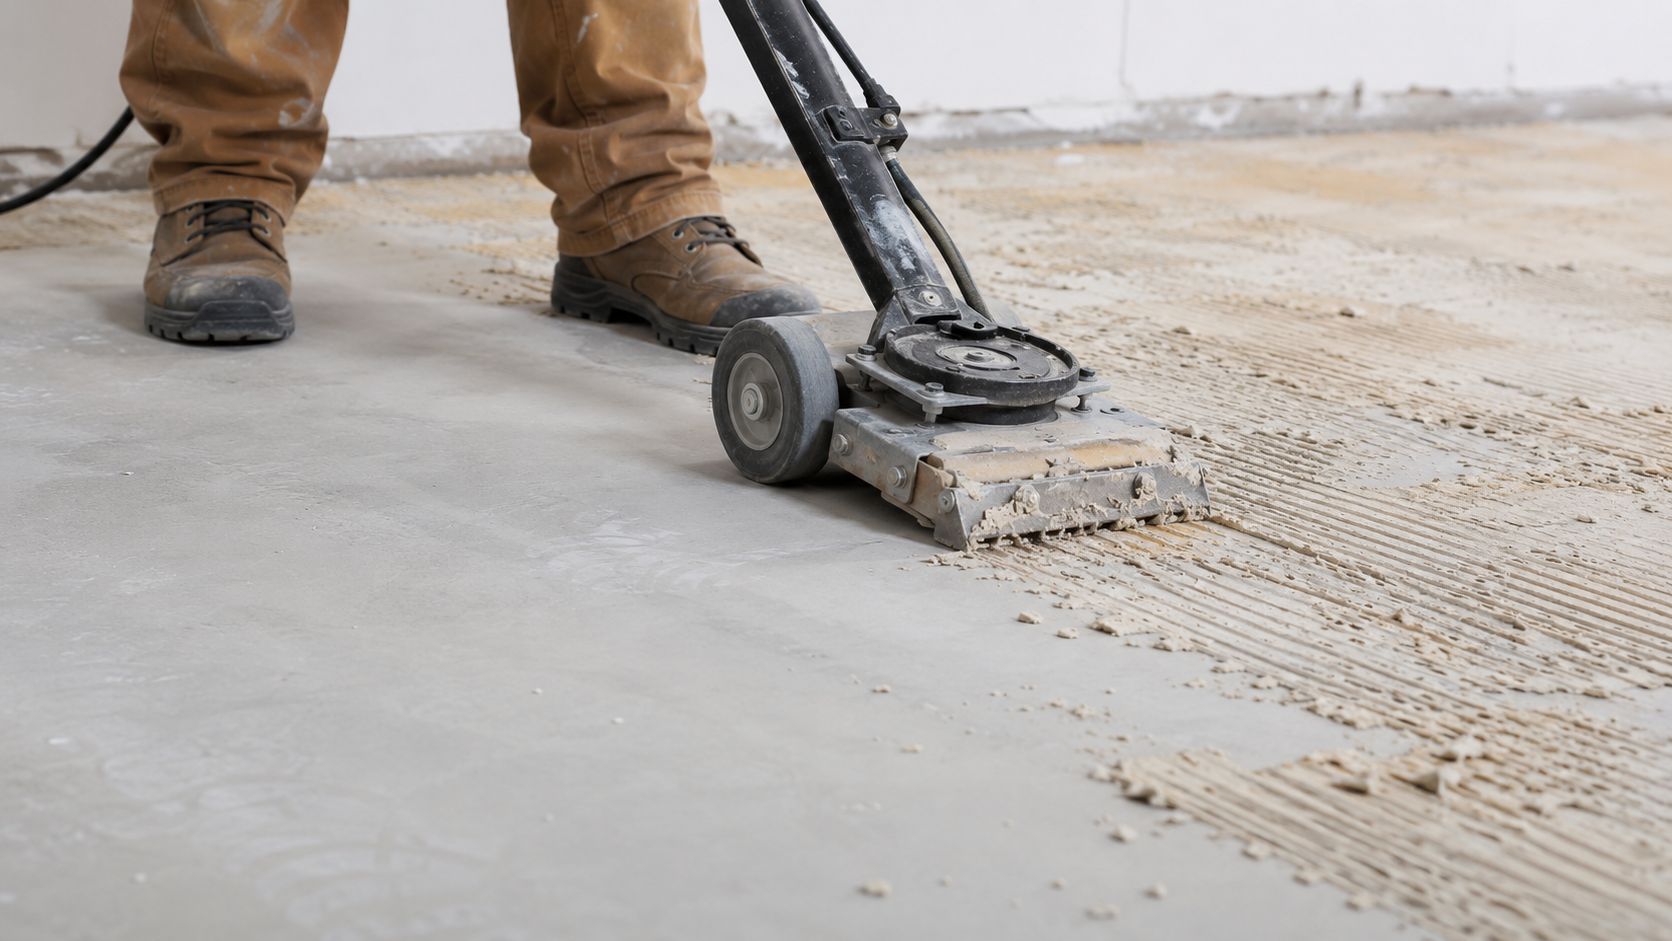
Get the floor flat, not just clean
Old thinset, adhesive ridges, and chipped mortar need to come off. If you leave high spots, your new flooring will telegraph them. That applies whether the replacement is new tile, engineered wood, or another finish that needs a stable base.
For smaller areas, a heavy-duty floor scraper and hand chisel can do the job. On concrete, stubborn thinset may need more aggressive grinding. On plywood, the goal is different. You're trying to remove residue without chewing up the surface so badly that the subfloor becomes unusable.
The mistake people make here is stopping when the floor “looks mostly fine.” Mostly fine isn't flat. Run your scraper across the surface. Feel for ridges, divots, and sharp transitions. If your blade catches, your next flooring installer will catch it too.
Check what the tile was hiding
Once the floor is exposed, inspect it like you're buying the house from yourself.
Look for:
- Soft or dark areas in wood: Those often point to moisture damage.
- Delamination in plywood: Layers separating means the panel has lost integrity.
- Cracks or spalled spots in concrete: Minor issues may be workable, but they still need attention.
- Fastener movement or squeaks: Movement under a rigid floor is never a good sign.
If the damage goes beyond surface cleanup, the job changes from demolition to repair. For wood floors that may need refinishing, patching, or replacement strategy, it helps to understand what a proper finished floor requires. That's where a service page like hardwood floor restoration can help you compare whether you're repairing a substrate for new flooring or preserving an existing finished wood surface.
A good subfloor prep result is boring. Flat, solid, dry, and clean. That's what you want. If it still looks like a demolition site when the tile is gone, you're not ready for the next step.
Cleanup Disposal and Solving Common Problems
By this stage, the hard part feels finished. It usually is not. The room is full of sharp fragments, thinset dust, and bags that get heavy faster than expected. Cleanup is where a lot of DIY jobs turn sloppy, and sloppy cleanup creates injuries, cracked baseboards, and dust all through the house.
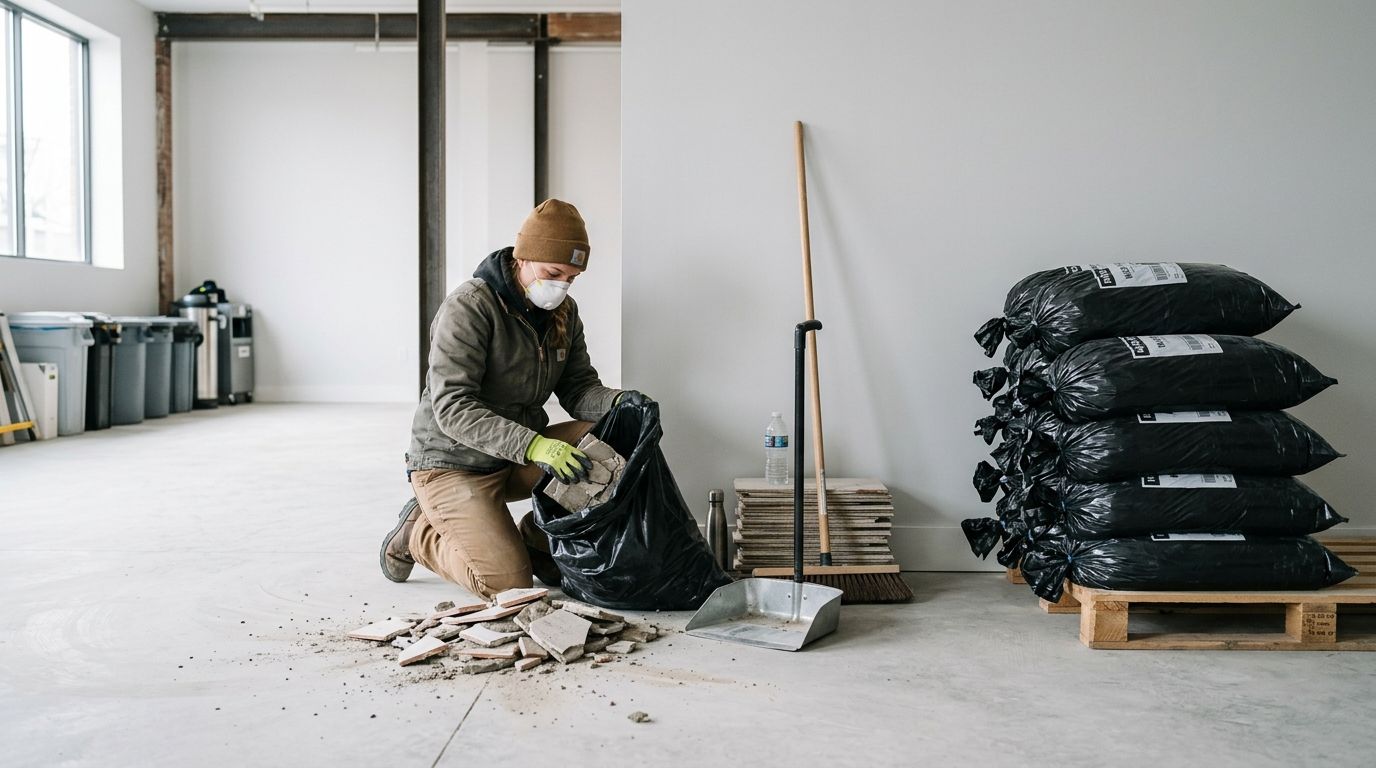
Get the debris under control early
Broken tile is dense and razor sharp. One overloaded bag can split open on the way out the door or throw your back out before you reach the truck.
Use small, manageable loads. Buckets work well for sharp chunks. Heavy contractor bags are fine for lighter debris and dust, but do not stuff them full of tile. If you are carrying debris through finished parts of the house, lay down plywood, cardboard, or drop cloths first. Ceramic chips scratch hardwood and crack trim corners without much effort.
A cleanup routine that works on real jobs looks like this:
- Clear as you go: Keep a path to the door open so you are not walking over shards all day.
- Separate heavy debris from fine waste: Tile chunks, thinset scrapings, and dusty sweepings are easier to handle when they are not all mixed together.
- Sweep in stages: Large pieces first, then small chips, then dust.
- Vacuum at the end: A shop vac is for final pickup, not for swallowing piles of broken tile.
- Check local disposal rules before demo day: Some dump sites take construction debris easily. Others charge by weight or limit what homeowners can drop off.
As noted earlier, haul-away can add enough cost that some homeowners do their own disposal and hire out only the demolition. That split can make sense if the tile comes up cleanly and you have a vehicle that can handle the weight.
Solve the problems that show up mid-job
Tile removal rarely stays neat from the first row to the last. The test is knowing when to change tools and when to stop.
If a few tiles are stuck like they were welded down, switch tactics before you waste an hour fighting one spot. A hand chisel gives more control along edges and around vents, door jambs, and plumbing penetrations. A powered chipping hammer saves time in open areas, but it can also beat up the subfloor fast if you hold it too steep or stay in one place too long. The trade-off is simple. Hand tools are slower and safer. Powered tools are faster and less forgiving.
Watch for these common trouble spots:
- Tiles that shatter but will not release: Open the grout line and work from an exposed edge instead of pounding the center.
- Thinset ridges that keep grabbing the scraper: Change the blade angle or move to a heavier floor scraper. More force is not always the answer.
- Heat vents, toilet flanges, and supply lines: Slow down and switch to hand tools nearby.
- Dust getting out of the room: Stop and fix containment before you keep going. Fine tile dust travels farther than people expect.
Sometimes the floor tells you the job has changed. If you uncover widespread black staining, soft wood, loose panels, or cracked concrete that keeps breaking at the surface, demolition is no longer the only task. Repair is now part of the project.
That is also the point where it helps to reconsider whether DIY still makes sense. If you are going to hand the repair work to someone else, use the same caution you would for any in-home contractor and review a contractor background check guide before hiring.
A clean room helps you judge the next move. Ultimately, I would rather spend 20 extra minutes sweeping and inspecting than rush into another hour of demo and miss a damaged area that should have stopped the job.
When to Skip the DIY and Hire a Professional
There's a point where pushing through stops being tough and starts being expensive. That point usually shows up once the floor tells you what kind of job this really is.
The red flags that change the decision
Put the tools down and bring in a professional if you run into any of these:
- Widespread subfloor failure: Large soft areas, rot, structural movement, or severe deterioration mean the problem is no longer tile.
- Uncontrolled dust conditions: If the room can't be isolated well or sensitive occupants are in the home, proper containment matters more than saving labor.
- Tight spaces near valuable finishes: Custom cabinets, tubs, stone thresholds, and finished trim raise the cost of one bad swing.
- Physical limits: Extended kneeling, lifting, and repetitive impact work can wreck your back, shoulders, wrists, and knees.
- Utility risk: Floors around plumbing penetrations, toilets, or other sensitive areas often need slower, more experienced hands.
Why stopping early can save the project
A licensed pro doesn't just remove tile faster. They're also better at judging when the tile is the easy part and the subfloor is the main job.
If you're at the point where you need someone trustworthy, look for proof before you hand over access to your home. A background screening standard like the one explained in this contractor background check page gives you a better filter than a random search result or the cheapest bid.
The best reason to hire help isn't convenience. It's avoiding a bad chain reaction. One rushed demo can damage plumbing, gouge subfloor, contaminate the house with dust, and delay the new floor installation.
Frequently Asked Questions About Tile Removal
Can you remove one broken tile without removing the whole floor
Yes, sometimes. It's most realistic when the surrounding tiles are sound and you can isolate the damaged piece without cracking the neighboring ones. The trick is patience. Open the grout lines, break the tile inward, and remove it in small pieces instead of prying against adjacent tile.
What if the thinset won't come off
That usually means the hard part of the job starts after the tile is gone. Try a heavy-duty floor scraper first. If the bond is extremely stubborn and the subfloor is concrete, more aggressive mechanical removal may be the only practical route. If the subfloor is plywood, be careful not to destroy the surface while chasing every last bit.
Can you install new flooring over the old thinset
Sometimes, but only if the surface is flat, sound, and appropriate for the flooring going in next. In practice, old thinset often leaves ridges, divots, and inconsistent height that need correction first. The safe mindset is simple. Don't assume “covered” means “fixed.”
If you've started this job and realized it's turning into more than a weekend demo, Hand Vetted Co. is a practical next step. They match you with one licensed, background-checked, highly rated professional instead of blasting your info to multiple businesses. If you want help without the usual spam and guesswork, it's a cleaner way to get the right pro involved.