That chipped clawfoot tub may still be worth saving, but a glossy coating won't fix every old-bathroom problem. Before you sand anything, decide whether the tub has a sound cast-iron body, whether the existing enamel can hold a new finish, and whether its restored appearance fits the room you're building in 2026.
A proper clawfoot tub refinishing job is a surface-restoration project, not a quick coat of paint. Preparation, safe removal of old finishes, thin coating layers, and patient curing determine whether the result stays attractive or starts peeling soon after the work is finished.
Table of Contents
- What Refinishing a Clawfoot Tub Actually Does and When It Makes Sense
- How to Assess Your Clawfoot Tub and Decide Whether to Refinish or Replace
- Tools Materials and Safety Setup You Need Before Starting
- How to Refinish a Clawfoot Tub Without Cutting Corners
- Drying Curing Costs and How Long You Will Be Without the Tub
- Fixing Common Refinishing Problems and Knowing When to Hire a Pro
What Refinishing a Clawfoot Tub Actually Does and When It Makes Sense
A clawfoot tub is usually a cast-iron shell covered with porcelain enamel. Refinishing creates a new bonded coating over that existing surface. The new system is selected to adhere to the hard, nonporous enamel, not just to bare metal, which is why cleaning and surface preparation matter more than the final color.
The process can address dullness, discoloration, small chips, light surface rust, and a rough or worn interior. It can also make an otherwise tired tub look deliberate again, especially when the feet, plumbing, and surrounding room already support a vintage design.
It won't restore metal that's rusted through, stabilize a structurally cracked shell, or correct movement caused by a damaged floor or weak support. Those problems require repair or replacement before a coating system makes sense.
Why old clawfoot tubs still have value
Clawfoot tubs became mainstream in the late nineteenth century after manufacturers commercialized porcelain enamel bonding to cast iron in the 1880s. 1883 is a key milestone, when John Michael Kohler is widely credited with creating a modern enamel-coated cast-iron bath from a horse trough, while David Buick's enamel-bonding process helped make durable cast-iron tubs practical for mass production, as described in this history of the bathtub.
That history explains why many older tubs have a durable cast-iron body beneath a worn finish. A heavy antique tub isn't automatically obsolete. Its proportions, feet, and deep basin can be a strong heritage feature when the rest of the bathroom supports it.
Practical rule: Refinish the surface when the tub is structurally sound and the room benefits from keeping its character.
Refinishing makes the most sense when you want to preserve an original fixture, avoid removing a very heavy tub, or repair cosmetic damage without rebuilding the bathroom around a replacement. It makes less sense when the tub has severe rust-through, persistent leaks, major structural damage, or a shape that no longer works for the room.
The finish also needs time to cure. A beautiful coating applied over residue, moisture, or unstable old material is still a failed job waiting to happen.
How to Assess Your Clawfoot Tub and Decide Whether to Refinish or Replace
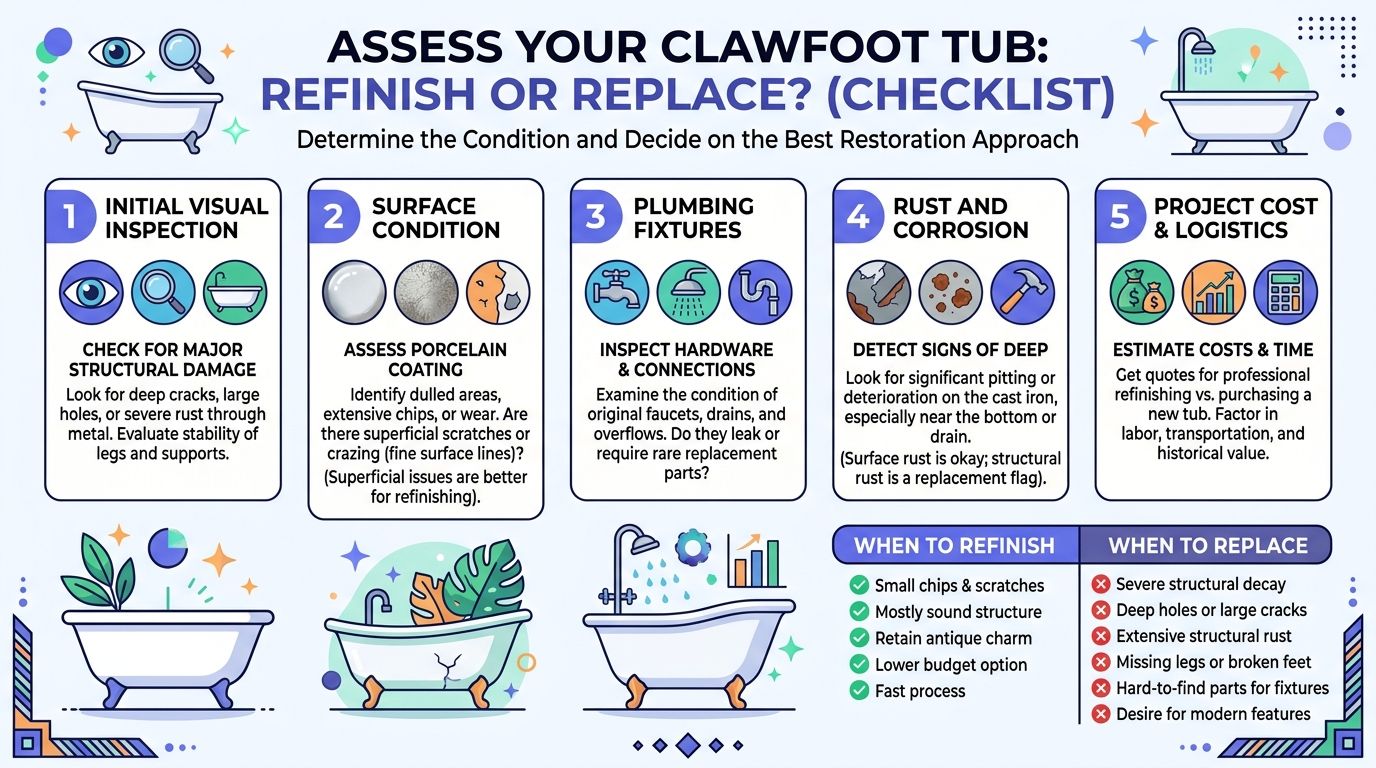
Start by identifying the tub itself. Cast iron feels exceptionally heavy and usually has a thick, solid rim. A magnet can help distinguish iron from some other materials, but it won't tell you whether the porcelain surface is sound. Look underneath the rim, around the drain, behind the feet, and at any exposed edge where the finish has chipped.
Clawfoot tubs commonly use cast iron with a porcelain enamel surface, and refinishing products are designed to bond to that hard finish rather than bare metal alone. Antique pre-1940 tubs may contain lead in the porcelain substrate or in old repair coatings, so lead-testing guidance for vintage clawfoot tubs should be part of the assessment before sanding or stripping.
Inspect the damage, not just the color
Run your hand over the basin after cleaning it. Isolated chips and staining are usually surface issues. Bubbling, soft spots, exposed metal that keeps flaking, or cracking that continues beyond the original damage points to a larger problem.
Look closely at previous repairs. Thick patches, peeling layers, and unknown coatings can make a new finish unreliable. A professional may need to remove unstable material instead of just covering it.
Your room and resale goals matter, too. 2026 bathroom design trends favor sculptural freestanding tubs in matte, earthy finishes, while cast-iron clawfoot tubs are shifting away from some primary baths toward powder rooms and guest suites, according to this 2026 bathtub design trends analysis. That doesn't make a clawfoot tub a bad choice. It means the tub should look intentional in its setting.
| Factor | Refinish Makes Sense | Replace Makes More Sense |
|---|---|---|
| Body condition | Cast iron is solid, with cosmetic enamel damage | Rust-through, structural cracks, or persistent leaks |
| Surface | Chips, dullness, staining, and light rust | Multiple unstable coating layers or widespread failure |
| Room design | Heritage, traditional, eclectic, or character-led space | A clean modern room built around a new sculptural tub |
| Project goal | Preserve the existing fixture and reduce removal work | Change the tub's size, shape, accessibility, or function |
| Resale intent | The clawfoot reads as a deliberate feature | The tub looks dated or awkward in the target market |
A renovation checklist can help you judge the tub alongside flooring, plumbing, ventilation, and layout. Use this bathroom remodel checklist before committing to a finish.
Tools Materials and Safety Setup You Need Before Starting
Gather everything before the first abrasive touches the tub. Stopping halfway through to find a compatible primer, respirator cartridge, or repair compound creates avoidable contamination and leaves the surface exposed.

Surface preparation supplies
You'll need a strong bathroom-safe degreaser, clean lint-free cloths, non-shedding scrub pads, abrasive paper or abrasive discs, and a compatible chemical etcher if the coating manufacturer specifies one. Keep fresh rinse water available, but don't leave any water trapped around the rim, feet, drain opening, or hardware holes.
For repairs, use a filler made for chips and bathroom surfaces. You may also need a rust treatment, sanding blocks for feathering edges, and a small inspection light. The repair compound has to cure and sand smooth before primer goes on.
The coating system should be designed for bathtub or porcelain-enamel use. Plan for a rust-inhibiting primer or bonding layer and one or two compatible topcoats. Don't mix random products because their labels sound similar. Follow the system's stated recoat window, surface temperature requirements, ventilation instructions, and cleanup method.
Containment and personal protection
Mask walls, flooring, trim, fixtures, supply lines, and the exposed underside of the tub. Plastic sheeting and quality painter's tape protect against overspray, dust, and primer that otherwise travels farther than expected.
Use eye protection, chemical-resistant gloves, appropriate work clothing, and a respirator selected for the coating and stripping products you're using. Ventilation should move fumes out of the room without blowing dust onto the prepared surface. Keep people and pets away until the work area is cleaned and the coating has cured.
Older homes need extra caution. For pre-1978 homes, sanding or stripping painted surfaces can trigger EPA Renovation, Repair and Painting requirements. HUD guidance identifies XRF analysis or paint-chip sampling as approved lead-testing methods for painted components in older homes, as explained in this guidance on historic-home bathtub reglazing safety.
If lead is possible, don't dry-sand first and ask questions later. Test the material, control dust, and follow applicable local requirements or hire a professional equipped to manage the hazard.
How to Refinish a Clawfoot Tub Without Cutting Corners
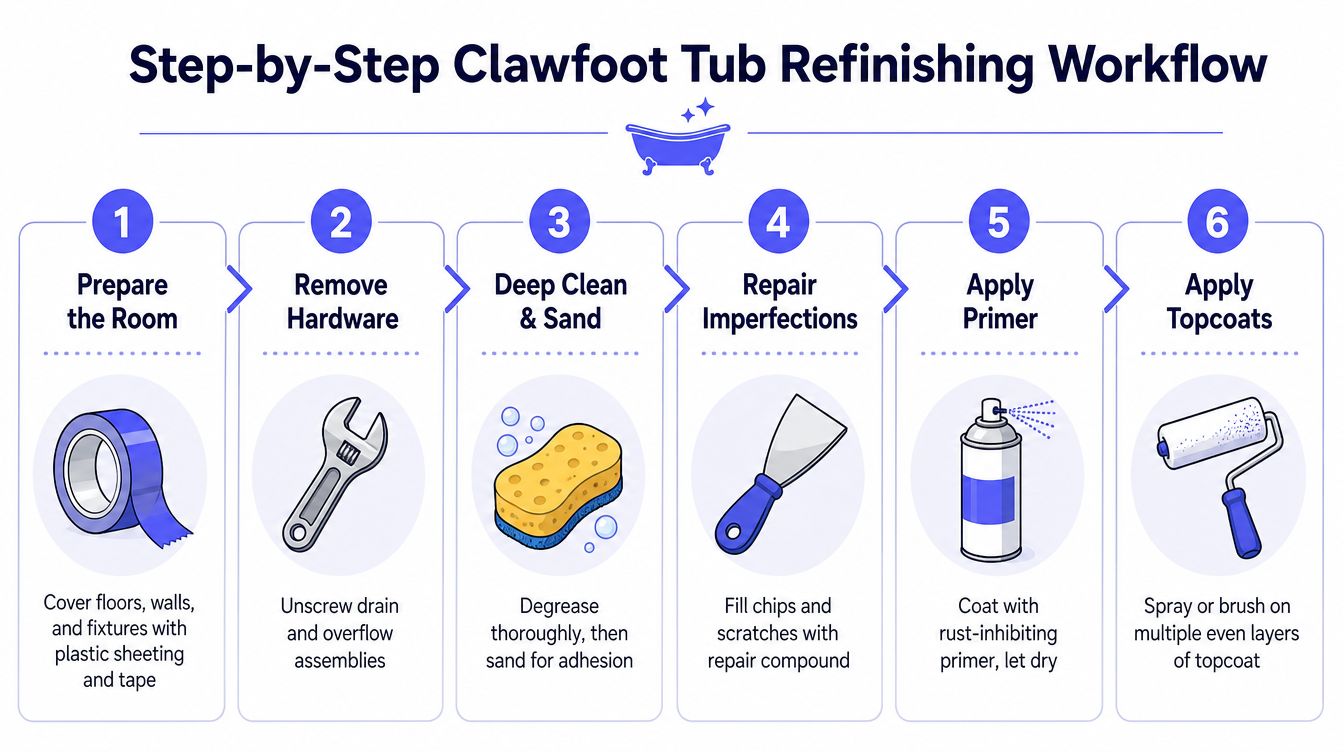
The reliable workflow is methodical. Every stage supports the next one, and the coating can't compensate for contamination left underneath it.
Prepare the room and remove hardware
Start by opening windows or setting up controlled exhaust ventilation. Cover the floor, walls, nearby fixtures, exposed plumbing, and the underside around the tub feet. The feet can make masking awkward, so press tape firmly into the corners and use overlapping plastic rather than relying on one loose sheet.
Remove the drain and overflow hardware if you can do so without damaging the fittings. Take off old caulk completely. Coating over silicone residue is a common shortcut that creates adhesion problems, especially around the rim and hardware openings.
Set removed parts aside in labeled containers. A vintage drain assembly may look simple but still be difficult to replace if it gets damaged.
Clean, degrease, and abrade
Scrub the entire surface with a suitable cleaner, paying particular attention to the waterline, drain area, overflow opening, and any place where body oils or bath products accumulate. Rinse thoroughly and inspect the basin under strong light.
Once clean, mechanically abrade the old enamel or use a compatible chemical etch according to the coating system's instructions. The objective isn't to grind through the porcelain everywhere. It's to remove gloss, create a consistent bond profile, and feather damaged edges so the new coating doesn't telegraph the old chip.
Do not rush drying. A cast-iron tub can look dry on top while moisture remains around seams, openings, or the underside of the rim.
Repair chips and rust
Fill chips and scratches with a repair compound compatible with the final coating. Apply it only as thick as necessary, allow it to cure, then sand the repair until the transition feels smooth when you run a fingertip across it.
Treat exposed rust as a source problem. Remove loose corrosion, stabilize the area with the appropriate rust treatment, and inspect for metal loss. If the rust has penetrated the shell, stop treating it as a cosmetic refinishing job and reassess whether the tub needs a more substantial repair or replacement.
Prime and apply thin topcoats
Vacuum or wipe away sanding residue using the method approved by the coating manufacturer. The surface must be completely dry, clean, and free of dust, oil, soap residue, and mineral scale before primer or bonding layer goes on.
Apply the rust-inhibiting primer in an even film. Avoid flooding corners, feet, drain openings, and the underside of the rim. Heavy application can trap solvent, create runs, and extend cure time.
After the primer reaches the correct recoat condition, apply one or two thin topcoats. Spray application can produce a smooth finish, but it requires careful containment and ventilation. Rolling or brushing may be more accessible for a small DIY setup, although technique and product selection determine the final texture.
The finish should look smooth because the surface was prepared smoothly, not because thick coating was used to hide defects.
Respect the recoat window and keep the room free from dust while the film settles. Reinstall hardware only after the coating has cured according to the system instructions, and use fresh caulk compatible with the finished surface.
Drying Curing Costs and How Long You Will Be Without the Tub
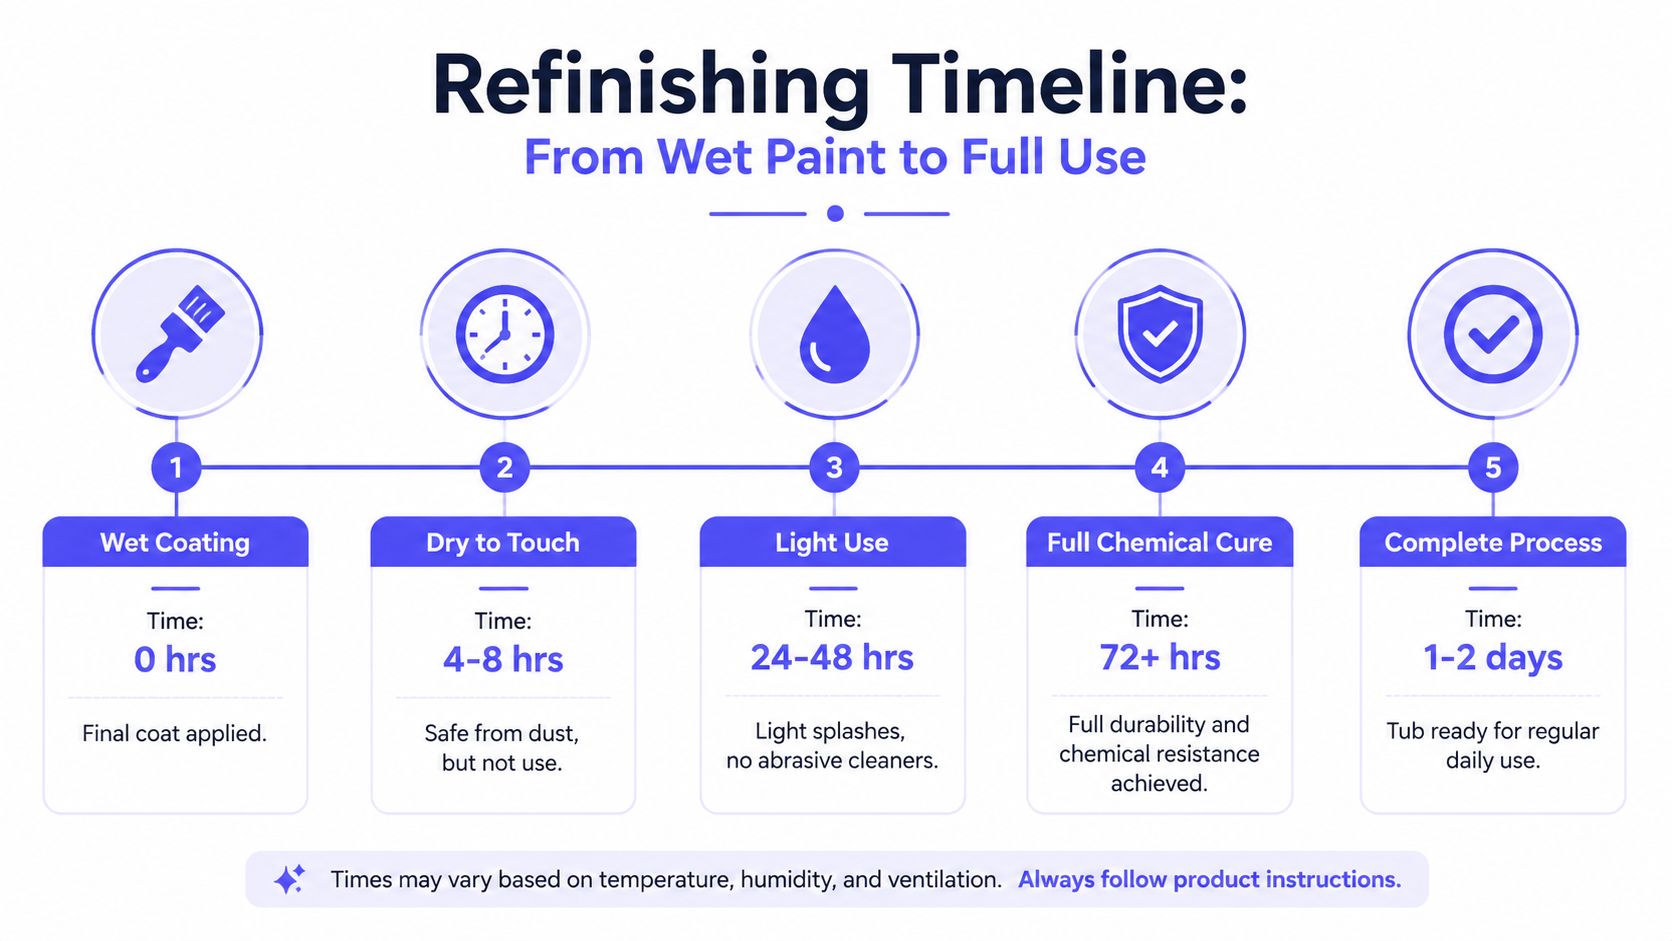
A tub can feel dry and still be chemically vulnerable. Touch-dry means the surface can resist light contact. It doesn't mean the finish has developed its final hardness, water resistance, or resistance to cleaners.
Professional refinishing commonly takes one to two days because the work includes preparation, etching, coating, and initial curing. Full chemical cure can take 48 to 72 hours or longer, depending on the coating, temperature, humidity, and ventilation, according to this bathtub refinishing process guide.
Plan the downtime realistically
A careful DIY project can take a weekend to a full week, depending on preparation, repairs, coating instructions, and the amount of ventilation and cure time available. Antique clawfoot services that require the tub to be transported may quote a two to three week turnaround, as shown in this antique clawfoot refinishing FAQ.
Those timelines describe different workflows, not necessarily conflicting advice. An on-site professional job, a DIY project, and a drop-off restoration service involve different logistics.
Keep the tub out of service until the coating manufacturer permits water exposure. Don't test it early with a quick shower. Water, bath products, abrasive cleaners, and shifting hardware can damage a finish that hasn't reached full cure.
Think about the economics beyond the coating price
The tub refinishing services market is projected at USD 1.24 billion in 2025 and USD 2.03 billion by 2032, with a projected 7.2% compound annual growth rate, according to this tub refinishing services market report. The same source places North American bathroom remodeling at USD 67.8 billion in 2023, with a projection of USD 88.4 billion by 2032 and a 3% CAGR.
For residential work, industry writeups commonly place refinishing jobs in the rough range of USD 2,500 to USD 6,000, also reported in that market reference. Your actual quote can change with transport, repairs, lead-safe work, coating type, hardware removal, access, and whether the tub is finished on-site or off-site.
Schedule the project around your household, guests, tenants, and any other bathroom. A renovation planner such as this home renovation project planner can help you account for access, material lead times, and the period when the tub can't be used.
Fixing Common Refinishing Problems and Knowing When to Hire a Pro
Most early peeling isn't mysterious. Poor preparation is the leading cause of premature coating failure, especially when mineral scale, soap residue, or moisture remains on the tub. The new finish bonds to contamination instead of the enamel, so the coating can lift even when it initially looks smooth.
Bubbles usually point to trapped moisture, solvent release, or an overly heavy application. Peeling around the drain, overflow, or rim often indicates residue or silicone that wasn't removed. A dull finish may come from contamination, incompatible cleaners, poor application, or a coating that hasn't fully cured.
Test adhesion before recoating
If an old coating is already questionable, don't just scuff it and cover it. A cross-hatch tape test can reveal whether the existing layer has enough adhesion to remain. One expert source recommends stripping rather than recoating when more than 10% of the tested area lifts, as explained in this technical guide to bathtub reglazing failures.
A failed test means more preparation, not a thicker topcoat. Remove unstable material, clean again, repair the exposed areas, and rebuild the coating system from a sound base.
Choose DIY or professional work honestly
DIY refinishing can work for a sound tub when you can control dust, ventilation, safety, and cure time. It gives you control over the schedule, but it also leaves you responsible for substrate testing, product compatibility, surface defects, overspray, and the result if the finish fails.
Professional work is more compelling for antique tubs, lead-risk surfaces, difficult access, extensive repairs, or a finish that matters to resale. Available service references show warranties of three years for owner-occupied homes or one year for rental and commercial properties, while another guide estimates recoating may be needed every 10 to 15 years, depending on care and conditions.
Ask for the preparation method, coating system, cure instructions, warranty exclusions, and failure response in writing. If you need help understanding the scope, this explanation of what a restoration company does can help you separate surface refinishing from structural restoration.
If your tub is structurally sound and the finish damage is cosmetic, get a written refinishing assessment before pricing replacement. Hand Vetted Co. connects you with one licensed, background-checked, 4.5+ star rated professional, with each match kept exclusive so you aren't sent competing sales calls. Use the service to compare preparation, downtime, warranty coverage, and replacement advice before you commit.