A pipe bursts at night, your floor starts spreading water, and your first instinct is usually wrong. People grab towels, panic-call insurance, or start pulling up wet materials before they even know whether the water is safe to touch. That costs time, money, and sometimes your health.
Emergency water damage repair is a triage problem first. You need to stop the source, protect yourself, document the scene, and make one smart call on whether this is a DIY cleanup or a professional restoration job. Get that call right in the first day, and the rest of the process gets much easier.
Table of Contents
- Safety First Your Immediate Action Plan
- Document Everything for Your Insurance Claim
- Assess the Damage DIY or Call a Pro
- What to Expect from a Restoration Contractor
- Estimating Water Damage Repair Costs and Timelines
- Finding a Verified Restoration Pro You Can Trust
Safety First Your Immediate Action Plan
The first hour is more critical than often recognized. Field reports indicate that initiating emergency mitigation within the first 2 hours reduces overall drying time and restoration costs by up to 30%, while delays beyond 24 hours significantly increase Category 3 black water contamination risks and structural demolition requirements, according to Emergency Restoration Authority's guidance on emergency water damage response.
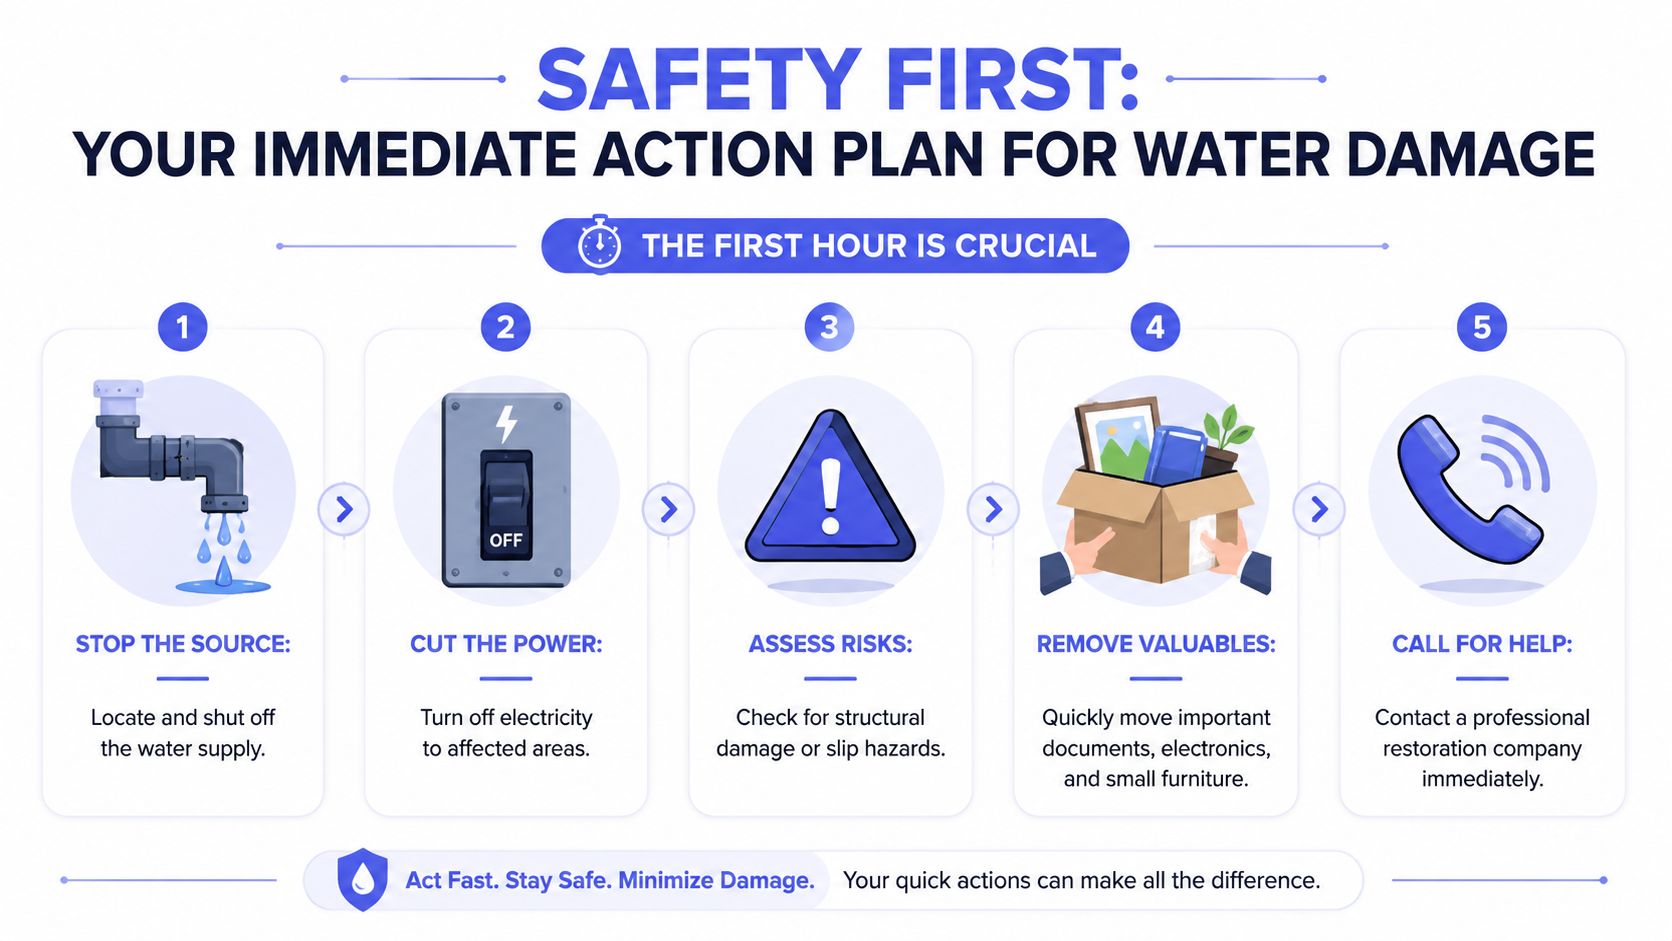
Shut things down in the right order
Start with the water source if you can reach it safely. That might be the shutoff valve behind a toilet, under a sink, at the water heater, or the home's main water shutoff.
Then cut electricity to the affected area at the breaker if water is near outlets, appliances, baseboard heaters, or extension cords. Don't stand in water and reach for anything electrical. If the panel itself isn't safely accessible, back off and wait for a professional.
Practical rule: If you have to choose between saving belongings and avoiding electrocution, the belongings lose every time.
Use this order because stopping the flow prevents the problem from growing while you decide what comes next. Cutting power protects you from the hazard people forget in a flood, which is energized water around wiring, devices, and metal surfaces.
Protect what you can without getting hurt
Once the source is off and the area is electrically safe, do four things fast:
- Check for obvious hazards. Look for sagging ceilings, swollen drywall, slippery floors, and loose flooring.
- Move valuables first. Grab paper records, laptops, chargers, medications, photos, and small furniture that can be lifted safely.
- Create airflow if the water is clearly clean. Open doors, turn on safe ventilation, and remove wet rugs.
- Do not start ripping out materials yet. You can destroy evidence for insurance and make the contamination problem worse if you guessed wrong about the water type.
A wet living room from a burst supply line is one problem. A basement flood with sewage odor is a completely different job. Treat every unknown water event as potentially unsafe until you classify it.
Quick first-hour checklist
- Stop the leak: Shut off the nearest valve or the main water supply.
- Kill power safely: Turn off breakers to affected areas if you can do it without stepping into danger.
- Clear the zone: Keep kids, pets, and anyone barefoot out of the area.
- Lift and separate items: Put aluminum foil, blocks, or plastic under furniture legs if the area is safe and the furniture stays in place.
- Make the call early: If the water source is unknown, contaminated, or widespread, call a restoration company immediately.
Wet drywall, padding, insulation, and wood don't care whether you feel calm yet. They start absorbing and holding moisture right away.
Document Everything for Your Insurance Claim
Before you “clean up,” build the record. Insurance pays from evidence, not from memory. And this isn't a rare issue. Analysis of data from 2017 through 2021 reveals that the average U.S. household claim for water damage and freezing exceeded $12,500, and water damage is the third-most frequently filed homeowners insurance claim for property damage, based on ConsumerAffairs' summary of water damage insurance claim statistics.
Build your claim before the cleanup erases the evidence
Start with a slow video walk-through. Narrate what happened in plain language. Say where the water started, when you discovered it, and what rooms or items are affected.
Then take photos in two passes:
- Wide shots: Each affected room from multiple corners
- Mid-range shots: Wet flooring, walls, ceilings, cabinets, and furniture
- Close-ups: Brand labels, model numbers, warped materials, staining, bubbling paint, and damaged personal property
If the source is visible, photograph it before anyone disconnects or removes it. That means the split supply line, failed appliance hose, leaking valve, overflow point, or ceiling stain.
Keep a simple running loss log
A basic note on your phone works fine. You don't need fancy software. You do need consistency.
Track these items:
- Date and time discovered: When you first saw the damage
- Immediate actions taken: Water shutoff, breaker shutoff, item removal, temporary drying
- People contacted: Insurance carrier, plumber, restoration company
- Damaged items: Room-by-room list with brand, approximate age, and condition
- Receipts and emergency purchases: Fans, bins, hotel stays if needed, cleanup supplies
Use plain descriptions. “Oak dresser in guest room, bottom drawer swollen, veneer lifting.” That's better than “dresser damaged.”
If you're trying to understand how your policy may respond, review your coverage details against this homeowners insurance coverage guide. It won't replace your policy language, but it will help you ask sharper questions.
Your insurance adjuster wasn't standing in your hallway when the pipe burst. Your photos and notes are the closest thing they'll get to being there.
One more thing. Don't throw damaged items away until the carrier or adjuster has had a fair chance to review the loss, unless the item creates a safety or sanitation hazard. If you have to dispose of something contaminated, photograph it thoroughly first.
Assess the Damage DIY or Call a Pro
This is the decision that saves you or burns you. Many focus on how much water they can see. I focus on what kind of water it is.
The only question that matters first
The distinction between Category 1 clean water, Category 2 grey water, and Category 3 black or foul water dictates whether a person can safely manage minor spills or must evacuate, and misidentifying Category 3 water, which contains pathogens, as a DIY job poses severe health risks, based on 1800 Water Damage's explanation of emergency water categories.
That means your first sorting question is not “Can I mop this up?”
It's “What am I standing in?”
Water Category Triage Checklist
| Water Category | Source Examples | Potential Hazards | Action Required |
|---|---|---|---|
| Category 1 Clean | Broken supply line, sink supply hose, fresh water pipe burst | Damage to flooring, drywall, cabinets, contents if not dried fast | DIY may be reasonable for a very small, contained incident if you can stop the source immediately and begin drying right away |
| Category 2 Grey | Dishwasher discharge, washing machine overflow, water with some contamination, older standing water | Bacteria, heavier soil load, worsening contamination as time passes | Call a professional if the area is more than very minor, if materials are saturated, or if water has reached porous finishes |
| Category 3 Black | Sewage backup, toilet backflow with waste, floodwater with foul contamination, water with strong odor or visible debris | Pathogens and serious health risk | Do not DIY. Leave the area and call a restoration professional immediately |
Here's the plain-English version.
Category 1 is water that started clean. A burst pipe over hardwood still creates a serious drying problem, but it doesn't automatically create a biohazard. If it's a small area, you shut it off fast, and nothing porous stayed soaked for long, you may be able to handle the initial cleanup.
Category 2 sits in the middle. Think appliance discharge or water that's been sitting long enough to get dirty. Once it soaks carpet pad, baseboards, cabinets, or drywall, the job gets riskier and more technical.
Category 3 is the stop sign. Sewage, toilet backflow, foul-smelling standing water, or water with visible contamination is not a weekend cleanup project.
Call a pro now if any of this is true
- You smell sewage or a strong foul odor
- The water came from a drain, toilet backflow, or outside flood source
- Ceilings are sagging or walls feel soft
- You can't remove standing water quickly with household equipment
- Water reached insulation, subfloor, cabinets, or multiple rooms
If you're asking yourself whether the water is safe, you already have enough uncertainty to justify professional help.
What to Expect from a Restoration Contractor
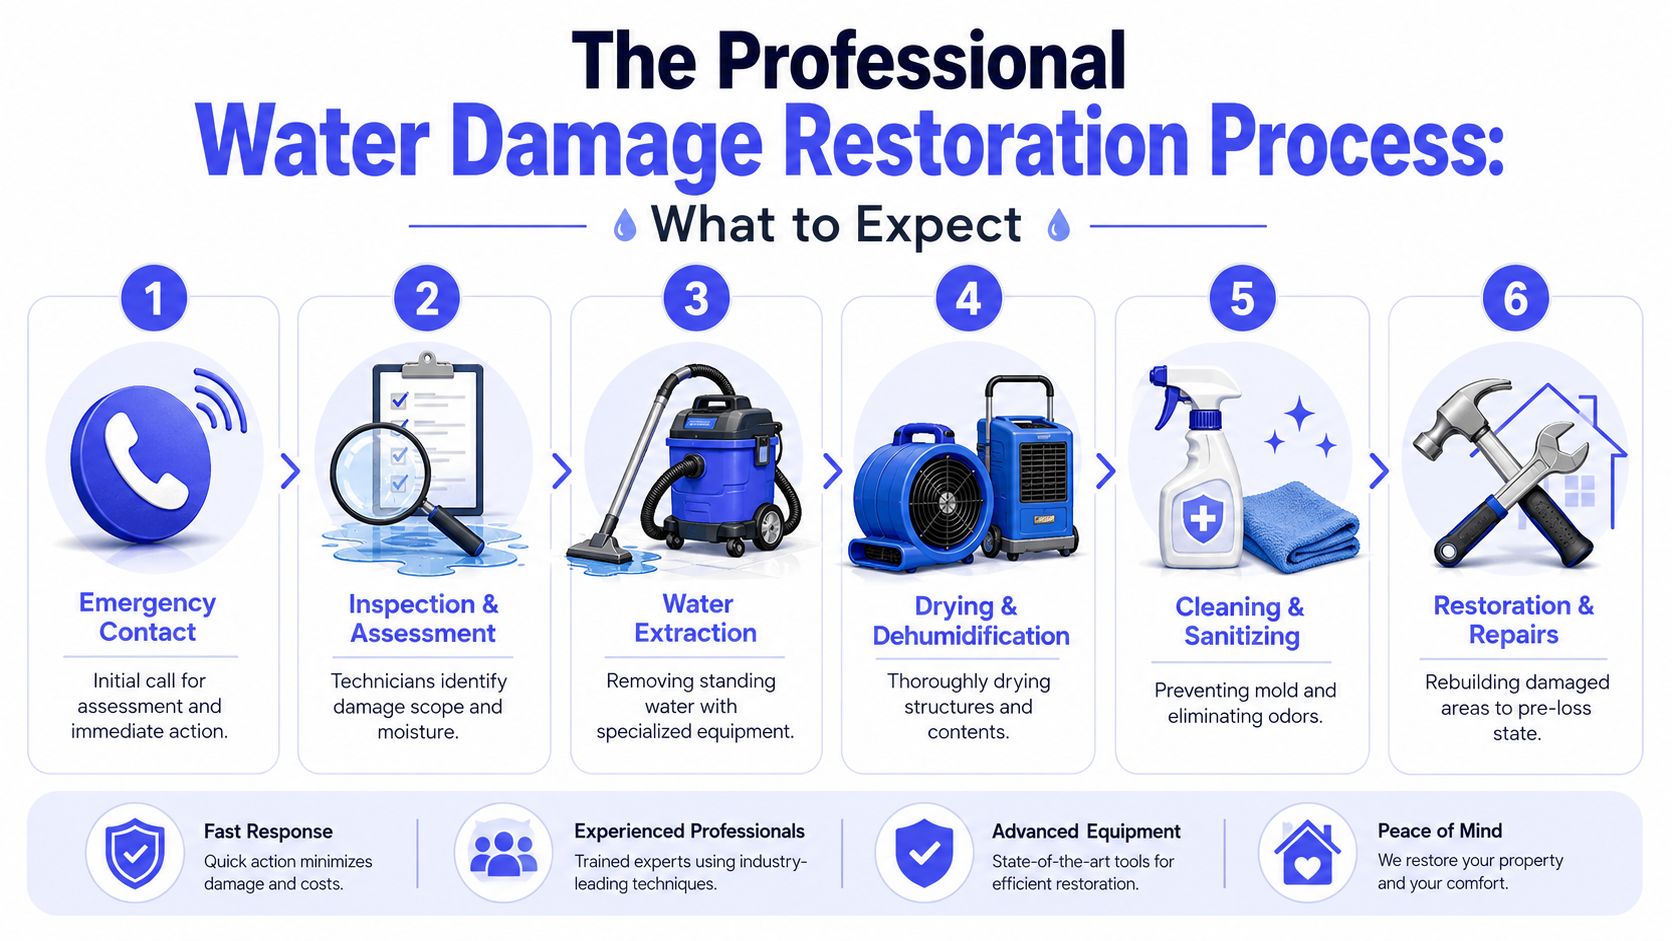
A good crew doesn't walk in, drop a few fans, and hope for the best. They inspect, map moisture, extract water, set drying equipment with intent, and come back to verify progress.
The first visit should look organized, not rushed
When the restoration contractor arrives, expect a sequence.
First comes the inspection. They should ask what happened, identify the source, classify the water, and check affected materials with moisture-detection tools. Competent teams don't guess where the moisture stopped. They map it.
Then comes extraction. If there's standing water, they remove that before real drying starts. After that, they set air movers and dehumidifiers based on the actual conditions in the building, not on a generic “one fan per room” shortcut.
A serious contractor will also explain what has to be removed and what might be salvaged. Wet laminate flooring, swollen particleboard cabinets, saturated insulation, and heavily affected drywall often don't get the same outcome as a solid wood table or a non-porous surface.
Drying is a monitored process, not fans and guesswork
Professional drying protocols mandate that moisture readings and psychrometric data must be documented at strict 24-hour intervals, and that daily monitoring cycle is the standard mechanism used to compare final readings against Equilibrium Moisture Content targets before any drying equipment is removed, according to National Water Damage Authority's emergency response protocol guidance.
That sentence matters because it tells you what to expect on day two and day three. The team should return, take readings, and adjust the setup if needed. If they never come back to measure anything and just tell you to “let the fans run,” that's not a controlled drying process.
Questions worth asking on site
- What materials are still wet right now
- What are you using to measure moisture
- What needs removal versus drying in place
- How often will you re-check readings
- What has to happen before equipment can come out
Good restoration work is boring in the best way. It's methodical, documented, and hard to argue with later.
For major flooding events involving whole-home flooding or sewage backups, the complete drying and sanitization process typically requires 2 to 3 weeks, followed by an additional month or more for full reconstruction, while minor Category 1 or 2 incidents may be resolved by in-house teams if drying begins immediately, as outlined in PuroClean's overview of emergency water damage restoration timelines.
Estimating Water Damage Repair Costs and Timelines
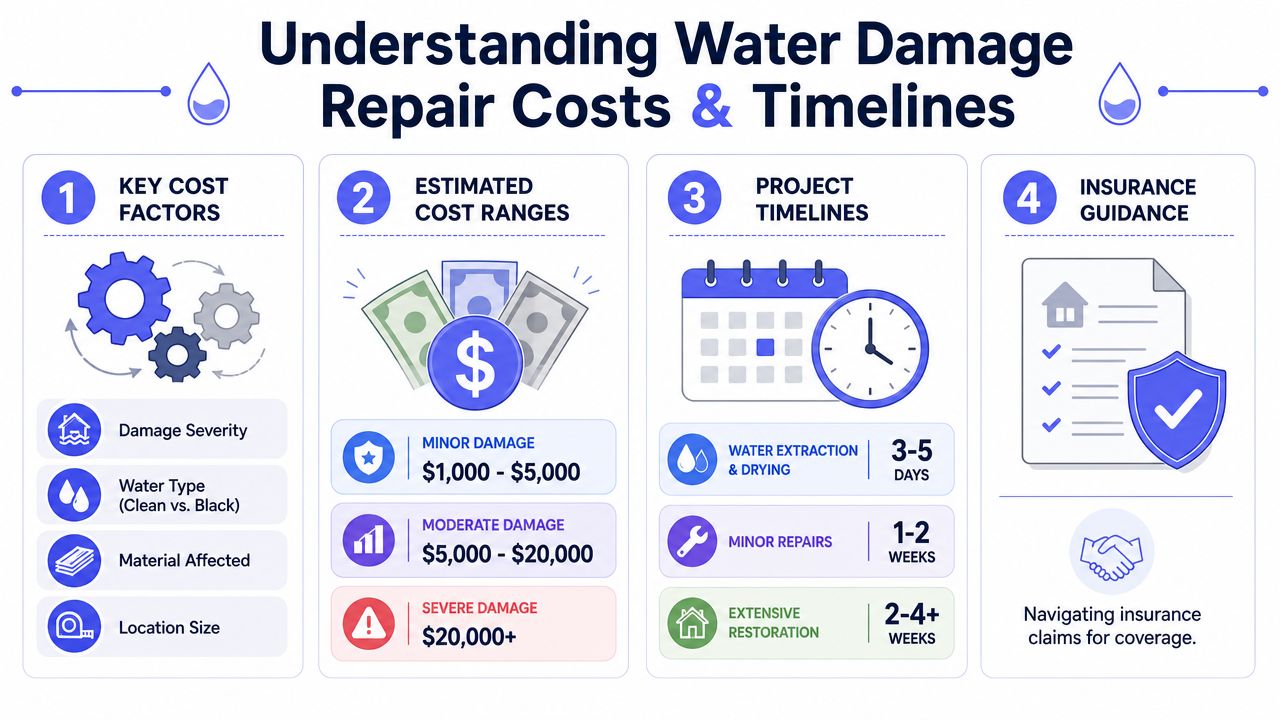
People usually want one clean number. That's not how this works. Cost depends on water category, how long materials stayed wet, what got saturated, and how much of the job is drying versus demolition and rebuild.
What usually drives the bill
Emergency water damage restoration typically ranges from $3,000 to $7,000 per job, though severe cases can run far higher depending on scope and location, according to 360iResearch's water damage restoration market overview.
That range is only the opening frame. The actual invoice moves based on a few things:
- Water type: Clean-water losses are simpler than sewage or heavily contaminated water
- Material type: Carpet pad, insulation, laminate, drywall, and cabinets often force harder decisions than tile or concrete
- Affected footprint: One room is different from multiple rooms, a crawlspace, or a finished basement
- Demolition needs: Costs jump when crews have to remove drywall, flooring, trim, cabinets, or structural components
- Reconstruction scope: Drying is one phase. Putting everything back is another
If you're also worried about whether hidden moisture could turn into a mold issue, this guide to professional mold testing cost helps frame that next conversation.
How long the work usually takes
The drying timeline depends on speed and severity. Mold growth can begin in as little as 72 hours after water intrusion, which makes the first 24 to 72 hour window critical for inspection, documentation, and moisture classification, based on 247 Remedial Services' water damage restoration playbook.
That's why I tell people not to confuse “the leak is stopped” with “the job is handled.” A room can look fine and still be wet inside the wall cavity, under flooring, or behind cabinetry.
A realistic way to think about the timeline
| Situation | Likely timeline |
|---|---|
| Small clean-water incident caught fast | Short drying window, with limited repair work if materials stayed salvageable |
| Multi-room saturation or hidden moisture in walls and floors | Longer drying period, more site visits, and selective material removal |
| Sewage backup or major flood | Drying and sanitization first, then a reconstruction phase that can stretch well beyond the emergency response |
The fastest jobs are the ones where people act early and make the right classification call. The expensive ones are the jobs where people lose a day trying to “see if it dries.”
Finding a Verified Restoration Pro You Can Trust
In an emergency, the first company to answer the phone isn't always the one you want cutting into walls. Water losses attract some solid operators and some absolute opportunists. The cheap bid can get very expensive if the crew skips documentation, removes the wrong materials, or leaves hidden moisture behind.
Cheap emergency help is often expensive help
You want a business that can prove three things quickly. They're properly licensed where required, they carry the right insurance, and they know restoration as a discipline rather than basic cleanup.
You also want someone who can explain their process without dancing around simple questions. If a company can't tell you how they classify the water, how they measure moisture, or how they decide what stays versus what gets removed, keep moving.

What to verify before you let anyone start tearing out materials
A restoration company should be easy to vet under pressure. Check reviews, confirm the business identity, and ask how they screen the people entering your home. If you want a fast way to understand why that matters, look at this overview of a contractor background check.
My advice is simple. Don't shop this like a routine estimate for paint or landscaping. Water damage work affects safety, insurance recovery, mold risk, and rebuild cost. That calls for a professional you'd trust to document the job as carefully as they dry it.
If you need help finding the right restoration company without getting spammed by five different businesses, Hand Vetted Co. matches you with one licensed, background-checked, highly rated professional. It's a clean way to get help fast when you don't have time to vet companies from scratch.